How do I edit a Table of Contents?
Last updated on February 27, 2024Currently, the Table of Contents is created before Editors and Authors are added to a project, but it is expected that Editors and Authors will make edits, add new chapters, delete chapters, and generally maintain their ToC on their own throughout the course of the project. See this article that explains some next steps after you get started in Elsa: Where can I find information about what to expect when getting started in Elsa?
Video: How to edit the Table of Contents
The Table of Contents can be edited by Editors, Authors, and Content Managers and is accessed by clicking on the Table of Contents Tab.

From the Table of Contents, you can:
- Change autonumbering options.
- Add chapters.
- Move chapters.
- Rename chapters.
- Add sections.
- Move sections.
- Invite existing contributors to chapters.
- Add new contributors to chapters.
- Edit contributors to chapters.
- Add front/back matter pages.
When you create a new Chapter in the Table of Contents, you are creating the document Contributors will write in. The ToC can be edited at any time by Editors/Authors, so don’t worry if your ToC is not final at the start of your project, you can make changes throughout the authoring process.
As with chapters, the Table of Contents can only be edited by one person at a time. The 'Public' icon indicates that this is the public version of the TOC and it is read-only. To edit the TOC, click on ‘edit’:

Now, the ToC is ‘private’ and any changes you make to the ToC will not be visible to anyone else until you click ‘Publish & Invite.’ So, if you’ve just added three new chapters and 3 new contributors to your project, none of that will be visible to anyone else until you click on ‘Publish & Invite.’

Elsa automatically numbers the chapters in your ToC. You can adjust the structure and auto-numbering preferences at any time by going to the top toolbar and clicking the ‘gear’ icon and then choosing ‘Set Auto-Numbering.’

Make your selection and then click ‘set.’ Your ToC will automatically be updated. You can change the structure and auto-numbering preferences as many times as you like.

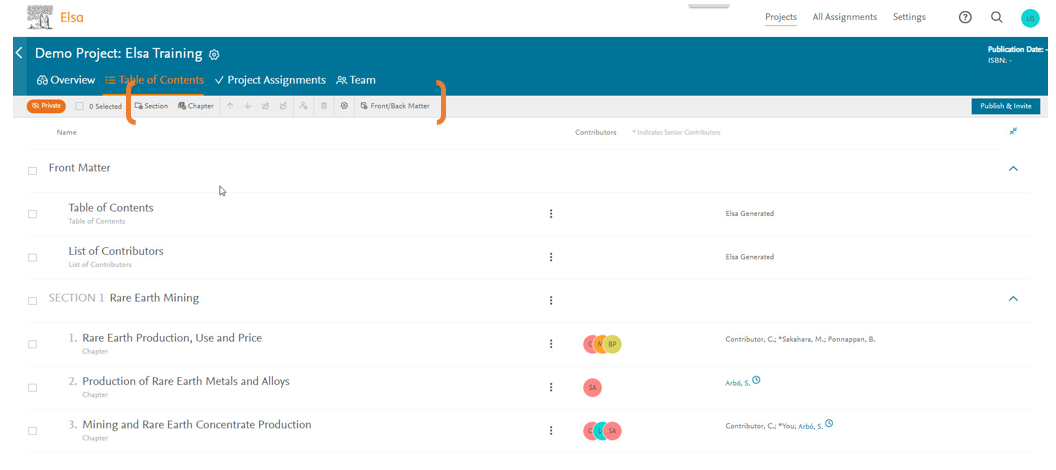
To add chapters, parts/units, sections (depending on your auto-numbering settings), or front/back matter go to the top toolbar and choose the appropriate icon, then follow the on-screen instructions.

You can also click on the ‘more options’ icon next to a chapter to see what options you have.

Next, you can type in your titles or copy + paste titles from a Word document. If you’re adding more than one title at a time, remember to make sure each title is on its own line.
Remember, Elsa auto-numbers your chapters, so you do not need to include chapter numbers in your titles.
If you choose 'Yes' under 'Are these chapters all by the same contributor?' a new screen will open where you can add a new contributor.

For more information about adding Contributors, see the 'Adding Contributors’ FAQ.
How to add content to a section or part
- Ensure that your Table of Contents has an auto-numbering style that includes section, part, or unit (see section “Set-auto-numbering options”)
- Create a new section/unit/part on your Table of Contents
- Select Publish & Invite
- Once the section/unit/part has been created, you can add content by accessing the Write space either from the hyperlinked title of the section/unit/part on the Table of Contents or from the Project overview page
How to move a chapter, part/unit, or section
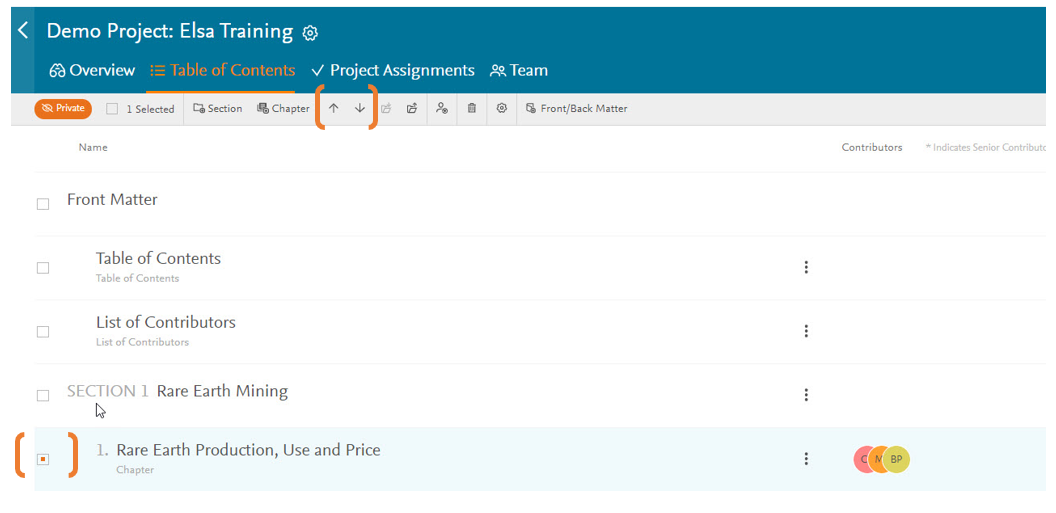
Select the chapter, part/unit, or section (multiple can be selected at one time) you would like to move and then drag and drop the component(s) to where you would like them to be moved. You can also use the top toolbar, more options ellipsis, or keyboard shortcuts: ctrl+up arrow on your keyboard to move up and ctrl+ down arrow on your keyboard to move down.

You can also move chapters in and out of sections by using these top toolbar icons.

Remember, Elsa automatically re-numbers your chapters as you move them around, so there is no need to manually renumber them.
Adding, Deleting, and Editing Contributors
A Contributor added to a Chapter(s) will have permission to edit that Chapter(s), but they do not have permission to edit chapters they are not added as a Contributor on.
Select the chapter(s) you would like to add contributor(s) to and click on the ‘add contributor’ icon on the top toolbar or click on the 'more' ellipses on the Chapter you would like to add the Contributor(s) to, then select 'Add/Edit Contributors' from the drop-down. Then follow the on-screen instructions.


For more information on adding contributors to you project, see this help article: How do I add Contributors to my project?
To edit the name of a chapter, click on the more ellipses on the chapter you’d like to change the name and choose ‘Edit Name.’

It’s important to note that you should use caution when deleting chapters, especially if writing has already begun on your chapters, and only delete chapters when access is no longer needed. When you delete a chapter, even if it has content in it, the chapter will be permanently deleted, users will no longer have access, and the content will be lost.
If you select a chapter(s) to delete that already has content written or is currently being edited by another user, you will receive one of these warning message before you can delete it.


To delete a chapter, make sure you are editing the Table of Contents.
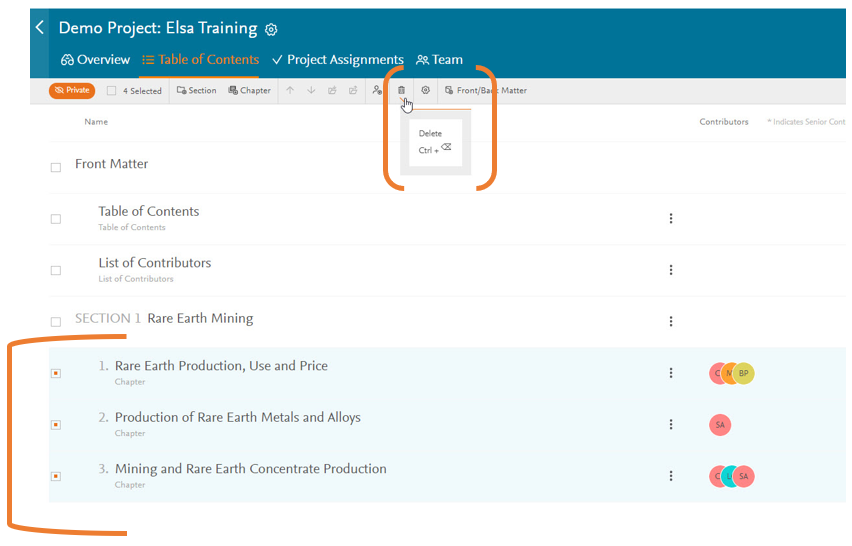
Select the chapter(s) you would like to delete and then select the ‘delete’ icon from the top toolbar:

You will see a warning message about deleting the chapter, if you wish to proceed click ‘Yes, delete.’ If not, click on ‘No, do not delete.’

Once deleted and you click ‘Publish & Invite,’ the chapter will no longer appear in the ToC.
You can also delete chapters one at a time by clicking on the ‘more options’ icon next to a chapter and selecting ‘delete’ from the menu.

It’s very important to remember that none of the changes you make in the ToC will take effect until you click on Publish & Invite. No invitations will be sent to Contributors, so new chapters will be created, no chapters titles will change, etc. until you click Publish & Invite.

Was this answer helpful?
Thank you for your feedback, it will help us serve you better.
If you require assistance, please scroll down and use one of the contact options to get in touch.
For further assistance: