Want to learn how to embed Instagram feeds on WordPress the easy way?
Cross-promoting your Instagram posts on your website helps you reach tons of people and keep them engaged. But directly embedding Instagram content into WordPress sites can be tough.
The good news?
Using our 10+ years of social media marketing expertise, we’ll show you how to embed your Instagram feed on WordPress.
Just follow this guide you can grow your audience and increase sales for your business using Instagram.
Since we’ll cover different methods, here’s a table of contents to help you find what you need:
- Why Embed Your Instagram Feed on WordPress?
- How to Embed your Instagram Feed on WordPress
- How to Embed an Instagram Hashtag Feed on WordPress
- How to Embed Your Instagram Post Without a Plugin
Ready? Let’s get started!
Why Embed Instagram Feeds in WordPress?
Displaying an Instagram feed on your WordPress website has lots of benefits. It gives your website visitors a chance to see your latest Instagram posts. Plus, it adds dynamic content to your site.
Here are a few ways you can use Instagram feeds on your website to engage your audience:
- Show an Instagram feed of product reviews from customers to increase product sales easily.
- Add an Instagram hashtag feed of relevant content to your site to keep visitors engaged and let them stay for longer.

- Display an Instagram feed of user-generated content to serve as positive social proof for your brand so you can drive more sales to your business.
- Have video testimonials for your business? Embedding Instagram video testimonials on your WordPress can encourage your site visitors to buy from you.
- You can also improve your SEO when you embed Instagram feeds on your website. Since the feeds are crawled and indexed by Google, they provide relevant content to boost your website’s rankings.
How to Embed Instagram Feed on WordPress (Easy Way)
If you try to embed Instagram feeds without a plugin, you’ll have to deal with embed code, custom HTML, JavaScript, Custom CSS, or other coding languages.
On top of being complicated, this can take a lot of time.
The solution? You can embed an Instagram feed into WordPress using the Instagram Feed Pro plugin from Smash Balloon.
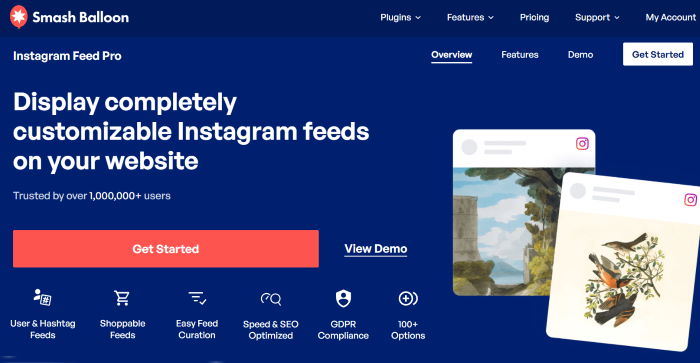
As the highest-rated Instagram feed plugin for WordPress, it lets you display completely customizable Instagram feeds on your site in just minutes – no need to touch a single line of code!
Simply follow a 3-step guided flow that will show you how to create, customize, and embed Instagram feeds.
You can then engage your visitors with content from your Instagram profile, hashtags, mentions, reels, videos, and more.

Since the plugin automatically copies your site’s design, your feeds will look great right out of the box. This way, your feeds look consistent with your brand’s design, with minimal effort on your part.
The best part? Since the plugin’s built with users in mind, it’s designed to be ultra fast. That’s why the pro version of Instagram Feed is trusted and happily recommended by over 1 million users worldwide!
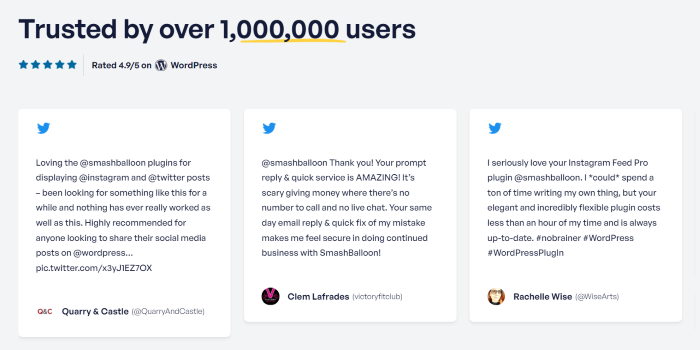
As you can see, Instagram Feed Pro is the best WordPress Instagram plugin if you want to display engaging posts on your site.
Let’s talk about the step-by-step instructions on how to display an Instagram feed on your website.
How to Embed Your Instagram Feed on WordPress
In this post, we’ll show you how to add Instagram feeds to WordPress using a plugin.
All you have to do is follow the step-by-step guide below.
Step 1: Install and Activate Instagram Feed Pro
To start using this plugin, get your copy of Instagram Feed Pro here and download it to your computer.
Then, install and activate it on your WordPress website. If you’re not familiar with how to do that, you can follow the instructions for how to install a WordPress plugin here.
Step 2: Create a New Instagram Feed
The next step is to create a new Instagram feed for your site. To do that, head to the Instagram Feed » All Feeds menu from the WordPress admin area.
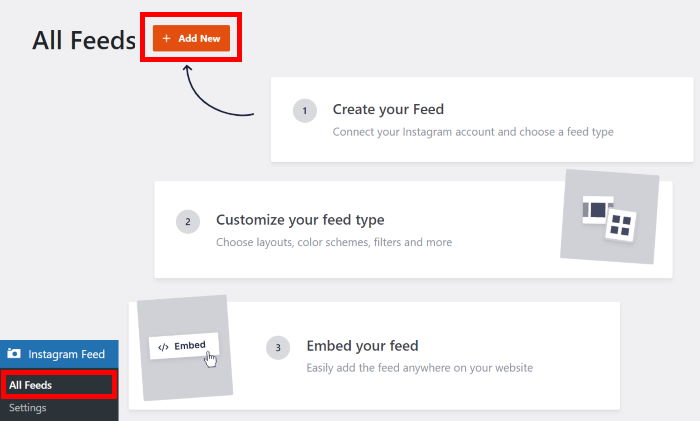
Next, you can choose the type of Instagram feed you want to embed. You get 3 options to pick from here:
- User Timeline: Show photos and videos that you’ve posted on your Instagram profile
- Public Hashtag: Display Instagram posts with your chosen hashtags
- Tagged Posts: Embed posts where other Instagram users have tagged you
Plus, you can even select multiple options and create a feed that combines different feed types.
To continue, just select the feed types that you prefer and click on Next.
For our tutorial, we’ll go with a user timeline.

Step 3: Connect Your Feed to Instagram
To show Instagram posts on your website, you can add an Instagram account to your website first.
Since Instagram Feed Pro asks for read-only access to your account, the plugin can only view your content and won’t be able to make any changes.
As a result, Smash Balloon is safe to use.
First, click on the Add Source button to get started with connecting your feed to Instagram.
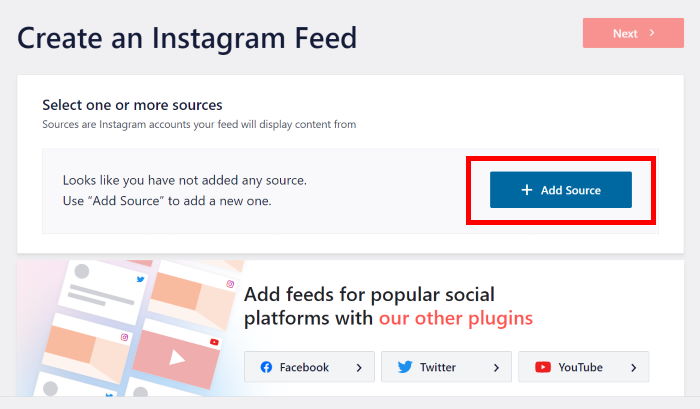
After that, you can pick between a personal Instagram account or a business account
With a personal account, you can use all the features you’ve regularly used on Instagram. For your new feed, you can display posts from your own Instagram account only.
On the other hand, an Instagram business account gives you advanced features like analytics and a contact button.
Plus, you can get more options for your feed, like Instagram videos, shoppable e-commerce feed, hashtag feed, and more.
After selecting your account type, click on the Login with Instagram button.

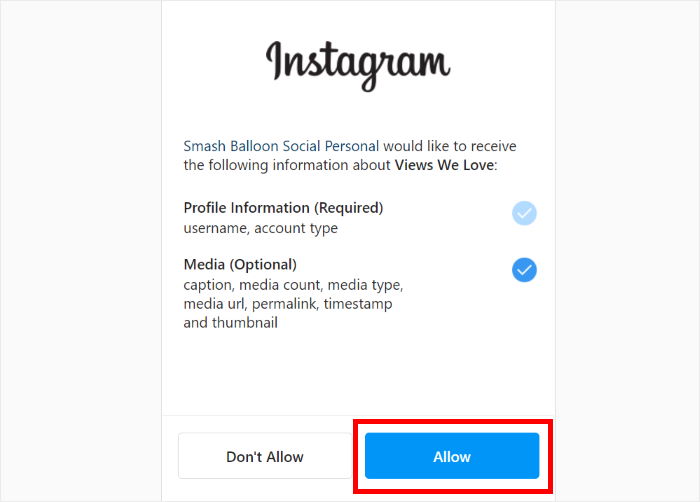
To continue, you can confirm that you want to connect your Instagram account by clicking on the Allow button.
The plugin will now bring you back to your site so you can connect your Instagram account as the source for your feed.
To do that, just click on the Next button.
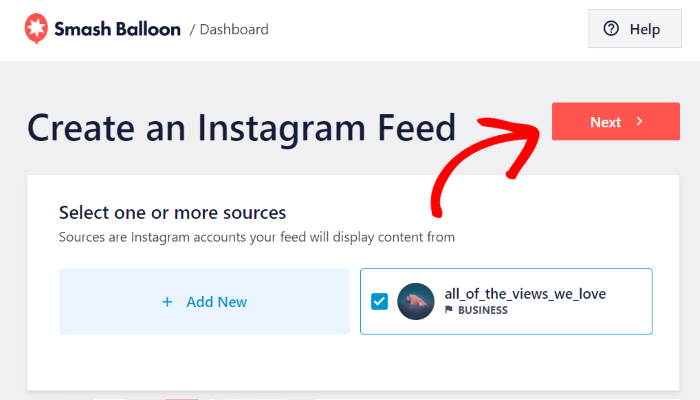
Just like that, you’ve created a new feed and connected it to Instagram.
The great thing about this Instagram aggregator is that your feed will automatically inherit the design of your WordPress theme and perfectly suit your website.
What’s more, you can now go to step 4 and customize the design of your new Instagram feed.
Step 4: Customize Your Instagram Feed
Ready to create a beautiful Instagram feed?
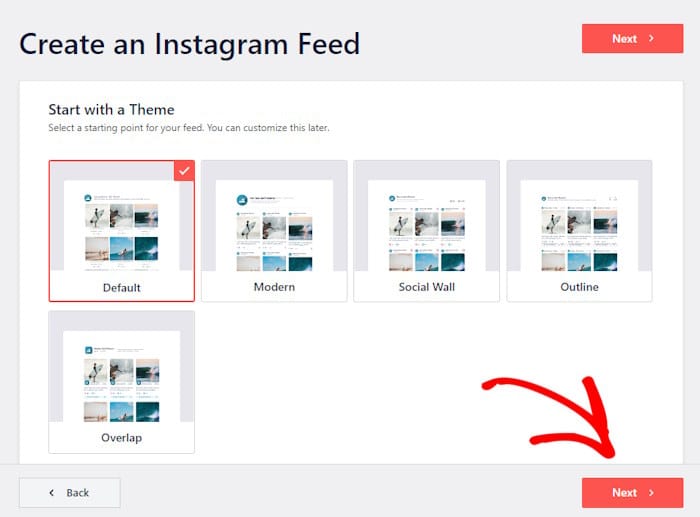
To get started, you can simply import a pre-designed theme for your Instagram feed. You have 5 different themes to choose from:
- Default
- Modern
- Social Wall
- Outline
- Overlap
After you select a theme, click on Next to continue.
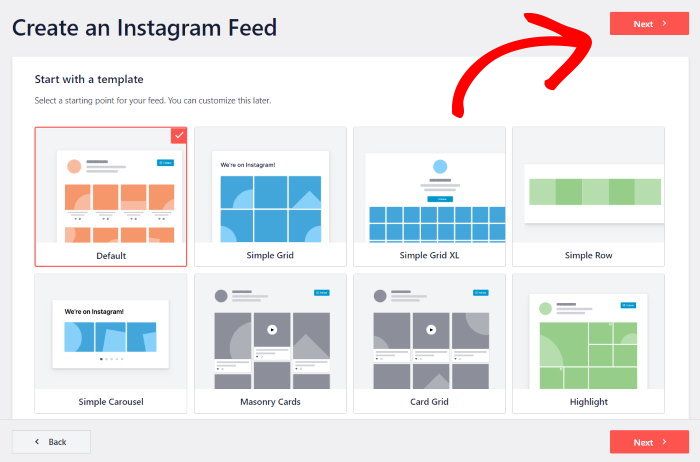
Next, you can import a template to quickly change the layout of the Instagram posts and header on your site.
Like before, select a template from the options and then click on Next.
Once you import a theme and template, you can use the live feed editor to customize it.
Here, you can find all of your customization options on the left side. Using these options, you can change the feed layout, color scheme, post style, header design, load more buttons, follow button, and much more.
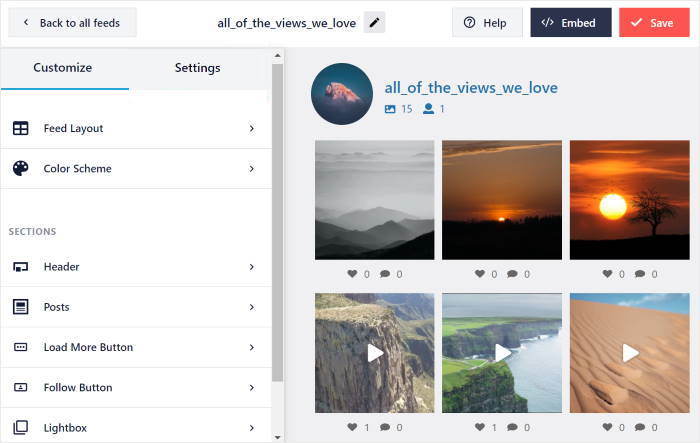
Towards the right, you can see a live preview of your Instagram feed. You can see all the changes you make in real-time here.
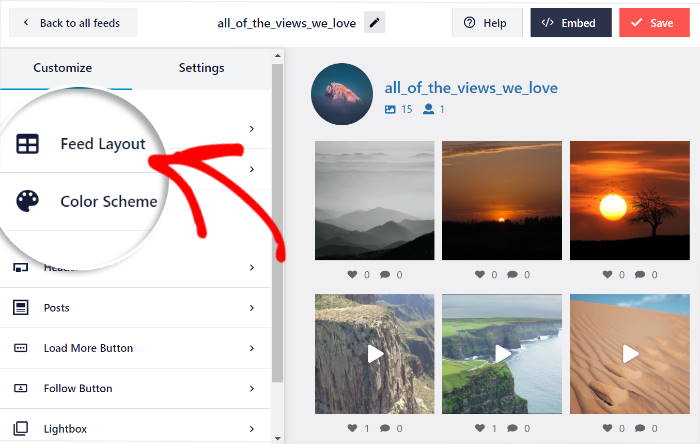
To start the customization, you can select the Feed Layout option from the left.
For your Instagram feed, there are 4 options that you can pick from: Grid, Carousel, Masonry, and Highlight.
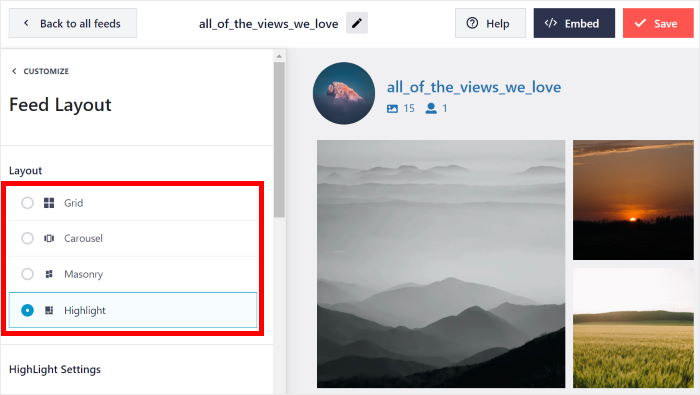
The first option is the grid layout, which shows Instagram posts in rows and columns. Plus, all of your posts are cropped to the same size, so they look clean and uniform.
With this layout, you can show lots of Instagram content on your site at once.
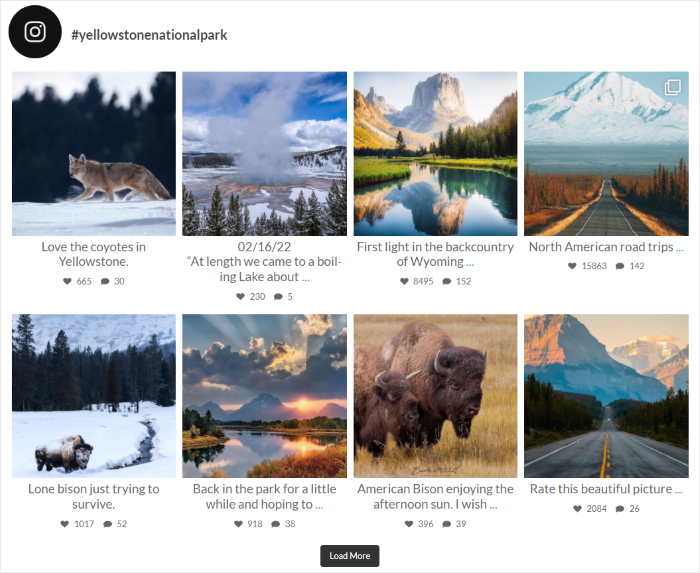
To add an Instagram feed slider to WordPress, you can click on the carousel option here.
It’s a great way to give website visitors another way to interact with your site.

After that, you have the masonry layout, which shows Instagram posts in different columns.
You can use this layout to embed photo feeds and video feeds with their original proportions.

Finally, there’s the highlight option which can show a beautiful Instagram gallery where the posts are more visible.
In fact, you can increase the size of your photos and videos by 4 times with this layout.

Once you pick your layout option, click on Save.
To proceed, click on the small Customize button and go back to the main customization options.
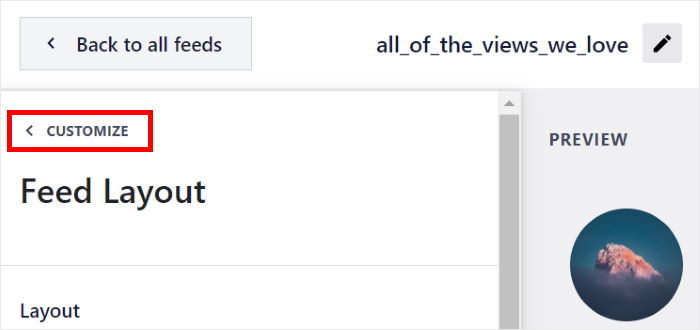
Now, select the Color Scheme option on the left so you can customize the colors of your WordPress Instagram feed.

For the color scheme, you can choose from 4 different options:
- Inherit from Theme: Copy the colors of your website for your Instagram feed
- Light: Show an Instagram feed with a lighter background and dark font color
- Dark: Pick a darker background and a light font color for your feed
- Custom: Manually select all the colors of your Instagram feed yourself

After picking your color scheme, click on the Save button.
Just like this, you can customize the rest of your Instagram feed using the live feed editor. You’ve got options to change your post layout, template, header style, button design, lightbox, and much more.
Once you’re done with the customization, remember to save changes by clicking on Save.
Step 5: Embed Instagram Feed on Your WordPress Website
Embedding your Instagram feed in WordPress is pretty straightforward using this plugin.
In fact, there are 2 ways you can embed your Instagram feed:
- Embed Instagram Feed on WordPress Page
- Embed Instagram Feed on WordPress Sidebar or Footer
How to Embed Instagram Feed on WordPress Page
First, let’s see how you can display Instagram feeds on a page of your WordPress site.
To begin, click on the Embed button in the top right corner.
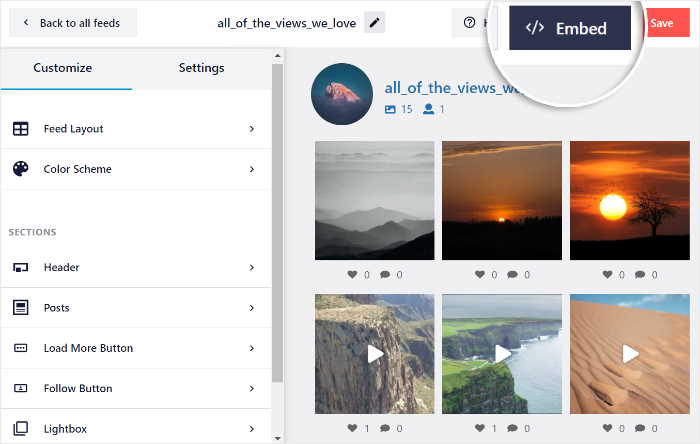
You’ll now see a popup that asks you to choose where you want to embed your Instagram feed. There’s also your Instagram feed shortcode that you can copy to embed feeds on your WordPress posts.
To continue, select Add to a Page here.
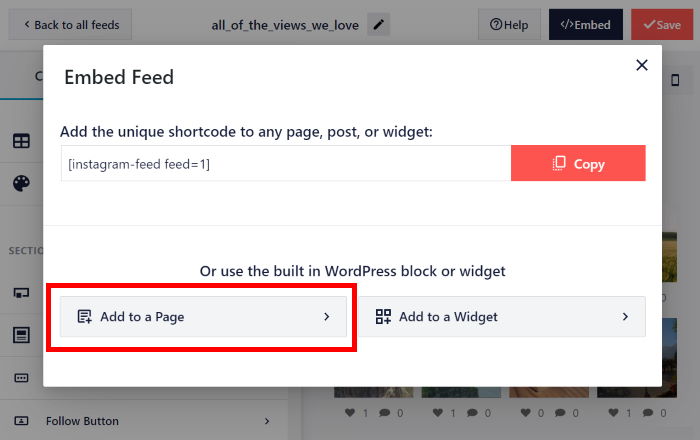
After that, just select the WordPress page from the list and click on Add.
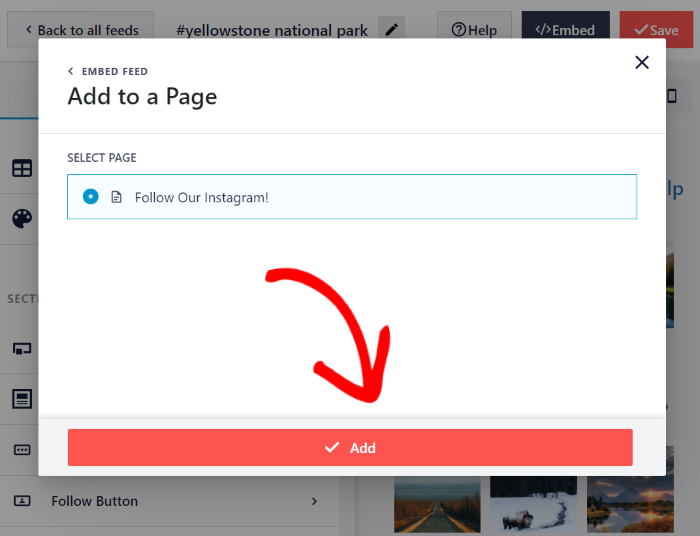
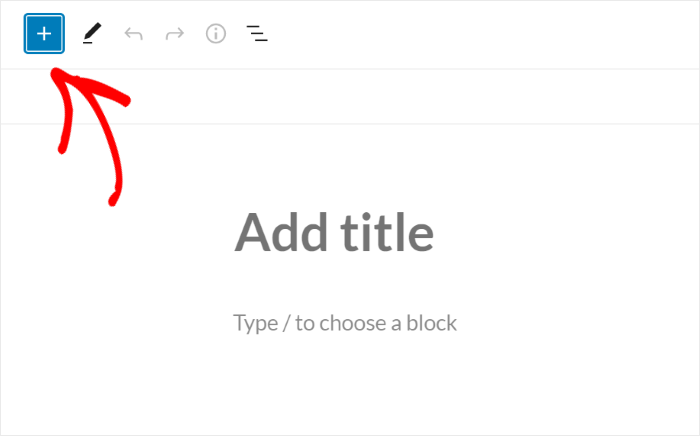
This will open the page in the WordPress editor. Now click the Plus (+) icon to add a new WordPress content block.
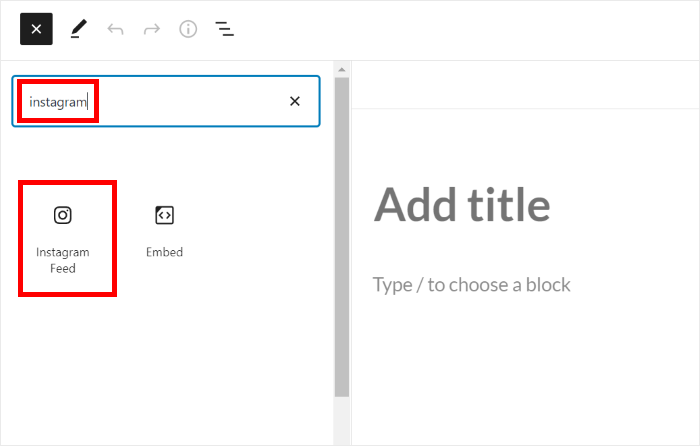
After that, enter “Instagram” in the search bar and then click on the Instagram Feed block from the search results.
Now click on the Publish button to save your new Instagram feed.
With that, you’ve added an Instagram feed to your WordPress website. To see how it looks, you can open your site and see.

Now, let’s check out the other way to embed Instagram feeds on your website.
How to Embed Instagram Feed on WordPress Sidebar or Footer
You also get a built-in Instagram widget that you can use to add your feeds to the sidebar or footer areas.
To embed your Instagram feed as a widget, first, open it in the live feed editor. For that, you can go to Instagram Feed » All Feeds from your WordPress dashboard.
Here, click on your Instagram feed from earlier.
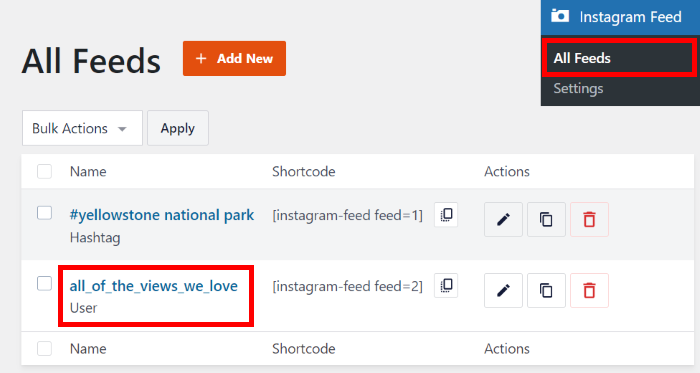
This will open your feed in the live feed editor once again.
To embed your Instagram feed to WordPress, select the Embed button at the top.

On the new popup, you can choose where to embed your Instagram feed. Just select the Add to a Widget option to continue.
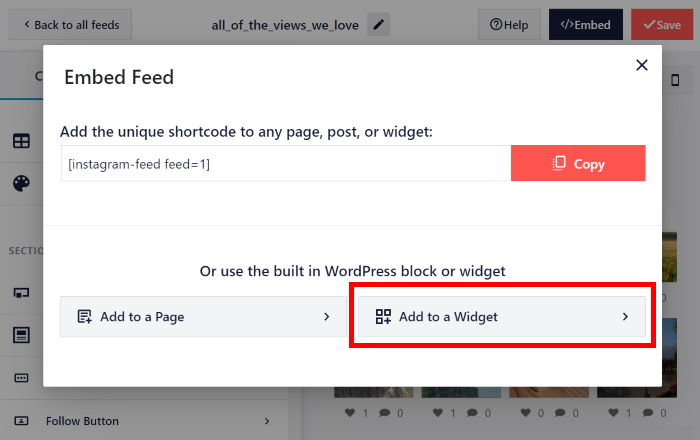
This will open the Widgets page of your website.
To add the Instagram feed to your sidebar, just click on the Sidebar panel on this page.
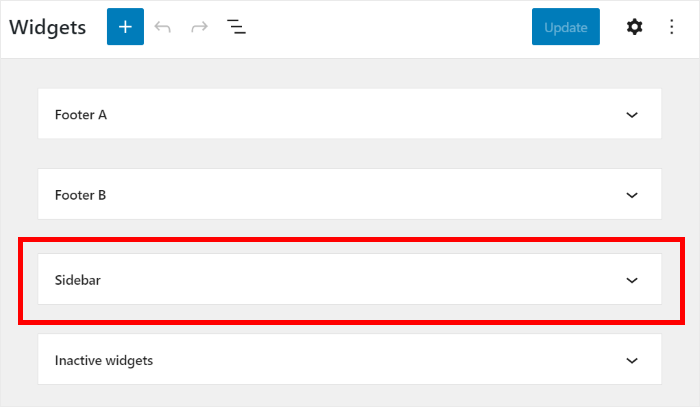
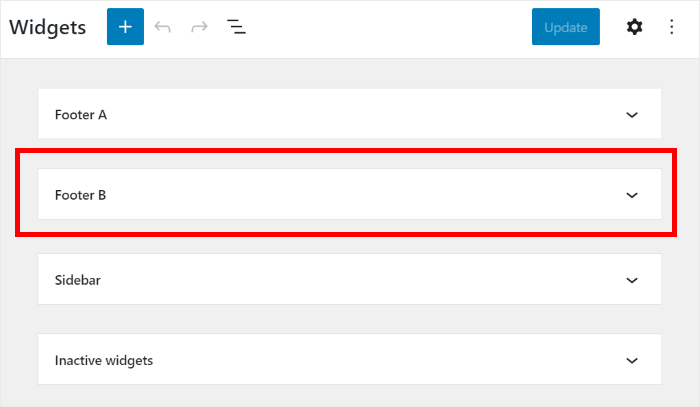
You can also click on a Footer panel instead if you want to embed your Instagram feed there.
For this tutorial, we’ll use the sidebar to embed an Instagram feed.
Now, you can see the active widgets on your sidebar or footer area. To add a new widget, click on the plus icon (+) here.
Finally, select the Instagram Feed widget from the options.
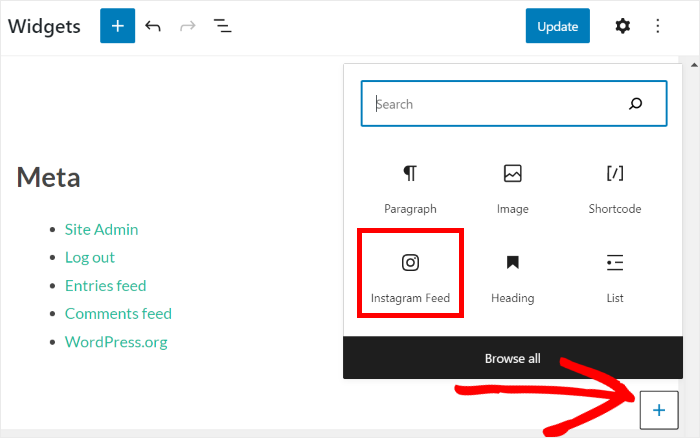
Click on Update to save your changes, and you’ve now embedded your Instagram feed to a widget-ready area of your site.
When you navigate to the front of your website, you can see how it looks.

Want to learn more about how to embed Instagram feed on WordPress sidebar or footer?
Check out this helpful tutorial on how to add an Instagram widget to your WordPress website.
How to Embed an Instagram Hashtag Feed
So far, we’ve discussed adding a standard feed to WordPress to highlight your embedded Instagram posts.
But as we touched upon earlier, Instagram Feed Pro can do a whole lot more. And that includes allowing you to embed Instagram hashtag feeds on your website.
Let’s learn how to do that next.
Step 1: Create a Hashtag Instagram Feed
First of all, use your WordPress dashboard to navigate to Instagram Feed » All Feeds.
Now click on the Add New button at the top.
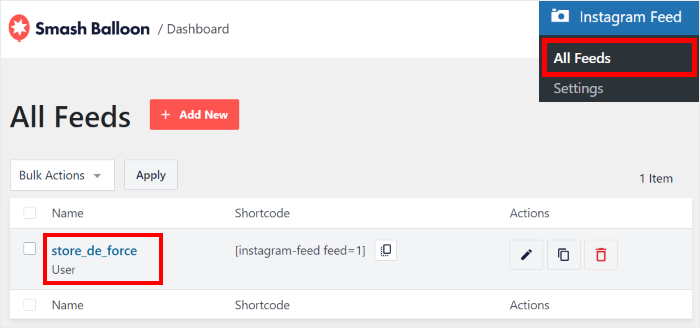
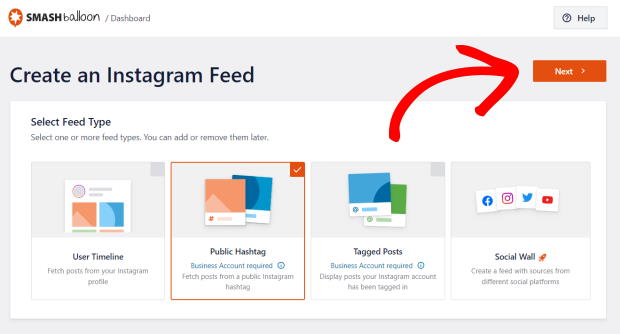
Then on the new page, just select the public hashtag feed type from the options.
If you want to show specific hashtags from your own Instagram posts or your tagged posts, you can select multiple feed types at once.
Once you’ve selected your feed type, click on Next.
Step 2: Connect Your Hashtag Feed to Instagram
To create an Instagram hashtag feed, you can just connect it to a business account for Instagram.
Click on the Add Source button here to get started.
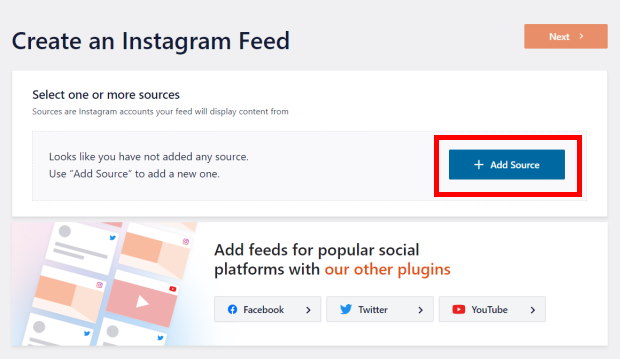
For a business account, you’ll see a Facebook popup where you can select your business Instagram account. Then, click on Next to continue.

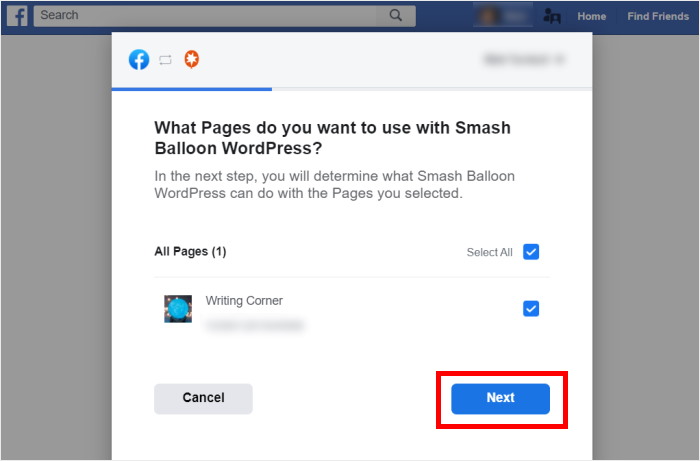
After that, you can select a Facebook page from the list that you want to connect to your website.
Then, click on the Next button to continue.
Finally, you can connect your business Instagram account by clicking the Done button on the popup.
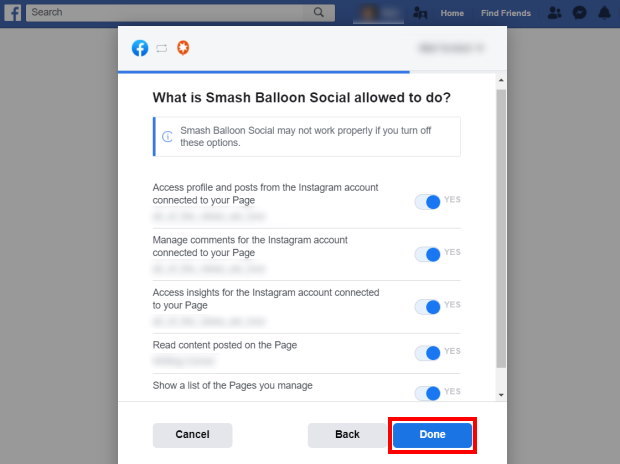
With that, you’ve given the plugin read-only access to your Instagram account. Like with a personal account, Instagram Feed Pro can’t make any changes and will only view your content.
Now you can just click on Add to confirm the Instagram account as a source for your feeds.
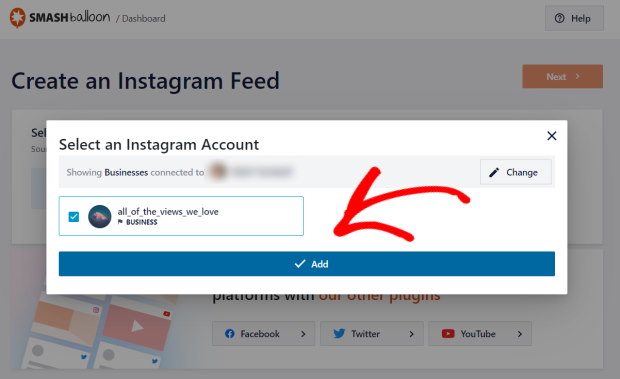
When creating new Instagram feeds in the future, you can just select this business account from this page.
To finish connecting your hashtag feed to Instagram, just click on the Next button.
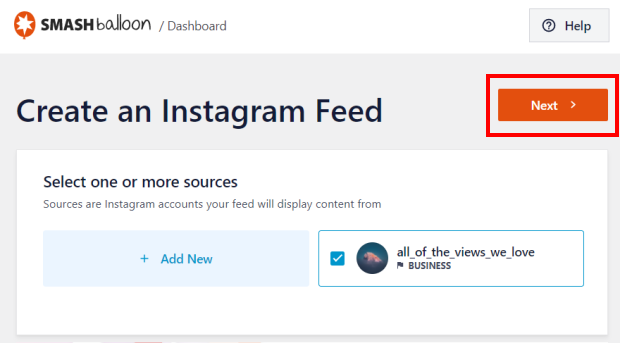
Step 3: Add Your Hashtags
Now, you can just enter the hashtags that you want to show on your site. To add more than 1 hashtag, just use a comma to separate them.
You can also choose between showing the top (most popular posts first) or recent (newest posts first) content from Instagram.
After you’ve added the hashtags, click on Next.

You’ve just created an Instagram hashtag feed for your website in just 3 steps.
Like before, you can now customize the design of your feed and embed it on your WordPress site.
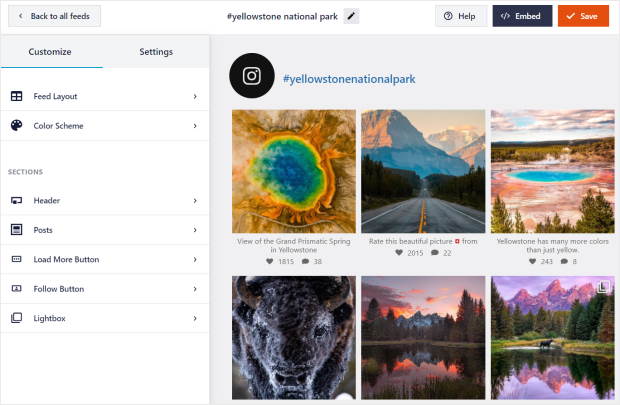
Want more details on how you can do this? Check out this post on how to embed an Instagram hashtag feed to your WordPress for guidance.
And if you want to display multiple Instagram feeds on your website, take a look at this tutorial.
How to Embed Instagram Posts Without a Plugin
In the past, WordPress allowed users to easily show Instagram posts without a plugin because of the oEmbeds functionality.
To embed Instagram on WordPress without plugins, you just needed to paste the link to your Instagram post, and WordPress would automatically embed it.
Sadly, WordPress discontinued oEmbeds for Instagram and Facebook on October 24, 2020.
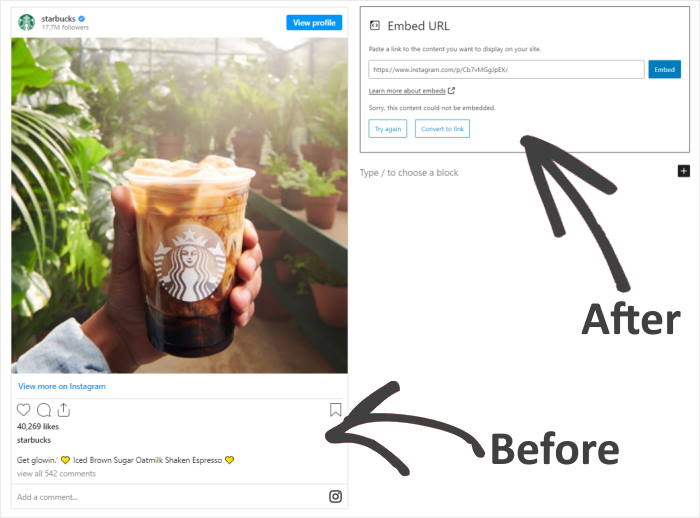
This means that if you’re not using a plugin, you can’t embed Instagram posts in WordPress by just pasting the link.
Want to add Instagram posts to WordPress the old way? Then you need to register with Facebook as an app developer.
This is time-consuming and complicated, especially when you just want to embed your Instagram posts on your website.
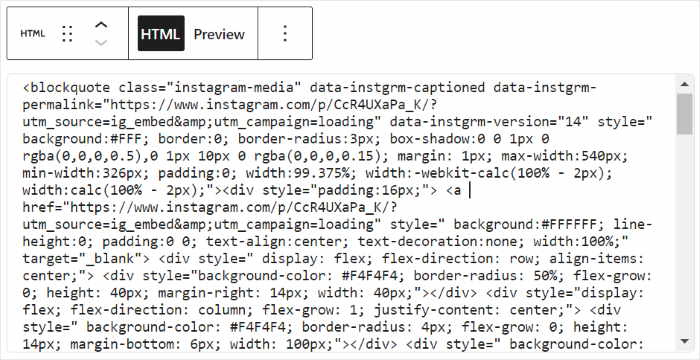
Plus, embedding Instagram feeds in iFrames can end up harming your site’s SEO.
The good news is that there’s a better way to do it.
Instagram Feed Pro brings back oEmbeds for Instagram and Facebook once again.
Using this plugin, you just need to paste the link to your Instagram posts. Then, your site will convert into a WordPress Instagram block and embed your post.
Simply follow steps #1, #2, and #3 above so you can install Instagram Feed Pro and connect your Instagram account.
Once you’ve successfully connected your Instagram account to the plugin, it’s time to enable oEmbeds for Instagram.
Enable oEmbeds for Instagram
First, navigate to the Instagram Feed » oEmbeds menu from your WordPress dashboard. On this page, you can enable oEmbeds for Instagram as well as Facebook.
Here, just click on the Enable button in the Instagram section.
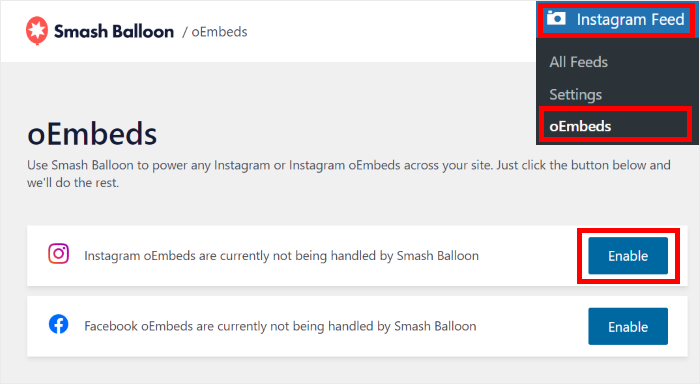
All you need to do now is to confirm your Facebook account. To do that, click on the Continue button on the popup.

Congratulations! You’ve now enabled oEmbeds for your WordPress website! Now, you can continue embedding your Instagram photos and videos to WordPress just by pasting the links.
Embed Your Instagram Posts on WordPress
First, head to your Instagram profile and find the post you’d like to embed in WordPress.
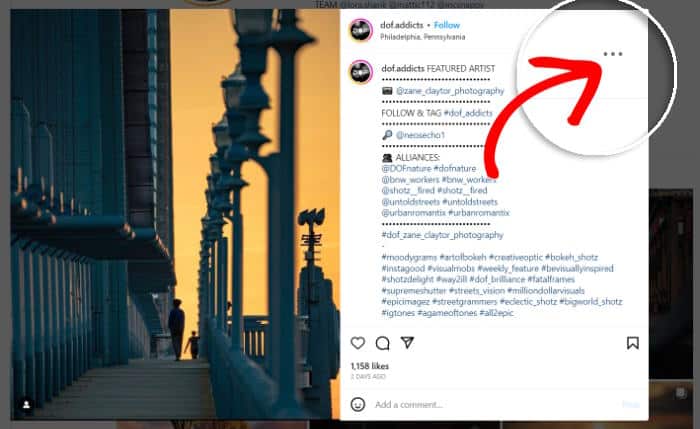
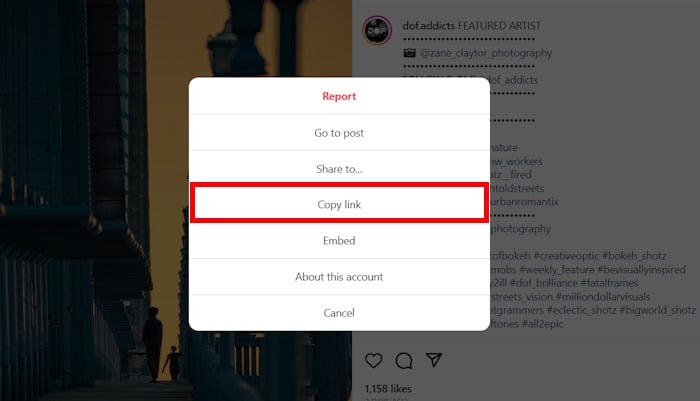
In the top right corner of the post, you’ll see 3 dots that look like this ⠇, which indicates more options for you to choose from. Click the dots and select the copy link from the menu that appears.
Next, create a new post or page in WordPress and paste the link directly into the block editor.
Since you’re using the Instagram Feed Pro plugin, WordPress will continue to automatically embed the Instagram post into the editor, so you can preview how it looks before publishing.

Then go ahead and publish your content to see the post live on your WordPress website. With that, you now know how to add Instagram feeds to WordPress in just a few steps.
Further Reading: How to Add Social Media Feeds to WordPress
There you have it!
In this article, you’ve learned how to embed your Instagram feed on WordPress in a few easy steps — no need for coding or access tokens.
So now, you can engage your visitors with social photo feeds, increase your Instagram followers, boost your conversions, and improve your business.
Ready to start embedding Instagram feeds? Get Smash Balloon’s Instagram Feed Pro now!
You may want to check out this next article on how to add Twitter feeds to your Elementor website.
If you enjoyed this article, feel free to follow us on Twitter and Facebook for more social media marketing tutorials.

