Expense Tracker using React
Last Updated :
30 Jul, 2024
The Expense Tracker project is a web application developed using React. Its main purpose is to assist users in keeping track of their expenses. With this app, users can easily add, and delete expenses to view a summary of their spending habits as well and it will show the available balance the user has left. Building an Expense Tracker, with React helps users learn. Also allows them to practice creating web applications.
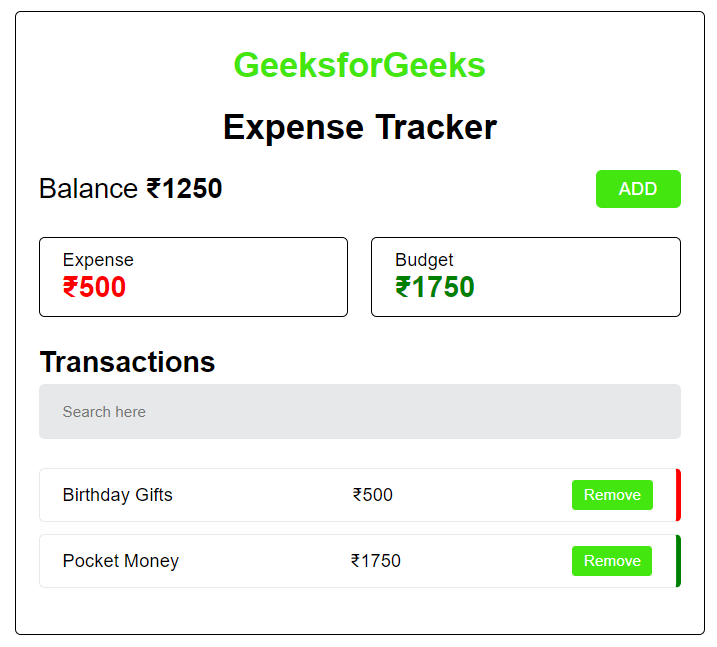
Preview of Final Output: Let us have a look at how the final application will look like:
 Expense Tracker using React
Prerequisites and Technologies Used in Expense Tracker:
Approach and Functionality to build Expense Tracker:
To accomplish this the project involves creating a user interface that enables users to add, edit, and delete expenses effortlessly. Additionally, the application maintains an updated list of expenses within its state. The total expenses are. Displayed for visibility. By utilizing React components the codebase remains structured and modular, for maintenance and scalability.
Steps to Create Expense Tracker in React
Step 1: Create a new React JS project using the following command
npx create-react-app <<Project_Name>>
Step 2: Change to the project directory
cd <<Project_Name>>
Step 3: Install the requires modules
npm i styled-components
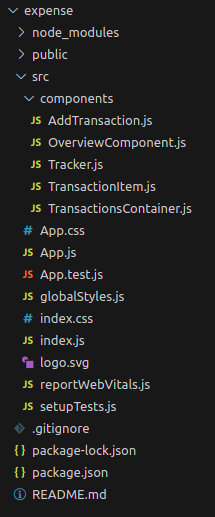
Step 4: Create a folder called components in src directory and create the following files inside it AddTransaction.js, OverviewComponent.js, Tracker.js, TransactionItem.js, TransactionsContainer.js and inside src directory create file globalStyles.js
Project Structure

The updated dependencies in package.json will look like this:
 "dependencies": {
    "@testing-library/jest-dom": "^5.17.0",
    "@testing-library/react": "^13.4.0",
    "@testing-library/user-event": "^13.5.0",
    "react": "^18.2.0",
    "react-dom": "^18.2.0",
    "react-scripts": "5.0.1",
    "styled-components": "^6.0.8",
    "web-vitals": "^2.1.4"
  }
Example: Write the following code in respective files
- App.js: This component is responsible, for rendering the layout of the application.
- AddTransaction.js: This component allows users to add transactions.
- OverviewComponent.js: This component displays the balance along with an "Add" button.
- Tracker.js: The component that brings together parts of the application such as overview transaction list and addition of transactions.
- TransactionItem.js: This component is responsible, for displaying transaction details including description, amount and a button to remove it from the list.
- TransactionsContainer.js: This component. Filters the list of transactions. It offers a search input field and displays only filtered transaction items.
JavaScript
// FileName: App.js

import styled from "styled-components";
import Tracker from "./components/Tracker";
import GlobalStyles from "./globalStyles";

const Main = styled.div`
  display: flex;
  justify-content: center;
  align-items: center;
`;

const App = () => {
  return (
    <Main>
      <GlobalStyles />
      <Tracker />
    </Main>
  )
}

export default App;
// FileName: globalStyles.js

import { createGlobalStyle } from "styled-components";


const GlobalStyles = createGlobalStyle`
    *{
        margin: 0;
        padding: 0;
        box-sizing: border-box;
        font-family: 'Poppins', sans-serif;
    }
`
export default GlobalStyles;
// FileName: AddTransaction.js

import { useState } from "react";
import styled from "styled-components";

const Container = styled.div`
  text-align: center;
  border: 1px solid #000;
  padding: 20px;
  border-radius: 5px;
  margin-bottom: 25px;
`;

const Input = styled.input`
  width: 100%;
  padding: 15px 20px;
  outline: none;
  border-radius: 5px;
  margin: 5px 0;
  border: 1px solid #000;
`;

const RadioContainer = styled.div`
  display: flex;
  align-items: center;
  justify-content: center;
`;

const Label = styled.label`
  margin-left: 10px;
  cursor: pointer;
`;

const RadioBtn = styled(RadioContainer)`
  margin: 10px 20px 10px 0;
`;

const SubmitBtn = styled.button`
  background-color: #44E610;
  color: #fff;
  border-radius: 5px;
  padding: 10px 20px;
  border: none;
  outline: none;
  cursor: pointer;
  &:hover {
    background-color: #44E610;
  }
`;

const AddTransaction = ({ setToggle, AddTransactions }) => {
  const [amount, setAmount] = useState("");
  const [details, setDetails] = useState("");
  const [transType, setTransType] = useState("expense");

  const AddTransactionData = () => {
    AddTransactions({
      amount: Number(amount),
      details,
      transType,
      id: Date.now(),
    });
    setToggle();
  };

  return (
    <Container>
      <Input
        type={"number"}
        placeholder="Enter Amount"
        value={amount}
        onChange={(e) => setAmount(e.target.value)}
      />

      <Input
        type={"text"}
        placeholder="Enter Details"
        value={details}
        onChange={(e) => setDetails(e.target.value)}
      />

      <RadioContainer>
        <RadioBtn>
          <input
            type="radio"
            id="expense"
            name="type"
            value={"expense"}
            checked={transType === "expense"}
            onChange={(e) => setTransType(e.target.value)}
          />
          <Label htmlFor="expense">Expense</Label>
        </RadioBtn>

        <RadioBtn>
          <input
            type="radio"
            id="income"
            name="type"
            value={"income"}
            checked={transType === "income"}
            onChange={(e) => setTransType(e.target.value)}
          />
          <Label htmlFor="income">Budget</Label>
        </RadioBtn>
      </RadioContainer>

      <SubmitBtn onClick={AddTransactionData}>Add Transaction</SubmitBtn>
    </Container>
  );
};

export default AddTransaction;
// FileName: OverviewComponent.js

import styled from "styled-components";

const Container = styled.div`
  display: flex;
  justify-content: space-between;
  align-items: center;
  margin-bottom: 25px;
`;

const Balance = styled.h2`
  font-weight: 500;
  & span {
    font-weight: bold;
  }
`;

const AddBtn = styled.button`
  cursor: pointer;
  background-color: rgb(68, 230, 16);
  color: rgb(255, 255, 255);
  padding: 7px 20px;
  font-size: 16px;
  border: none;
  text-transform: uppercase;
  border-radius: 5px;
`;

const OverviewComponent = ({ toggle, setToggle, income, expense }) => {
  const bal = income - expense;

  return (
    <Container>
      <Balance>
        Balance <span>₹{bal}</span>
      </Balance>
      <AddBtn onClick={() => setToggle(!toggle)}>
        {toggle ? "Cancel" : "Add"}
      </AddBtn>
    </Container>
  );
};

export default OverviewComponent;
// FileName: Tracker.js

import React, { useEffect, useState } from "react";
import styled from "styled-components";
import AddTransaction from "./AddTransaction";
import OverviewComponent from "./OverviewComponent";
import TransactionsContainer from "./TransactionsContainer";

const Container = styled.div`
  display: flex;
  flex-direction: column;
  width: 600px;
  max-width: 100%;
  background-color: #fff;
  padding: 30px 20px;
  border: 1px solid #000;
  border-radius: 5px;
  margin: 10px;
`;

const Heading = styled.h1`
  font-size: 30px;
  font-weight: bold;
  text-align: center;
  margin-bottom: 20px;
`;

const TransactionDetails = styled.div`
  display: flex;
  justify-content: space-between;
  align-items: center;
  gap: 20px;
  margin-bottom: 25px;
`;

const THeading = styled.div`
font-size: 30px;
font-weight: bold;
text-align: center;
margin-bottom: 20px;
color: #44E610;
`;

const ExpenseBox = styled.div`
  flex: 1;
  border: 1px solid #000;
  border-radius: 5px;
  padding: 10px 20px;
  background-color: #fff;
  & span {
    font-weight: bold;
    font-size: 25px;
    display: block;
    color: ${(props) => (props.isExpense ? "red" : "green")};
  }
`;

const IncomeBox = styled(ExpenseBox)``;

const Tracker = () => {
  const [toggle, setToggle] = useState(false);
  const [transactions, setTransactions] = useState([]);
  const [expense, setExpense] = useState(0);
  const [income, setIncome] = useState(0);

  const AddTransactions = (payload) => {
    const transactionArray = [...transactions];
    transactionArray.push(payload);
    setTransactions(transactionArray);
  };

  const removeTransaction = (id) => {
    const updatedTransactions = transactions
                                .filter((transaction) => transaction.id !== id);
    setTransactions(updatedTransactions);
  };

  const calculateTransactions = () => {
    let exp = 0;
    let inc = 0;

    transactions.map((item) => {
      item.transType === "expense"
        ? (exp = exp + item.amount)
        : (inc = inc + item.amount);
    });

    setExpense(exp);
    setIncome(inc);
  };

  useEffect(() => {
    calculateTransactions();
  }, [transactions]);

  return (
    <Container>
        <THeading>GeeksforGeeks</THeading>
      <Heading>Expense Tracker</Heading>
      <OverviewComponent
        toggle={toggle}
        setToggle={setToggle}
        expense={expense}
        income={income}
      />

      {toggle && (
        <AddTransaction
          setToggle={setToggle}
          AddTransactions={AddTransactions}
        />
      )}

      <TransactionDetails>
        <ExpenseBox isExpense>
          Expense <span>₹{expense}</span>
        </ExpenseBox>

        <IncomeBox>
          Budget <span>₹{income}</span>
        </IncomeBox>
      </TransactionDetails>

      <TransactionsContainer
        transactions={transactions}
        removeTransaction={removeTransaction}
      />
    </Container>
  );
};

export default Tracker;
// FileName: TransactionItem.js

import React from "react";
import styled from "styled-components";

const Item = styled.div`
  display: flex;
  justify-content: space-between;
  align-items: center;
  border: 1px solid #e6e8e9;
  background-color: #fff;
  border-radius: 5px;
  padding: 10px 20px;
  border-right: 5px solid ${(props) => (props.isExpense ? "red" : "green")};
  margin-bottom: 10px;
  cursor: pointer;
`;

const RemoveButton = styled.button`
  background-color: #44E610;
  color: white;
  border: none;
  padding: 5px 10px;
  border-radius: 3px;
  cursor: pointer;
`;

const TransactionItem = ({ transaction, removeTransaction }) => {
  return (
    <Item isExpense={transaction?.transType === "expense"}>
      <span>{transaction.details}</span>
      <span>₹{transaction.amount}</span>
      <RemoveButton onClick={() => removeTransaction(transaction.id)}>
        Remove
      </RemoveButton>
    </Item>
  );
};

export default TransactionItem;
// FileName: TransactionsContainer.js

import React, { useEffect, useState } from "react";
import styled from "styled-components";
import TransactionItem from "./TransactionItem";

const Container = styled.div``;

const Heading = styled.h2`
  font-size: 25px;
  font-weight: 600;
`;

const SearchInput = styled.input`
  width: 100%;
  padding: 15px 20px;
  outline: none;
  border-radius: 5px;
  margin: 5px 0;
  border: 1px solid #e6e8e9;
  background-color: #e6e8e9;
  margin-bottom: 25px;
`;

const TransactionItems = styled.div``;

const TransactionsContainer = ({ transactions, removeTransaction }) => {
  const [searchInput, setSearchInput] = useState("");
  const [filteredTransactions, setFilteredTransactions] = useState(transactions);

  const filteredData = (searchInput) => {
    if (!searchInput || !searchInput.trim().length) {
      setFilteredTransactions(transactions);
      return;
    }

    let filtered = [...filteredTransactions];
    filtered = filtered.filter(
      (item) =>
        item.details.toLowerCase().includes(searchInput.toLowerCase().trim())
    );
    setFilteredTransactions(filtered);
  };

  useEffect(() => {
    filteredData(searchInput);
  }, [transactions, searchInput]);

  return (
    <Container>
      <Heading>Transactions</Heading>

      <SearchInput
        type="text"
        placeholder="Search here"
        value={searchInput}
        onChange={(e) => setSearchInput(e.target.value)}
      />

      <TransactionItems>
        {filteredTransactions?.length ? (
          filteredTransactions.map((transaction) => (
            <TransactionItem
              transaction={transaction}
              key={transaction.id}
              removeTransaction={removeTransaction}
            />
          ))
        ) : (
          <p>No Transactions</p>
        )}
      </TransactionItems>
    </Container>
  );
};

export default TransactionsContainer;
Steps to run the project:
Step 1: Type the following command in terminal.
npm start
Step 2: Open web-browser and type the following URL
http://localhost:3000/
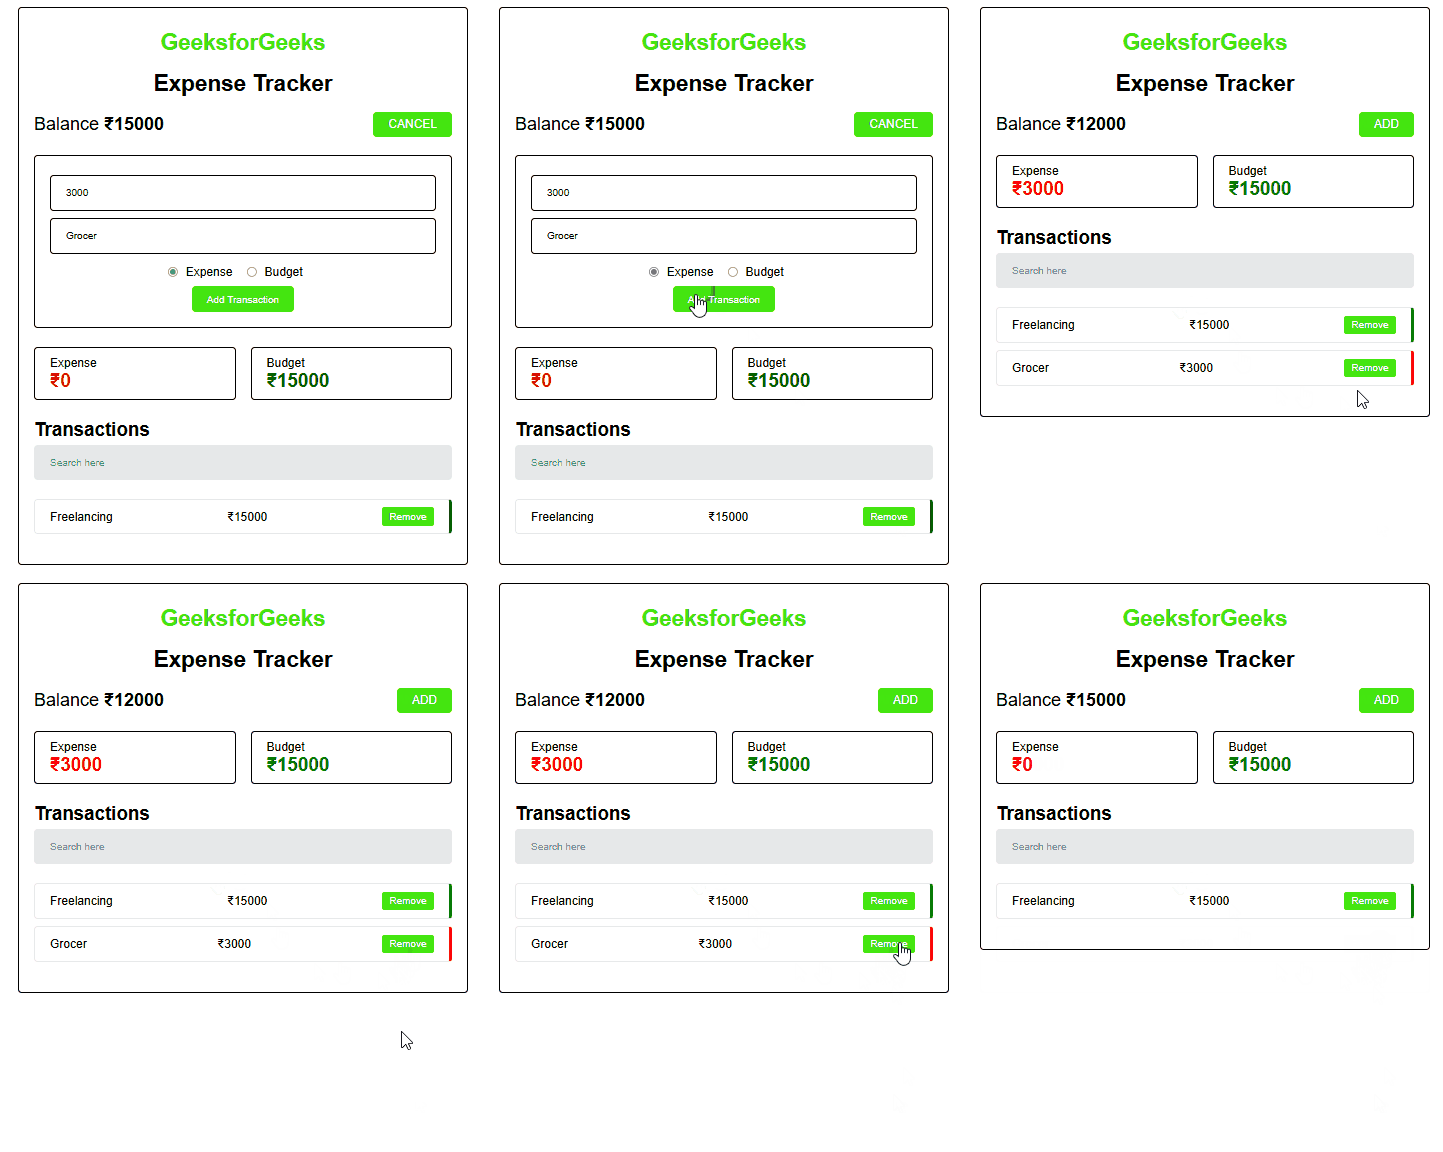
Output:

Similar Reads
Expense Tracker using React
The Expense Tracker project is a web application developed using React. Its main purpose is to assist users in keeping track of their expenses. With this app, users can easily add, and delete expenses to view a summary of their spending habits as well and it will show the available balance the user
7 min read
Expense Tracker using Next.js
The Expense Tracker project is a NextJS-based web application designed to help users manage their finances more effectively. Users can easily add and delete expenses and income, allowing them to track their spending habits and view a summary of their expenses. This project not only provides a practi
4 min read
Create an Expense Tracker using React-Native
Expense Tracker application using React-Native is an application where users can manage the transactions made and then visualize the expenditure with the help of a pie chart. The users can add transactions while providing the category of expenditure. The application will run on any device and is the
7 min read
Movie Trailer app using ReactJS
In this article, we are going to make a simple app that searches for any movie/web series trailers. The users can search for their favourite movie trailers using this application. The API will fetch the trailer from the internet and display it on the webpage. We will use 'movie-trailer' npm package
3 min read
ReactJS Rendering Elements
In this article we will learn about rendering elements in ReactJS, updating the rendered elements and will also discuss about how efficiently the elements are rendered. What are React Elements?React elements are different from DOM elements as React elements are simple JavaScript objects and are effi
3 min read
News App using React
News App using React JS uses React's basic principles to fetch the latest news from a News API and show them to users based on their interests. It's a simple project to create an interactive and personalized news-viewing experience. Preview of final output: Let us have a look at how the final output
4 min read
Storybook Using React
Storybook is an open-source tool to build the UI components individually, allowing developers to concentrate on one component at a time, examine it more deeply, and record its behavior and changes. The objective of the project is to increase the effectiveness of the development of React components b
4 min read
Create ToDo App using ReactJS
In this article, we will create a to-do app to understand the basics of ReactJS. We will be working with class based components in this application and use the React-Bootstrap module to style the components. This to-do list can add new tasks we can also delete the tasks by clicking on them. The logi
3 min read
React Spring Events as Objects
In this article, we will learn how to use Events as Objects using React Spring. React spring is an animation library that makes animating UI elements simple. It is based on spring physics which helps it to achieve a natural look and feel. It is different from other animation libraries where someone
3 min read
Creating a Travel Journal App using React
The Travel Journal App project is a web application developed using React. This travel journal app will allow users to record their travel experiences and manage their entries efficiently. By leveraging the power of React for the frontend and Bootstrap for styling, we'll create an interactive and vi
5 min read