How to deploy web applications using Nginx on Remote server (Ubuntu based) – Set 2
Last Updated :
01 Aug, 2021
In the last article, we got the idea about Nginx and how we can leverage its benefits, further we installed it on our device or remote server. In this article, we will see how to deploy a web application stored in the remote server using Nginx.
We need to follow the given steps in order to deploy web applications using Nginx.
Step 1: Open the terminal, and change the directory where your web application is stored using the cd command.
# Example: Suppose test is a web application
# folder stored in downloads, I'll open terminal
# in home screen
cd  ../Downloads/test/

# Check the contents once here
ls

Step 2: Installing Curl, OpenSSH-server, and vim editor in your distro for easy setup using the following commands. But before that, I’ll explain what are they and why need to use them.
Curl: CLI tool used to transfer data from a web server.
OpenSSH-server: OpenSSH-server is a collection of tools that are used for the remote control and transfer of data between remote networked computers.
Vim-editor: It is an editor that is used to create and modify text files in ubuntu.
# Commands to install all the above-required libraries in terminal
sudo apt-get install curl
sudo apt-get install openssh-server
sudo apt-get install vim
Now we have finished with our pre-requisites part.
Step 3: Now in this step we will copy our web application folder to this absolute path /var/www
# change directory to parent folder where
# you have stored the web application folder
sudo cp -r test /var/www
Step 4: Now we will point our domain name to the server where we will host this application. i.e. we need to add the IP address of your server to the DNS settings. Let’s suppose your server IP address is 0.0.0.0 and your domain name is www.test.com, then your domain name should point to your server IP address.
For that we need to also do some settings in server, we need to create a file, we will use vim for that
Firstly, change your directory to var/www/ then use the vim commands:
# Change your directory
cd var/www

# Vim command for new file
sudo vi /etc/hosts
Now you will see a file with similar contents as shown in the picture
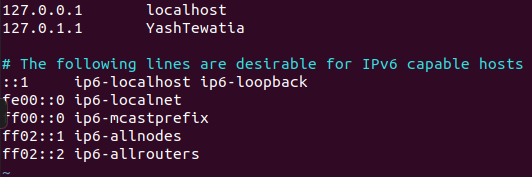
you need to add your IP address here in starting and your domain name after it, you can use the below image for reference.

Step 5: As on a remote server, we need to add our web application folder to that server. For that, we need to change the permission of our web application folder. (your folder name of the web application can differ)
# Change directory to /var/www/test
cd /var/www/test

# Change permission for your folder
sudo chmod -R 777 *

# Secure copy your files to web server
# (Your IP address of server will be different)
# (eg: scp -r * root@x.x.x.x:var/www/FOLDER_NAME)
scp -r * 0.0.0.0:/var/www/test
So our files have securely been copied to the server.
Step 6: So now, we will configure our Nginx Server to serve our website, let’s, first of all, see the Nginx folder
# Change directory
cd /etc/nginx

# See Contents of it
ls
Here we should be interested in 2 directories, sites-available and sites-enabled.
sites-available: It contains all the individual config files possible for your all static files.
sites-enabled: It contains the link to config files that Nginx will read and run.
So we need to create a config file in sites-available and a symbolic link in sites-enabled for Nginx.
Firstly, we will create a new file and add the following contents to it.
# Command to create and open a new file
sudo vim sites-available/test

# Now add the following contents to it
server {
listen 80 default_server;
listen [::] default_server;
root /var/www/test;
index index.html;
location / {
try_files $url $url/ =404;
}
}
Here we have opened socket 80 and your application port for default_server, we have told nginx where our web application files are. Location of our Index page, and if you get some wrong URL then through a 404 error.
Step 7: Now let us add this file to the sites-enabled folder in Nginx
# Command to add file to sites-enabled folder
sudo ln -s /etc/nginx/sites-available/test /etc/nginx/sites-enabled/test
Amazing! Now we have one main issue, as earlier we had our Nginx server running, and we configured to open port 80 in our web application, and Nginx is also trying to open its default page using port 80. Hence we need to move that default files to somewhere else to avoid conflict.
# I generally move it to home directory
sudo mv /etc/nginx/sites-enabled/default /home/yashtewatia/default

# Restart Nginx service
sudo systemctl restart nginx
So we have restarted our nginx server! Now you can go to your IP address to view the contents in the browser or you can use the curl command for the same in terminal like,
curl www.test.com
# or we can give the IP address here of our server
curl 0.0.0.0
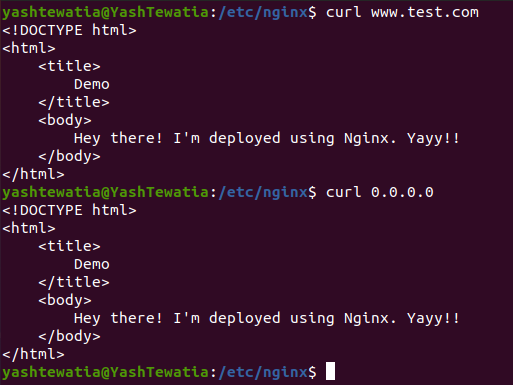
Hence we have deployed our web files using Nginx Server.
Similar Reads
How to deploy web applications using Nginx on Remote server (Ubuntu based) - Set 2
In the last article, we got the idea about Nginx and how we can leverage its benefits, further we installed it on our device or remote server. In this article, we will see how to deploy a web application stored in the remote server using Nginx. We need to follow the given steps in order to deploy we
5 min read
How to install and configure Nginx Web Server on Godaddy VPS (Ubuntu)?
GoDaddy Server is a cloud-based hosting platform that consists of virtual and dedicated servers. The premium service includes weekly backups, 99% uptime, 24x7 Customer Support, a free encrypted SSL certificate, unlimited bandwidth, and SSD storage. For regular users, the latest generation is VPS Gen
2 min read
How to deploy simple frontend server-less (static) React applications on Netlify
Netlify is one of the most popular hosting services that specialize in hosting server-less services for web applications and static websites. It is a web development program that quadruples productivity. By unifying the elements of the modern decoupled web, from local development to advanced edge lo
5 min read
How to Deploy React App using Azure Static Web Apps ?
Microsoft Azure is a public cloud computing platform. It provides a lot of cloud services to access, manage, and deploy applications. Where as Azure Static Web App is one of the services of Microsoft Azure. It automatically builds and deploys full-stack web apps from the code repository to azure. In
3 min read
Deploy Serverless Express Application to Vercel
Vercel is a serverless cloud-based hosting solution to host front-end and serverless applications. Express is a Node.JS framework and deploying serverless express application aids cost-cutting to nearly zero. Although the traditional way of deploying to the server is expensive and there is a limit o
3 min read
How to set Multiple Web Apps with Different Base Directories on the Same Express Server ?
Node.js supports server side functionality using Express. It allows us to add new features and organize the functionalities. While working with Express, we can set up our own local server for a given base directory. The following approach covers how to serve multiple web apps with different base dir
2 min read
How to Cache Ejs and Built the Progressive Web Application with Nodejs?
To cache EJS (Embedded JavaScript) templates and build a Progressive Web Application (PWA) with Node.js, we need to leverage several key technologies. Caching EJS templates can significantly enhance performance by reducing the need to recompile templates on each request. we'll learn how to cache EJS
4 min read
How To Deploy a Django Application to Heroku with Git CLI?
Deploying a Django application to Heroku using the Git command-line interface (CLI) is a simple process. Heroku provides a platform-as-a-service (PaaS) that enables you to deploy, manage, and scale your applications easily. This guide will walk you through the steps to deploy your Django application
3 min read
Deployment of React Application using GitHub Pages
Deploying a React application using GitHub Pages is an easy and efficient way to host your projects online for free. In this article, we will walk you through the steps to deploy your React app, making it accessible to users with a live URL. PrerequisitesA GitHub accountNode.js and npm installedBasi
4 min read
How to Deploy Node.js Express Application on Render ?
Deploying a Node.js Express application on Render is straightforward and involves a few key steps to set up your project, configure deployment settings, and manage your application on the Render platform. Render provides an easy-to-use platform for deploying applications, offering features like auto
4 min read