How to delete all your Google Photos permanently
From one by one to all in one go, we show you how to delete all your Google Photos and close your account so you don't have to pay a monthly fee

- How to backup your Google Photos before deletion
- Google Photos: archive vs bin vs delete, what's the difference?
- How to delete individual Google Photos images
- How to delete multiple Google Photos snaps
- How to delete photos from Google Photos albums
- How to delete all your Google Photos at once
- How to delete your Google Photos account
Looking to delete all your Google Photos forever? Whether you’re wanting to switch to a different photo backup service or you're looking at clearing out some unwanted cloud clutter, there are several ways to securely and permanently delete your snaps from Google Photos.
Like the Apple iCloud Drive and Amazon Photos cloud storage, Google Photos is a useful backup tool and a great way to both organize your snaps and share them easily with those you love.
But, while the Google Photos cloud storage system is easy to use, affordable, and accommodates both images and videos, the limited editing tools are often a turnoff for advanced users looking for more functionality.
A policy change that came into effect last year also now means that Google Photos no longer offers unlimited free storage for new 'high quality' photos. So, while you'll still get 15GB for free, anything on top of that will require a Google One subscription, which starts at US$1.99 / £1.59 per month for 100GB.
Although it's not a huge amount of money, even small amounts add up over time, so you may wish to delete all your Google Photos rather than paying the monthly subscription fee. Before you do that though, you'll want to download all your Google Photos to your PC or Mac so that you don't lose any of those precious memories.
Below, we talk you through how to delete all your Google Photos permanently, including options for deleting your photos one by one or all in one go. Let's take a look...
How to backup your Google Photos before deletion
Before you start any clean-up efforts, you should consider backing up your images from Google Photos. This might not matter if you’re only planning to erase unwanted snaps that are underexposed or out of focus.
Get daily insight, inspiration and deals in your inbox
Sign up for breaking news, reviews, opinion, top tech deals, and more.
But if you intend to erase some or all of your treasured snaps from Google Photos forever, it’s worth checking that you have a second copy saved somewhere else.

Our Google Photos backup guide shows you exactly how to save individual images, albums or your entire library to your PC or Mac.
If you don’t have a copy of your cloud library backed up offline, check that out before you delete all your Google Photos.
Google Photos: archive vs bin vs delete, what's the difference?
Before diving into deletion, it’s probably worth understanding the difference between the 'Bin' and the 'Archive' features on Google Photos. They might seem similar, but they serve different functions – and only one will permanently delete your images from Google Photos.
As with other Google products, sending images to the Archive does not erase them. Archived images still appear in search results, as well as any albums they feature in.
So what does Archive achieve? It allows you to reduce the clutter in your main Google Photos library: send a photo to the Archive and it will disappear from the main thumbnail grid – but it will still be accessible. Archiving photos won't save storage space or erase your images.
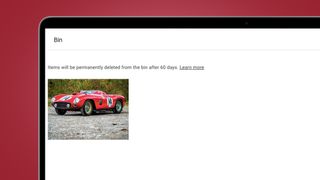
The Bin is where images actually go to be erased. Delete a photo and it will move to the bin, which is the first step towards permanent deletion.
How to delete individual Google Photos images
Deleting individual images from Google Photos is straightforward. If you’re accessing Google Photos from a web browser, simply open the image you want to delete from the thumbnail grid and click the bin icon in the top right corner. You’ll see a message confirming whether you want to remove the photo from your Google Account, synced devices, and places shared within Google Photos. Click ‘Move to bin’ and that’s what will happen.
Using the Google Photos app on a smartphone, the delete option is just as simple. Open an image from the main thumbnail grid and you’ll see the bin icon in the bottom right corner. Tap this and you’ll get the same pop-up as above. Tap ‘Move to bin’ and the first stage of deletion is complete.
You'll then want to go to the Google Photos bin. On the web, you’ll find the bin in the main Google Photos menu on the left of the screen. In the smartphone app, you’ll find it under the Library tab.
Once there, you’ll see a message at the top which reads ‘Items will be permanently deleted from the bin after 60 days’. To erase your images forever, you don’t need to do anything else: simply leave your deleted snaps in the bin for 60 days and they’ll be gone. However, if you want immediate peace of mind, you can also manually empty the bin.

On the web, head to the bin and click the button labeled ‘Empty bin’ in the top right corner. On a smartphone, tap the three dots in the top right, then tap ‘Empty bin’. Do either and you’ll be presented with a warning message, confirming that all items in the bin will be permanently deleted if you proceed – and a warning that the action can’t be undone.
If you’re sure that you want to immediately and irreversibly erase the snaps, click ‘Empty bin’.
You can also select specific photos from within the bin to permanently erase, rather than clearing the entire bin immediately. To select an image on the web, click the checkmark in the top left of the thumbnail. On a smartphone, simply long-press on the relevant images. Once you’re happy with your selection, you’ll see options to permanently delete – or restore – the selected images. These appear at the bottom of the screen on a smartphone and the top of the screen in a web browser.
Want more help when selecting which snaps to send to the bin? In June, Google is introducing a space-saving tool that will automatically identify blurry or underexposed images in your library for deletion. This will make it much easier to eliminate unwanted snaps that are sapping your account’s storage capacity.
How to delete multiple Google Photos snaps
If you instead want to delete a large number of photos from your Google Photos library, erasing them one by one will take a long time. Luckily, Google makes it easy to remove images in large batches.
Start by choosing the images you want to erase. To select snaps on the web, click the checkmark in the top left of the relevant thumbnail. In the smartphone app, long-press on the image thumbnails you’d like to select. Whichever method you use, selected snaps will be highlighted with a blue border and checkmark.
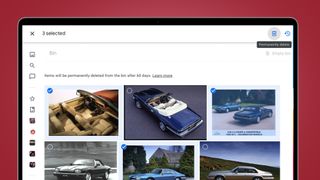
You can also use the shift key to highlight a range of images on the web. Select one image, then hold shift when clicking a second and every snap between the two will be highlighted.
When your selection is complete, look for the bin icon in the top right of your screen. Click or tap this and you’ll get the same confirmation message as above. Move your batch of snaps to the bin and they’ll be permanently erased after 60 days – or you can manually empty the bin instantly.
How to delete photos from Google Photos albums
A handy way to track down and delete specific photos is by finding them in albums that you’ve already organized. Though, if you choose to delete photos from within an album, the removal option is a little less obvious: open a photo in an album and you won’t see the little bin icon.
To delete a photo from within an album on the web, you’ll need to open the image, click the three dots in the top right corner, then select ‘Move to bin’ from the drop-down list. On a smartphone, open the image, tap the three dots in the top right corner, then scroll across the toolbar that appears until you see ‘Move to Bin’ – accompanied by a bin icon.
You can also delete batches of multiple images from albums in the same way as above. Once you’ve selected the relevant snaps, you’ll find the delete options hiding in the same places.
How to delete all your Google Photos at once
Unfortunately, there is no one-click way to delete your entire Google Photos library. Unlike services like YouTube, Google Photos cannot be individually removed from your account. So whether you want to move to a different cloud service or switch to offline backups, erasing every image from Google Photos will require a little more effort.
The easiest way to delete every image from your Google Photos account is to use the batch selection method suggested above. From the web version of Google Photos, highlight the top image in your library. Then scroll all the way down to the bottom of the thumbnail grid, until you get to the oldest image in your cloud collection.

Hold the shift key and click the last photo. Every single snap in your library will now be selected. You can then follow the same steps as above to move the images to the bin, by clicking the bin icon in the top right. Depending on how many images you have in your library, it may take a little time for Google to process the erase request.
Remember that images in your archive won’t be included in a selection made from the main photos grid. To delete absolutely everything, you’ll also need to check your archive too and move items from there to the bin. You’ll find the archive in the main Google Photos menu on the left of the screen. Head here and you’ll be able to select and delete images in batches, as above.
How to delete your Google Photos account
If that sounds like too much effort, there are alternatives. For one, leave any Google product inactive for two years and Google will remove all of your content – including Google Photos. So if you don’t upload, delete or otherwise interact with your Google Photos library for a full two years, Google will automatically delete everything in it.
While this might seem like an easy way to ensure your entire Google Photos collection is deleted, it does come with a significant potential pitfall: if at any point in those two years you interact with your account – for example, your smartphone automatically backs up a snap to Google Photos – then the clock will be reset and you’ll need to wait another two years.

So you could instead choose to delete your Google Account entirely. This is actually quite easy to do: from your Google account, navigate to the ‘Data & personalization’ tab, then scroll down to ‘Download, delete or make a plan for your data’. Click the option labeled ‘Delete a service or your account’, then ‘Delete your account’. You’ll be given an option to download your data and you’ll need to check a number of confirmation messages. But click ‘Delete account’ and all of your data will be permanently erased.
This is a drastic measure that will wipe out your entire account, including any other Google services you use with it like Gmail. However, if you’re someone who uses their Google account solely for photo backups and cloud storage, this might be a viable shortcut to total deletion.
Formerly News Editor at Stuff, Chris now writes about tech from his tropical office. Sidetracked by sustainable stuff, he’s also keen on cameras, classic cars and any gear that gets better with age.
