How to control Mac notifications on macOS Big Sur
To see or not to see?

Notifications, regardless of the device, are a useful tool to keep you updated throughout the day. However, not every notification is important or even worth seeing. On macOS Big Sur, you can receive, pause, or stop notifications on Mac to match your preferences and maximize their effectiveness.
Most apps on your computer use the built-in notification system on macOS to let you know about events, updates, or changes. These alerts appear briefly at the top right of the device or stay there until they're closed, depending on the settings.
You can set Mac notifications for individual apps or activate 'Do Not Disturb' to temporarily stop all alerts. You can also change how notifications are viewed and adjust other settings.
- Complete your home setup with the best monitor for MacBook Pros
- Here's how to fix a Mac that won't start
- Check out all the latest cheap MacBook deals

1. Setting up Mac notifications
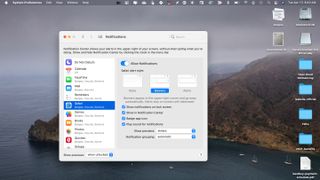
Mac apps that support notifications do so by default, although individual settings may differ. To review and adjust notification settings, click 'System Preferences' on the dock, then choose 'Notifications'.
Using the 'Do Not Disturb' setting on the left, you can determine when Mac notifications are silenced. Options (you can have more than one) include a range of times (for example, during the nighttime hours), when the display sleeps, when the screen is locked, and when you're mirroring the Mac to TVs and projectors.
During 'Do Not Disturb' periods, you won't see or hear notifications when they arrive. Instead, they’re collected in Notification Center, where you can view them later.
The rest of the 'Notifications' page is where you set alert settings for individual apps. You can turn notifications on/off and set the alert style ('None', 'Banners', or 'Alerts'). You can set whether to show these alerts on the lock screen or Notification Center. Whether to show a badge app icon or to play a sound for Mac notifications are two additional options. You can also decide how long to show previews and whether to group notifications.
Get daily insight, inspiration and deals in your inbox
Sign up for breaking news, reviews, opinion, top tech deals, and more.
You can show previews 'always', 'when unlocked' (the default), or 'never'. Choices for notification grouping are 'automatic', 'by app', or 'off'.
About those settings
Adjusting notification settings for individual apps on your Mac is a mundane process. And yet, once it's done, the Mac notifications you do receive will be much more useful and better match your needs.
In the Notification settings, start by toggling off notifications for apps you don't wish to receive alerts. From there, go into the ones you do want notifications for and make adjustments.

2. Using Notification Center to see Mac notifications
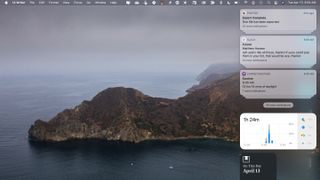
Updated for macOS Big Sur, the Mac Notification Center is where you'll find incoming alerts for apps and services. Click on the clock at the top right side of the menu bar to bring up Notification Center.
You can view Mac notifications in different ways depending on the type of alert and your settings. Notifications are sorted by the date and time they were received, with the newest alerts at the top. When you have more than one notification for an individual app, you'll see a stack. To expand a stack and see all the notifications for an app, click anywhere on the top notification. To collapse the stack, click 'Show less'.
Some notifications require that you take action. For example, an email alert gives you the opportunity to reply directly from the Notification Center. Other alerts have a down or side arrow. When the arrow is clicked, you'll see more information about the alert.
You can adjust an app's notification settings by right-clicking on a notification or the top alert of a stack. When selecting 'Deliver Quietly', future Mac notifications for that app won't show in the upper-right corner of the screen or on the Lock Screen. You also won't hear a sound as alerts arrive. Click 'Turn Off', and you will no longer receive notifications for that app.
To close notifications on Notification Center, click the "x" at the top left of each alert, then click the 'Clear' or 'Clear All' button.
Bryan M. Wolfe is a staff writer at TechRadar, iMore, and wherever Future can use him. Though his passion is Apple-based products, he doesn't have a problem using Windows and Android. Bryan's a single father of a 15-year-old daughter and a puppy, Isabelle. Thanks for reading!
Most Popular


