Browse and view photos in Photos on Mac
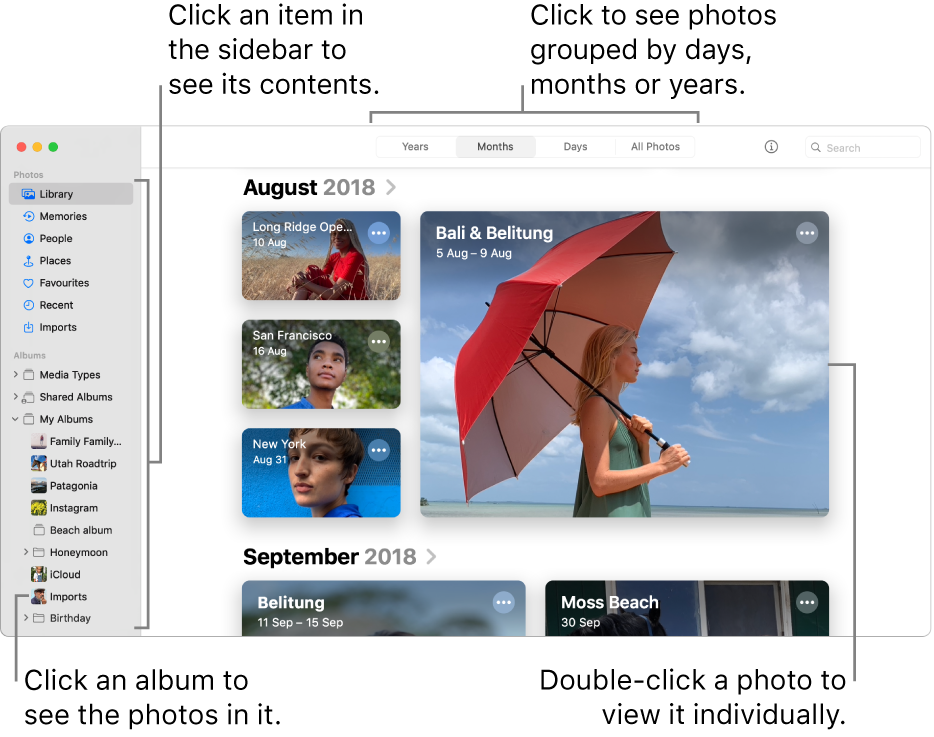
Photos uses Days, Months and Years views to organise your photos and videos by time and location. When displaying photos, Photos automatically hides similar photos and reduces clutter by removing items such as screenshots and receipts so you can focus on your best shots. Click Days to see photos and videos taken on the same day. Click Months to see photos and videos grouped by month and day. Click Years to quickly access photos taken in the same year. You can also view photos individually to see more detail, switch to a full screen view, and hide the photos you don’t want to work with.

Ask Siri. Say something like: “Open Photos.” Learn how to ask Siri.
Browse photos by day, month or year
In the Photos app
 on your Mac, click Library in the sidebar, then click Days, Months or Years in the toolbar.
Double-click a day, month or year to see the photos in it.
On a trackpad, you can pinch open or closed on the day, month or year to change views.

Do any of the following:
Scroll up or down in a view: Press the Up Arrow or Down Arrow key. On a trackpad, swipe up or down with two fingers.
Change the size of thumbnails: Drag the Zoom slider or pinch in or out on the trackpad.
Play a movie or show a map of the photos in a day or month: Click
 and choose Play Movie or Show Map.
View individual photos
In the Photos app
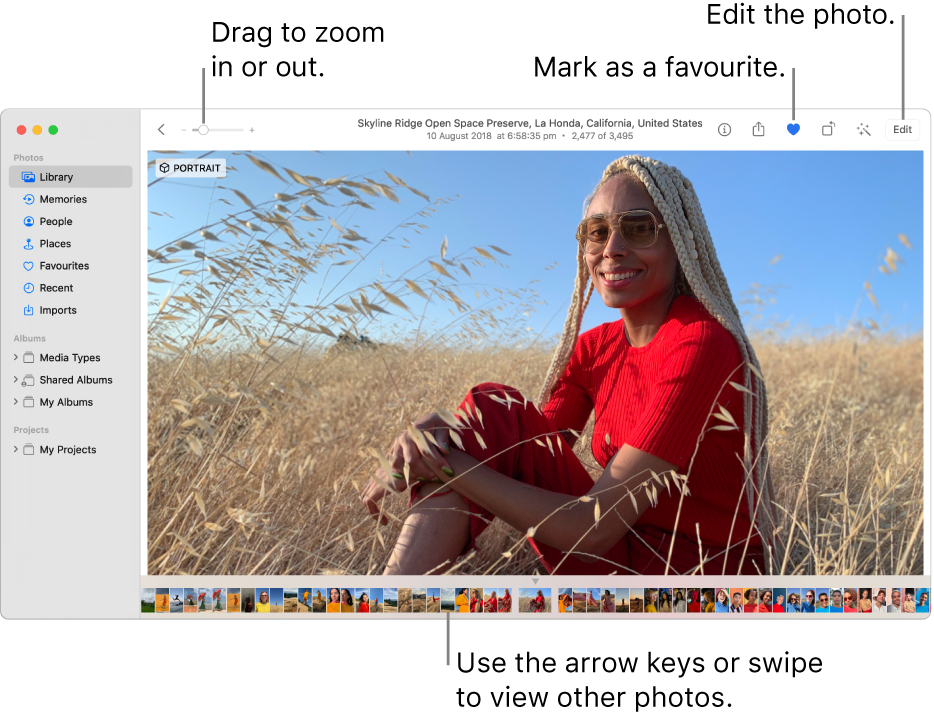
 on your Mac, double-click a thumbnail in an album or in Days view to see an enlarged view of it.
Tip: To quickly open or close a selected thumbnail, press the Space bar.

Do any of the following:
Zoom in or out on a photo: Drag the Zoom slider or pinch open or closed on the trackpad. You can drag the zoomed image to reposition it.

View information associated with a photo: Click the Info button
 in the toolbar. See Add titles, captions and more to photos using Photos on Mac.
Make a photo a favourite: Click the Favourite button
 in the toolbar. The photo appears in the Favourites album.
View a photo’s location on a map: Scroll down to Places. (You can scroll by using the mouse or swiping the trackpad even if scroll bars don’t appear.) Click Nearby Photos to see other photos from nearby locations. See View photos by location.
View moments (in Photos view) Scroll down to People to see the people identified in the photo. Double-click a person’s face to see other photos of that person. See Find and identify photos of people.
View related photos: Scroll down to Related to see similar photos from different times at that location. Double-click the group of related photos to see them. (Some photos may not have related photos.)
Show thumbnails of other photos below a photo viewed individually: Choose View > Show Thumbnails. Swipe left or right to scroll through thumbnails or press the arrow keys. Drag the edge of the thumbnail bar up or down to change the size of thumbnails.
Play Live Photos
With some models of iPhone, you can shoot Live Photos, which capture a still image and the moments just before and after the image.
Do any of the following:
Position the pointer over a Live Photo thumbnail.
Double-click a Live Photo thumbnail to view it individually, then press Option-Space bar or position the pointer over the Live Photo badge.
If you double-click a Live Photo that is set to Loop, Bounce or Long Exposure, the Live Photo plays immediately.
If you have a Force Touch trackpad, force click the Live Photo.
For information about editing a Live Photo or converting it to a still image, see Edit a Live Photo.
View photos full screen
In the Photos app
 on your Mac, choose View > Enter Full Screen.
In full screen view, do any of the following:
Scroll through photos: Press the arrow keys.
View thumbnails: Position the pointer at the top of the window to display the menu bar, then choose View > Show Thumbnails.
Show the toolbar and the sidebar: Position the pointer at the top of the window to display the menu bar, then choose View > Always Show Toolbar and Sidebar in Full Screen, so there’s a tick next to it.
Leave full screen view: Position the pointer at the top of the screen until the menu bar appears, then choose View > Exit Full Screen or press the Escape key.
Hide photos from view
You can hide selected photos and show them only when you want to work with them.
In the Photos app
 on your Mac, click Library in the sidebar.
Select the photo or photos, choose Image > Hide [number] Photos, then click Hide.
The selected photos disappear from view but are not deleted.
To show hidden photos, choose View > Show Hidden Photo Album. The Hidden album appears in the sidebar. To unhide photos in it, select them, then choose Image > Unhide [number] Photos.
Tip: You can use keyboard shortcuts to quickly do many common tasks in Photos. See Keyboard shortcuts and gestures in Photos on Mac. If your Mac has a Touch Bar, you can use it to view photos, make edits, and more. See Use the Touch Bar.