
A website serves as a storefront for most businesses to showcase their products and services. Your business can only reach its full potential and a wider audience with a website. Therefore, creating a website is important for increasing your brand’s awareness, helping potential customers interact with your business, generating leads, and boosting revenue.
Despite these benefits, many people still find creating their first website challenging due to a lack of coding skills, budget constraints for hiring a web developer, and the time needed to build a website. However, building a website is now easier, thanks to the advent of cost-effective and user-friendly web development platforms and tools. In fact, you can make a professional website in just one hour.
This comprehensive guide explores how to make a website using a website builder and Hosting + WordPress, with the pros and cons clearly highlighted. Keep reading as we walk you through the website building process from start to publish using these two options.
Key Requirements for Creating Your Website
To make your first website, you need to meet a few prerequisites. Here are the 3 most important requirements for building a website:
Website Building Platform
Website building platforms enable you to create a website without needing manual coding skills. These platforms can be either content management systems (CMS) or website builders.
WordPress, for instance, is a content management system that allows you to create and manage a website effortlessly. It’s highly customizable with themes and plugins, making it a favorite choice for many users.
Another option is using website builders. Website builders are tools or platforms that simplify the website creation process. Popular examples include Wix, Squarespace, Weebly, Webflow, and Shopify.
To use a website builder, you simply choose a template, customize it by adding your content and images, and then publish your site. The intuitive drag-and-drop interfaces make it easy for anyone to build a professional-looking website quickly.
Web Hosting Provider
Web hosting is a service that makes your website accessible to customers online. Hosting providers rent out a portion of their physical servers, allowing you to store your site files and data.
In addition to storage space, most hosting providers manage your website’s security and performance. They allow you to host your site in a data center close to your audience, ensuring fast loading times, more conversions, and better SEO performance.
Choosing the right hosting type and plan to suit your site’s needs is also important. For example, a web hosting provider like Hostinger offers everything you need to create a website, including a free website builder and a free domain. That’s why Hostinger is our top choice for the best web hosting service.
Domain Name
A domain name is where your website points at (address), like Gizmodo.com, that users type into their browser to access your site. It’s a crucial part of your branding strategy, building brand recognition and credibility.
Choosing a good domain name makes your site address memorable and easy to find, which is essential for attracting and retaining visitors. You can buy a domain name from registrars like GoDaddy or Namecheap or from your chosen hosting provider.
We’ve found that most web hosting providers, like Hostinger and SiteGround, offer a free domain name with many of their plans. This can be a cost-effective way to get your website up and running.
There are various top-level domains (TLDs) to choose from, each serving different purposes. For example, .com is best for commercial businesses and is the most used TLD, while .org is ideal for non-profit organizations and projects.
We recommend carefully choosing both the hosting platform for your site and the type of website building platform. A website builder like Wix is one of the top options to consider, allowing you to build a website for free or with the help of AI.
Using A Website Builder to Make A Website
In this section, we will explain how you can use a website builder to create a site without worrying about manual code editing. Let’s review the steps required to build a site in under one hour.
1. Choosing the Right Website Builder
When starting your website, the first step is to choose the right website builder. From our experience, a good website builder should offer customizable templates, an intuitive and user-friendly editor, and a variety of features to suit your needs.
Another key feature to look out for is AI integrations, which have significantly accelerated the website creation process. For example, a leading website builder like Wix offers built-in AI tools that help create SEO-friendly content, templates, layouts, images, and sections and refine key elements of your site.
Wix’s drag-and-drop editor is incredibly intuitive, making it easy for anyone to create a professional-looking website without coding skills.
Some of the reasons why we highly recommend Wix as the best website builder for making a website from scratch in less than 1 hour include:
- Free website builder option
- Pre-designed templates tailored to various industries
- AI tools
- User-friendly editor
- SEO tools to optimize your site
- 1000s of built-in design features
- Free web hosting with 99.9% uptime
Now that we’ve chosen Wix as our example for building a website, let’s explore the next steps you need to take.
If you want to learn more about its strengths and weaknesses, we recommend reading our comprehensive review of Wix.
2. Select and Customize a Template
Knowing how to design a website can be challenging at the beginning. That’s where website templates come in handy.
A template is a pre-designed layout structure that helps you quickly create your website. It determines the look and feel of your site, so it’s important to choose a customizable template that fits your brand and industry.
Wix offers over 900 templates, each carefully researched and tailored for various industries. You can browse this extensive collection and customize any template to perfectly reflect your brand’s identity.
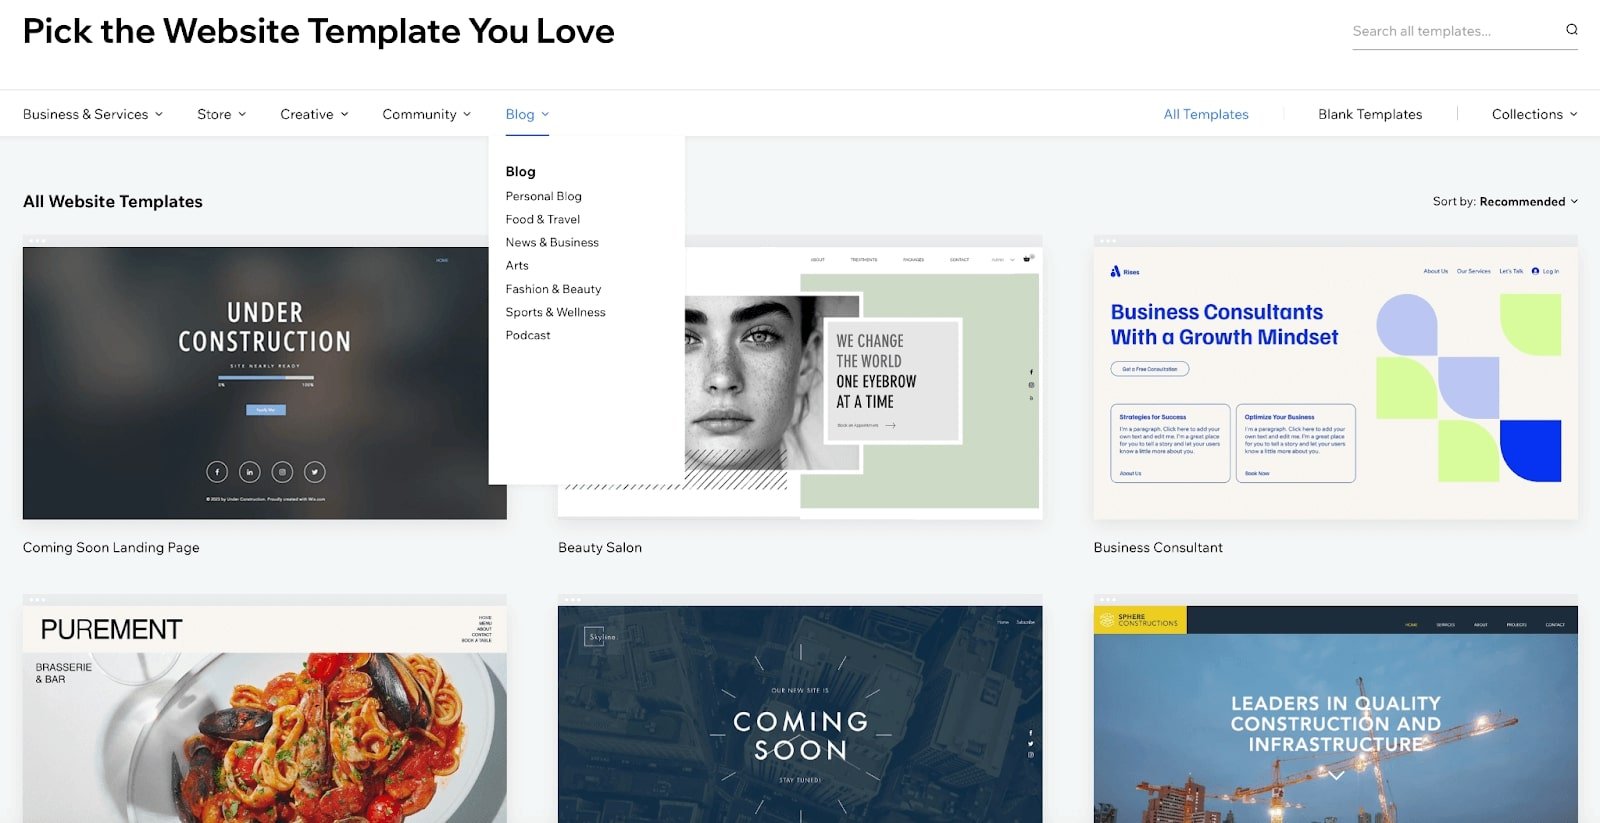
Alternatively, you can use AI website builders to generate a template for your site, offering a new and innovative way to create websites. Based on our experience, the Wix AI website builder can transform your business idea into a custom site.
It allows you to interact with an AI website creator by responding to prompts, which are then used to create a tailored site profile. Here is how you can create a site design for your website in less than 1hr using Wix artificial intelligence creator:
1. Go to the Wix website and click on Create with AI.

2. Sign up or log in to your Wix account to continue.

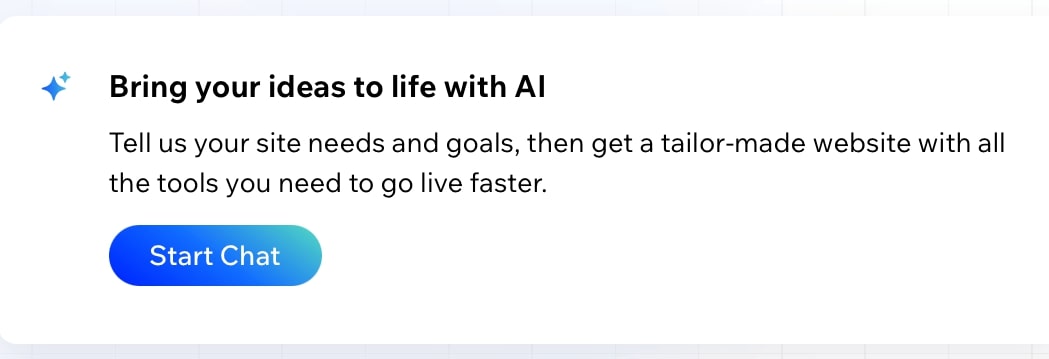
3. Click on Start Chat to begin the onboarding process.
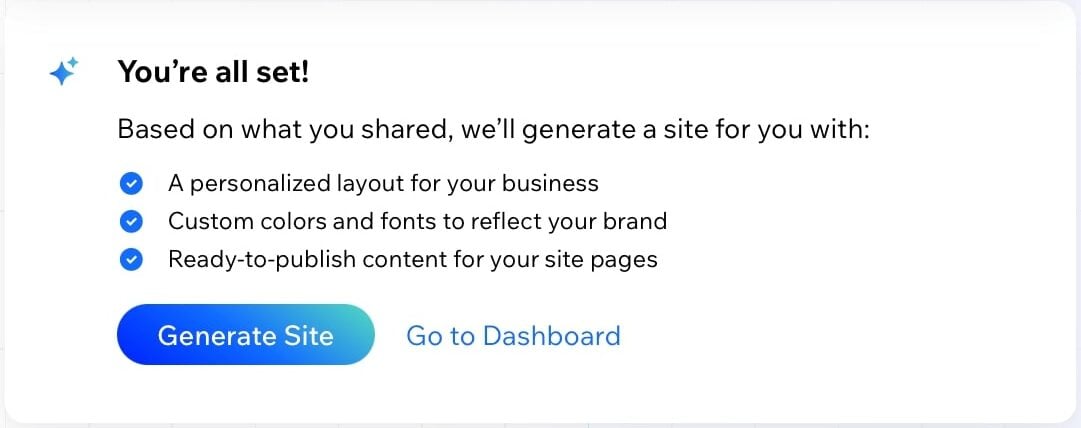
4. Click on Generate Site after the chat has ended.
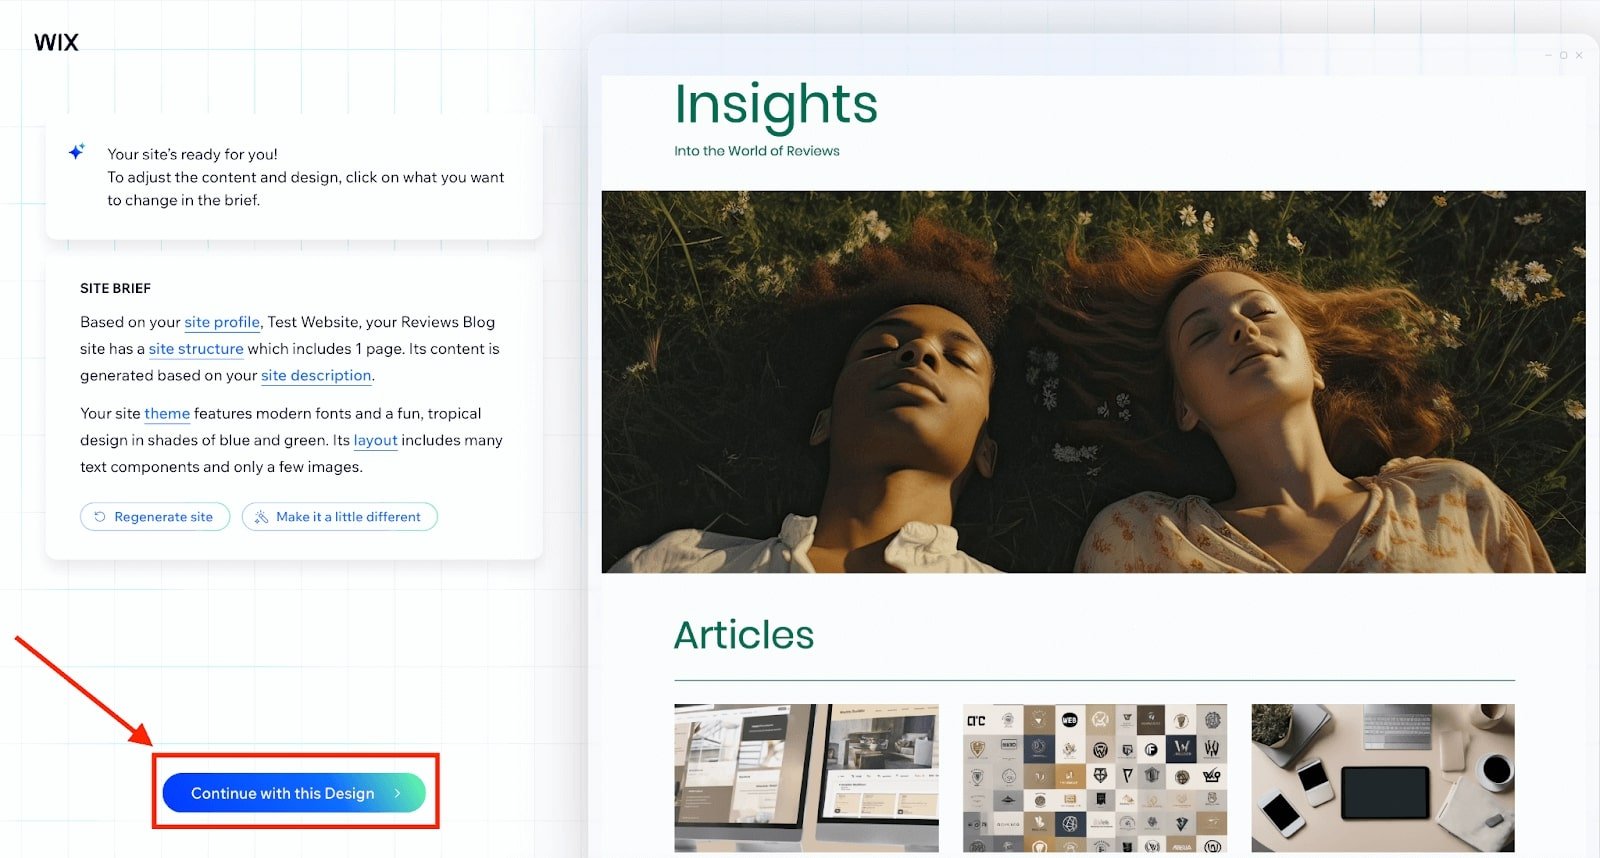
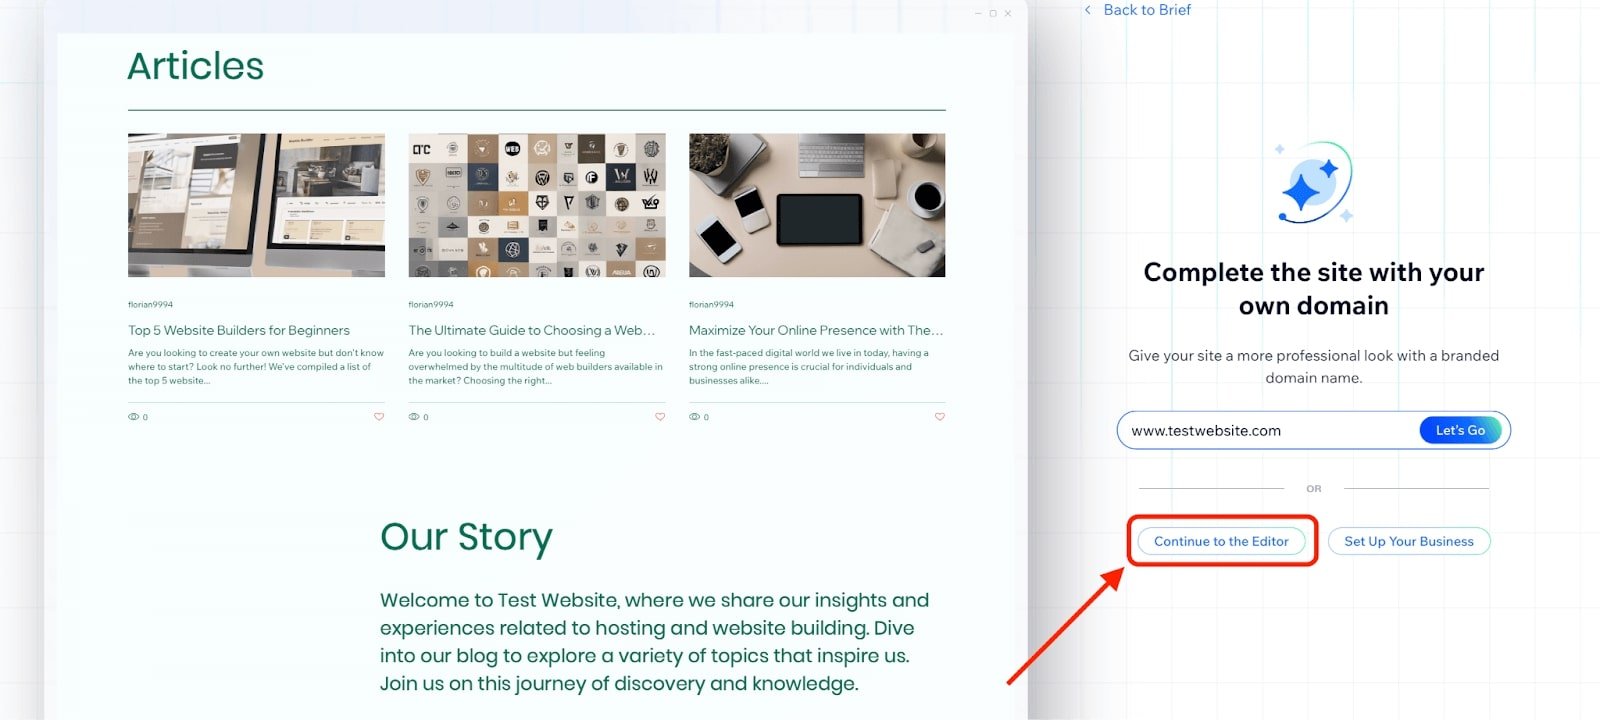
5. Wix AI provides a site brief and generates a template. You can further customize your site design by editing the site brief, clicking on Regenerate Site, or selecting Make it a little different. Once you are satisfied with the look of your generated site, click Continue with this design to proceed.
6. If you are not satisfied with the AI-generated design, the next step is to Continue to the Editor to customize your template to reflect your brand.
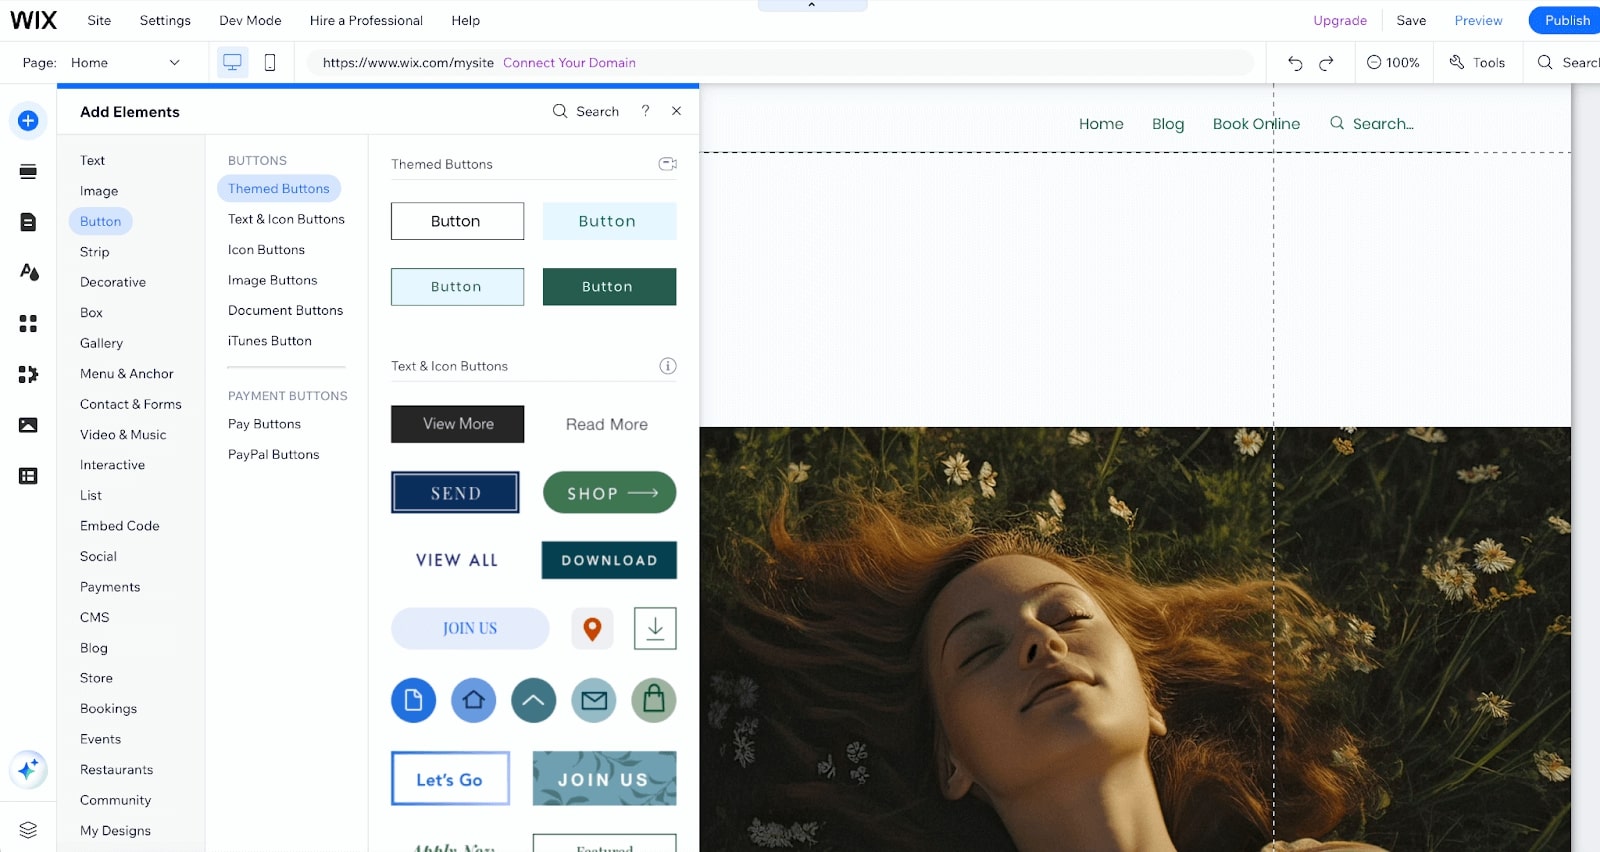
7. In the Wix site editor, you can enhance your AI-generated site template by adding new elements. Simply click on the element of your choice, then drag and drop it using the toolbar to move it up and down the page. To insert any element, click the ➕ sign on the left-hand panel and navigate to your preferred choice.
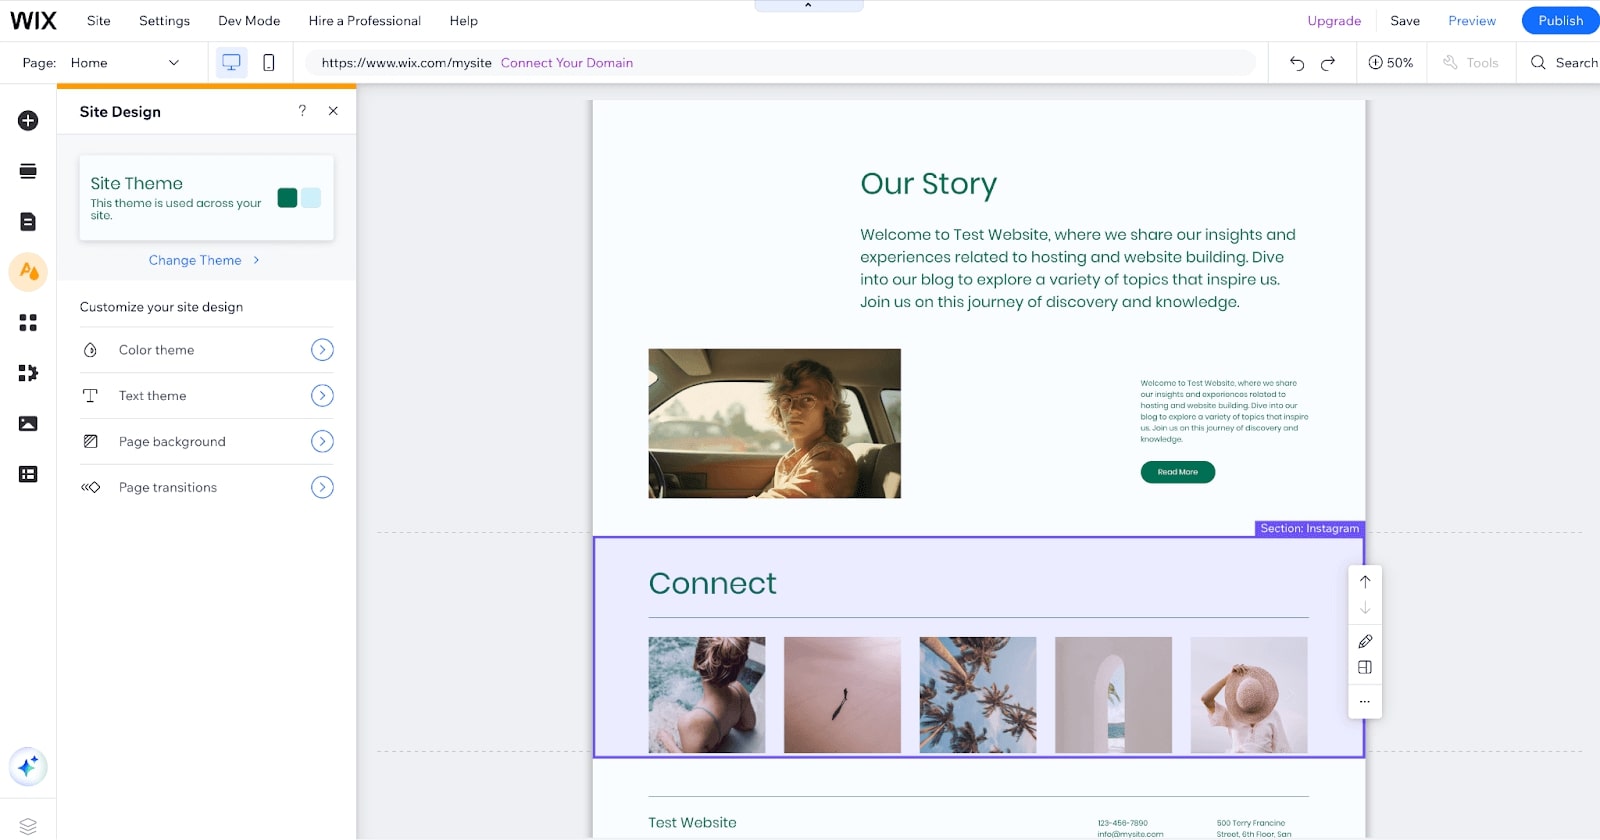
8. Change your site theme to customize your site design. Wix allows you to edit your color and text theme, page background, and transitions. You can also use AI to create images for unique backgrounds or generate a new theme.
3. Create New Sections, Site Pages and Menu
Another advantage of using website builders to create a site from scratch is the ability to add new sections, pages, and menus with just one click. The generated AI site design includes relevant pages tailored to your type of site based on your input during the onboarding process.
To further customize your site, you can create new pages about yourself, services, projects, contact information, landing pages, or blank pages to add your content. Here is how to make a new section, page, or menu for your site:
1. To add a new section, click the second icon on the left-hand panel. You can let AI do the work for you or choose one of the already customized sections. To add the chosen section from the available options, drag and drop it where you want on the page.
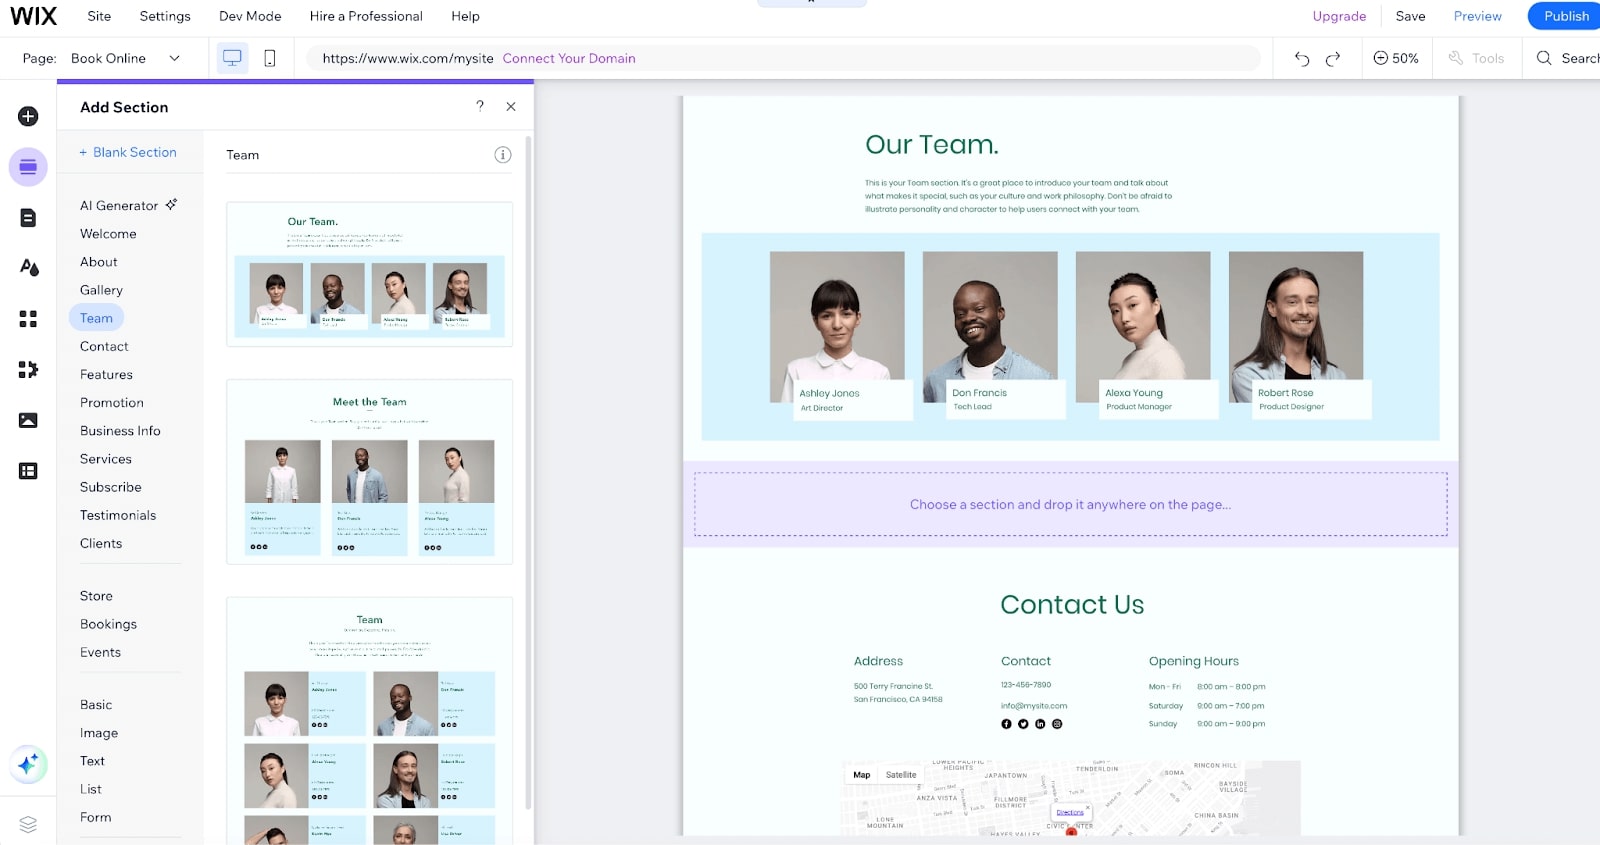
2. One of the reasons we love Wix is its AI section generator, which allows you to quickly add ready-to-use sections with text and images to any page on your site. Simply use the form to choose the section type, describe what the text should include, and click Generate Section.
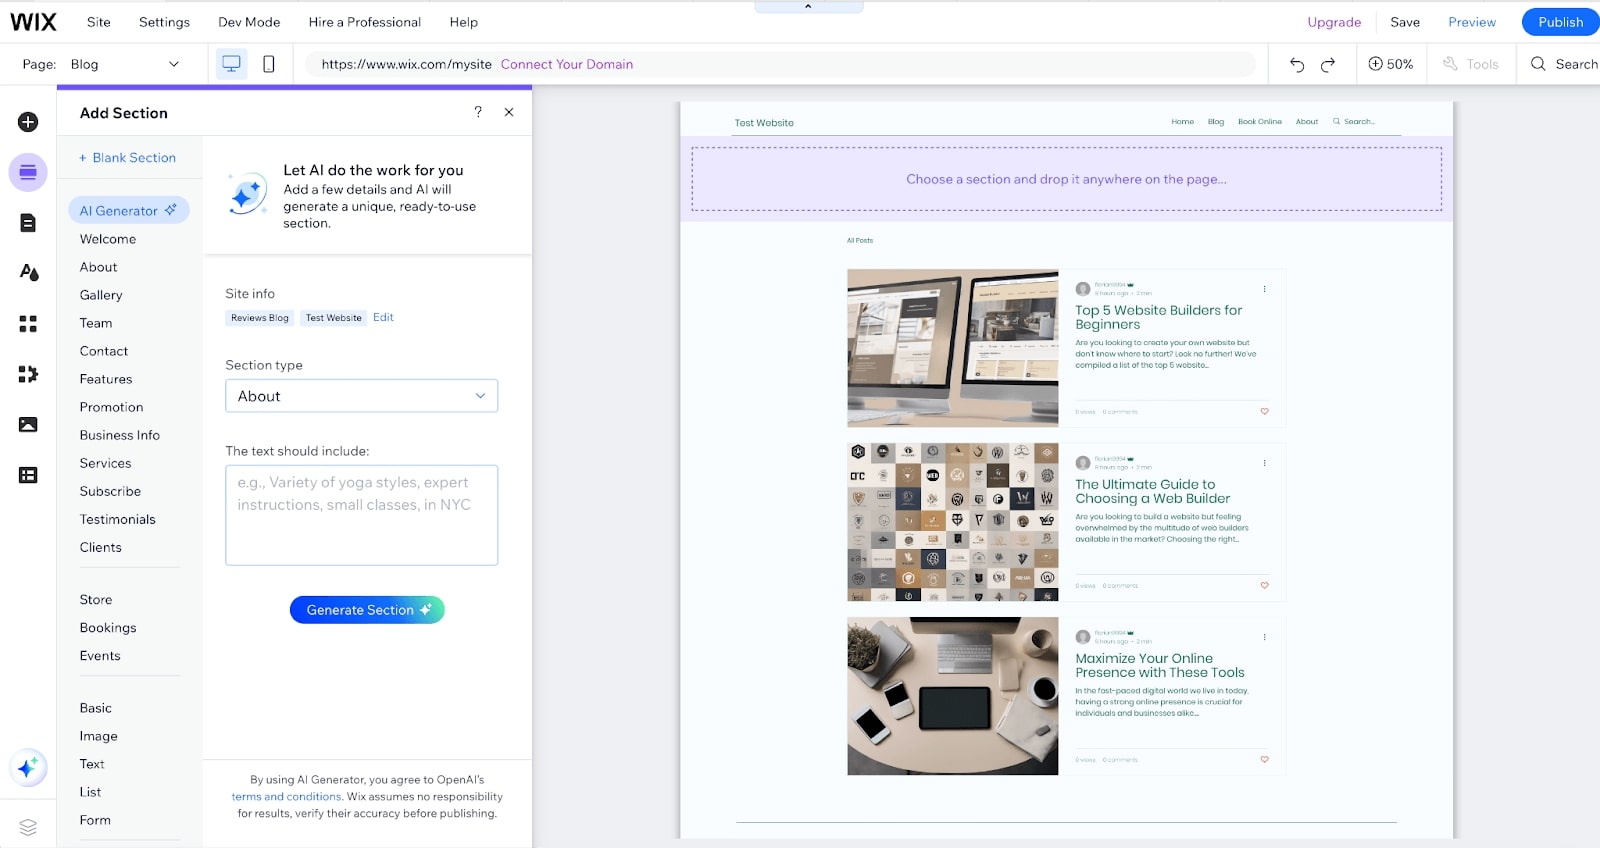
3. AI will write your text, design your images, and create a layout. You can then choose your favorite from the generated sections and add it to your site page.
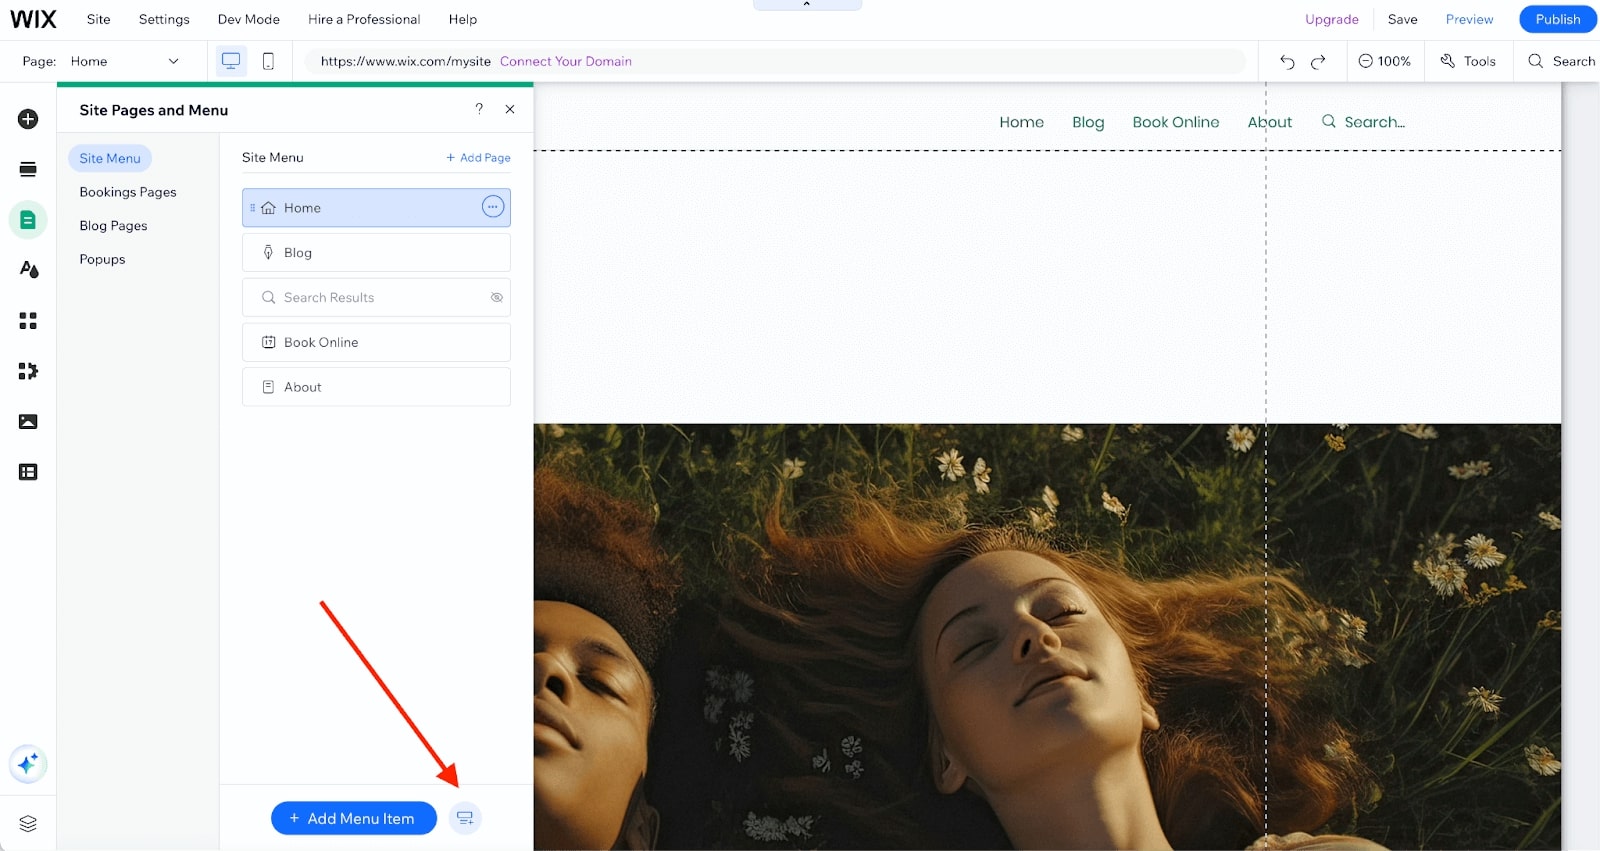
4. To create new site pages, navigate to and click on Add a Page. A pop-up window will appear, displaying a list of ready-to-use page templates you can add or preview.

5. The new page is automatically added to your site menu. You can also create a dropdown submenu with subpages by clicking on the icon indicated by the red arrow below.
When adding new sections and pages to a template design or AI-generated design, ensure consistency in design elements, such as colors, and styles, to maintain a cohesive brand identity throughout the website. For example, a landing page must tell the brand story and establish communication with the visitors.
We recommend making your website navigation intuitive and user-friendly with a logical menu structure. Content should be relevant, clear, and valuable to the audience, while visuals must be high-quality and properly aligned. Finally, adding only important pages and sections is important to ensure users understand the necessary information.
4. Enhance Your Website’s Functionality
After setting up your pages, you can integrate essential features to enhance your website. In addition to providing valuable information, many websites include functionalities like contact forms to convert visitors into customers.
Wix forms and payments, for example, allow you to create customizable forms to collect the information you need to capture leads and grow your business. With eCommerce functionalities like Wix Store, you can offer a seamless shopping experience for customers who prefer to buy online. Another fantastic feature to consider is the Wix blog, which lets you share your expertise by creating stunning blog content.
Here is how to add site or standalone forms to your website using Wix website builder:
1. To integrate a site form on your website, click on Add Elements + from the left-hand panel of the editor.
2. Navigate to Contact and Forms
3. Choose Create New Form if you prefer to add a form from scratch
4. Select Add Existing Form to use or edit an already saved form on your site
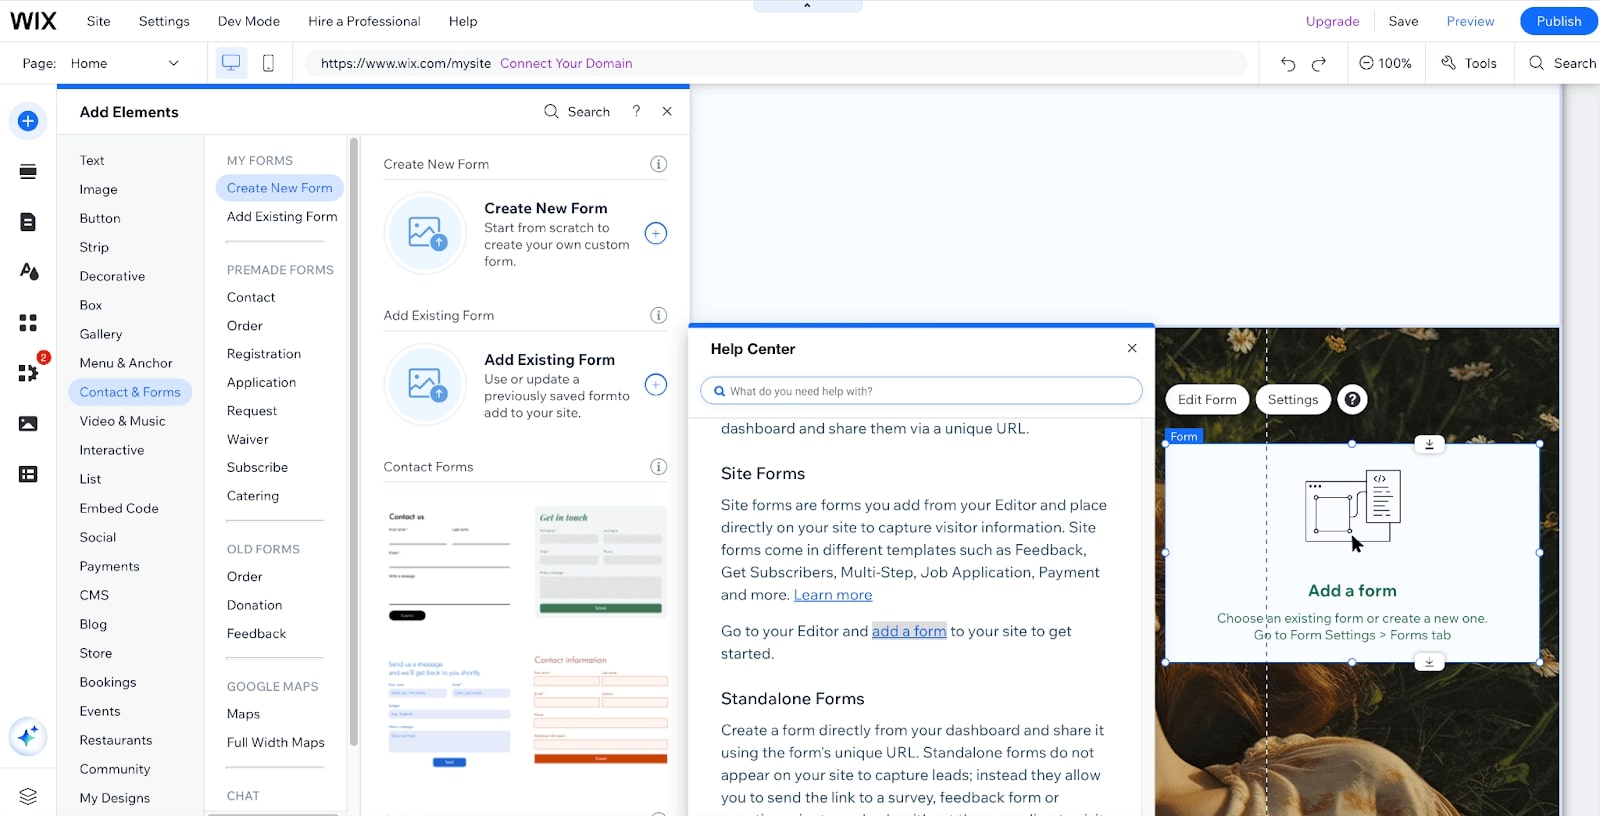
5. Add your form fields by clicking on the form in the Editor. Then click Edit form to open the form builder. You can drag and drop contact fields to create your form.
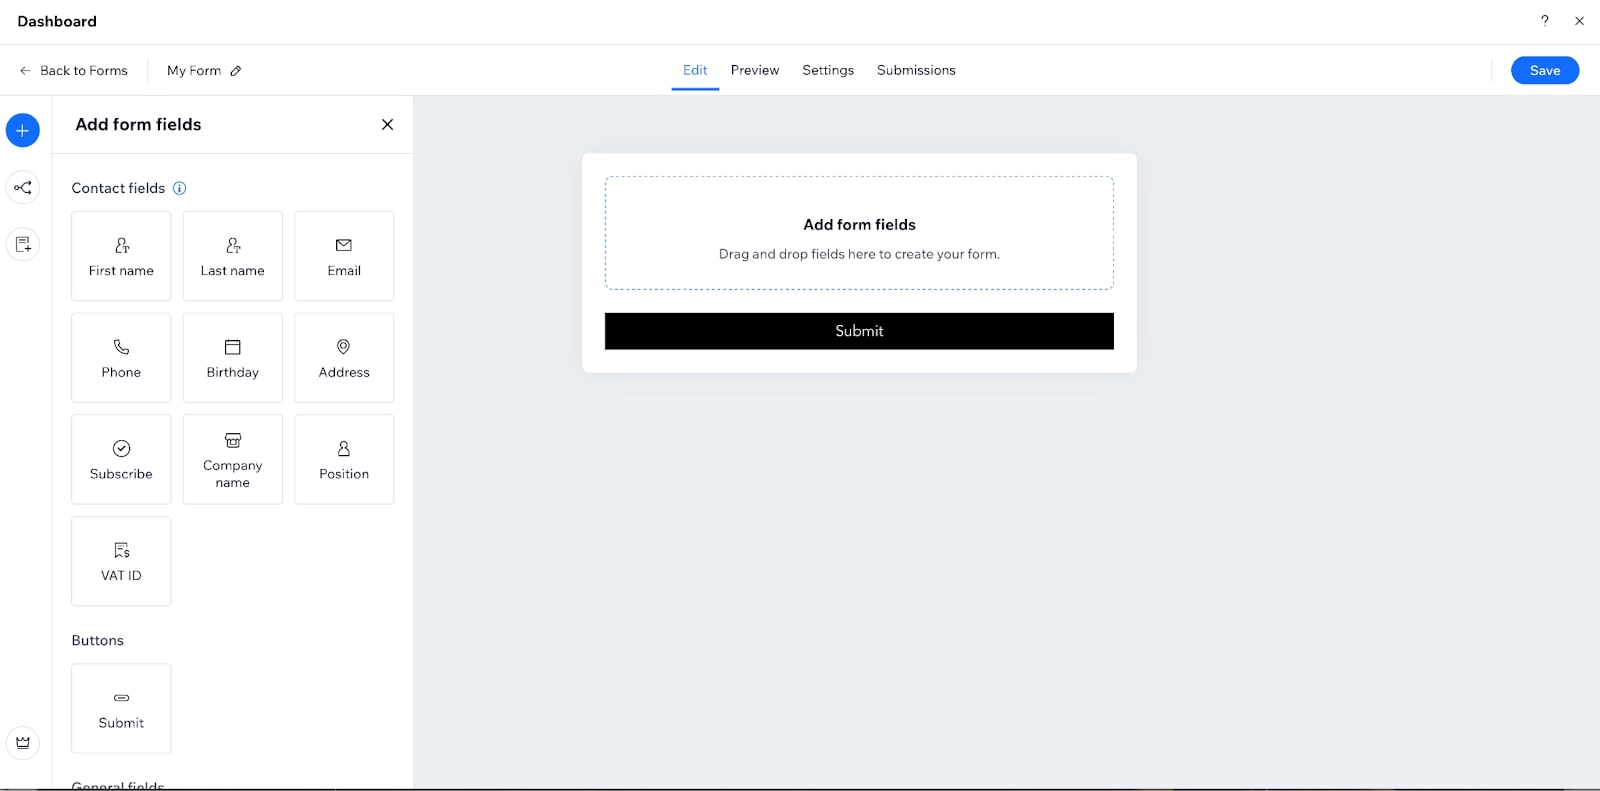
6. Click on the Edit icon at the top left, follow the instructions to adjust your form settings, and then save.
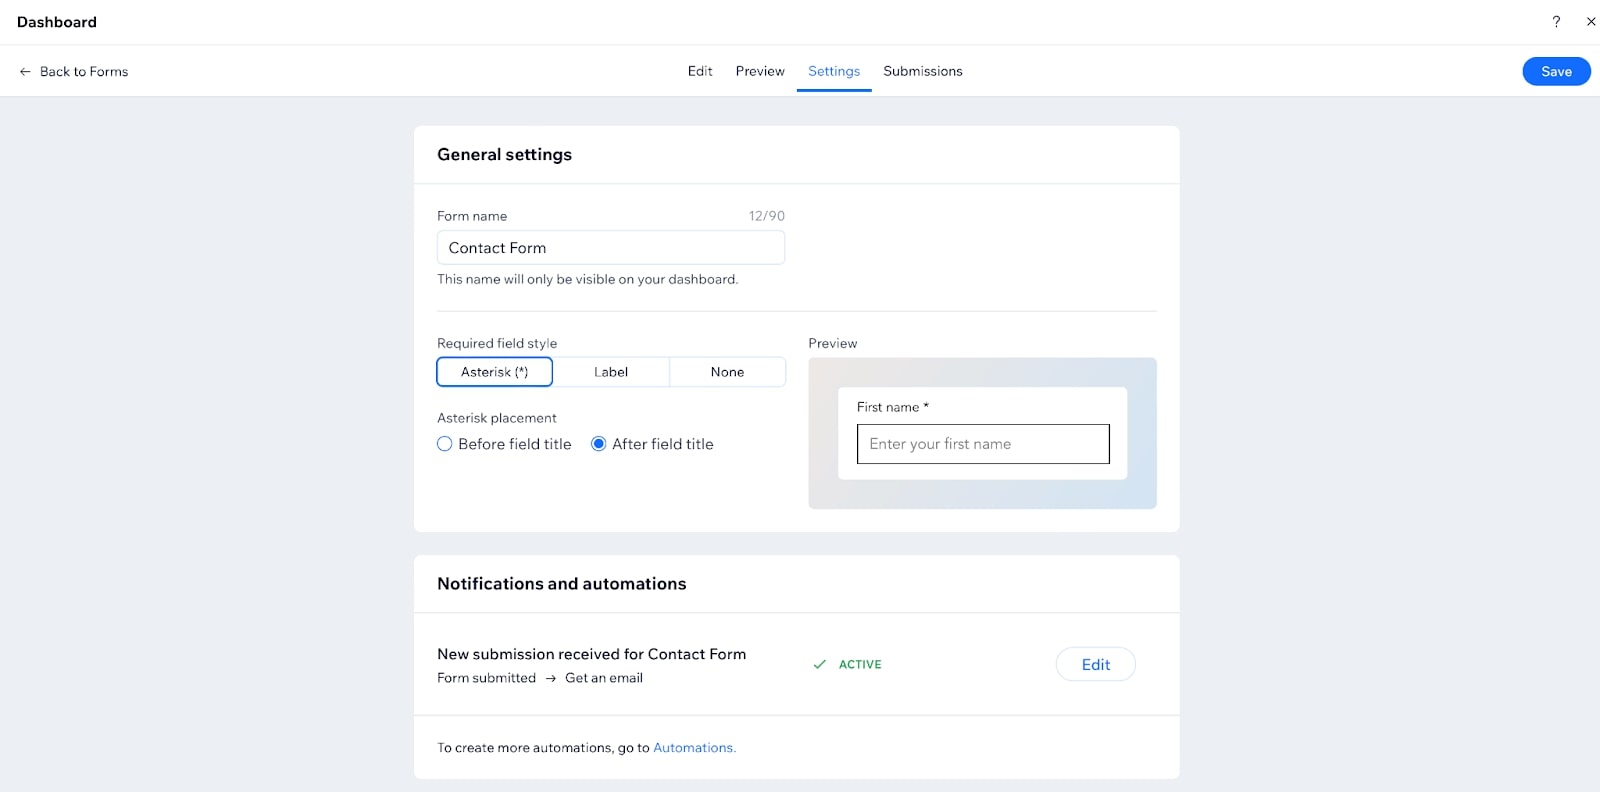
7. To save time, we recommend that you drag and drop Premade forms, Old forms, Google Maps and Wix chat on your site.

Next, follow these steps to add a Wix store and integrate eCommerce functionalities into your site:
1. Go to Add Elements on the left side panel
2. Click on Store from the list of elements
3. Select Add to Site to set up an online store
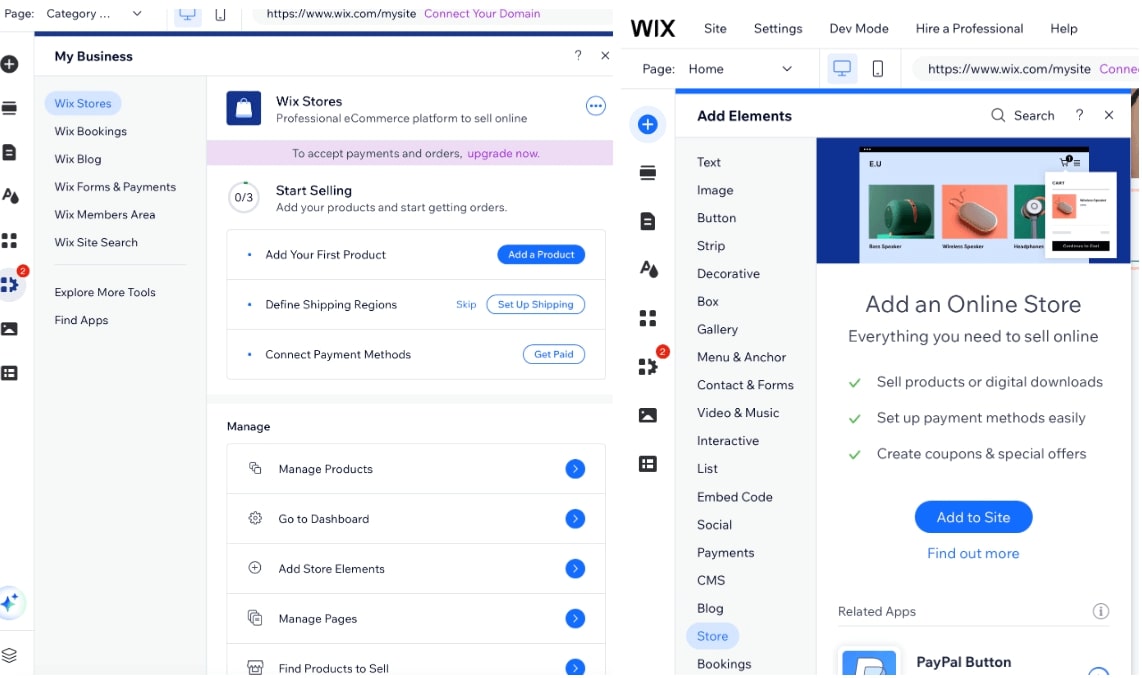
4. Go to My Business, add your first product, set up shipping, and connect payment methods.
5. Go to Wix Dashboard to manage products and find products to sell
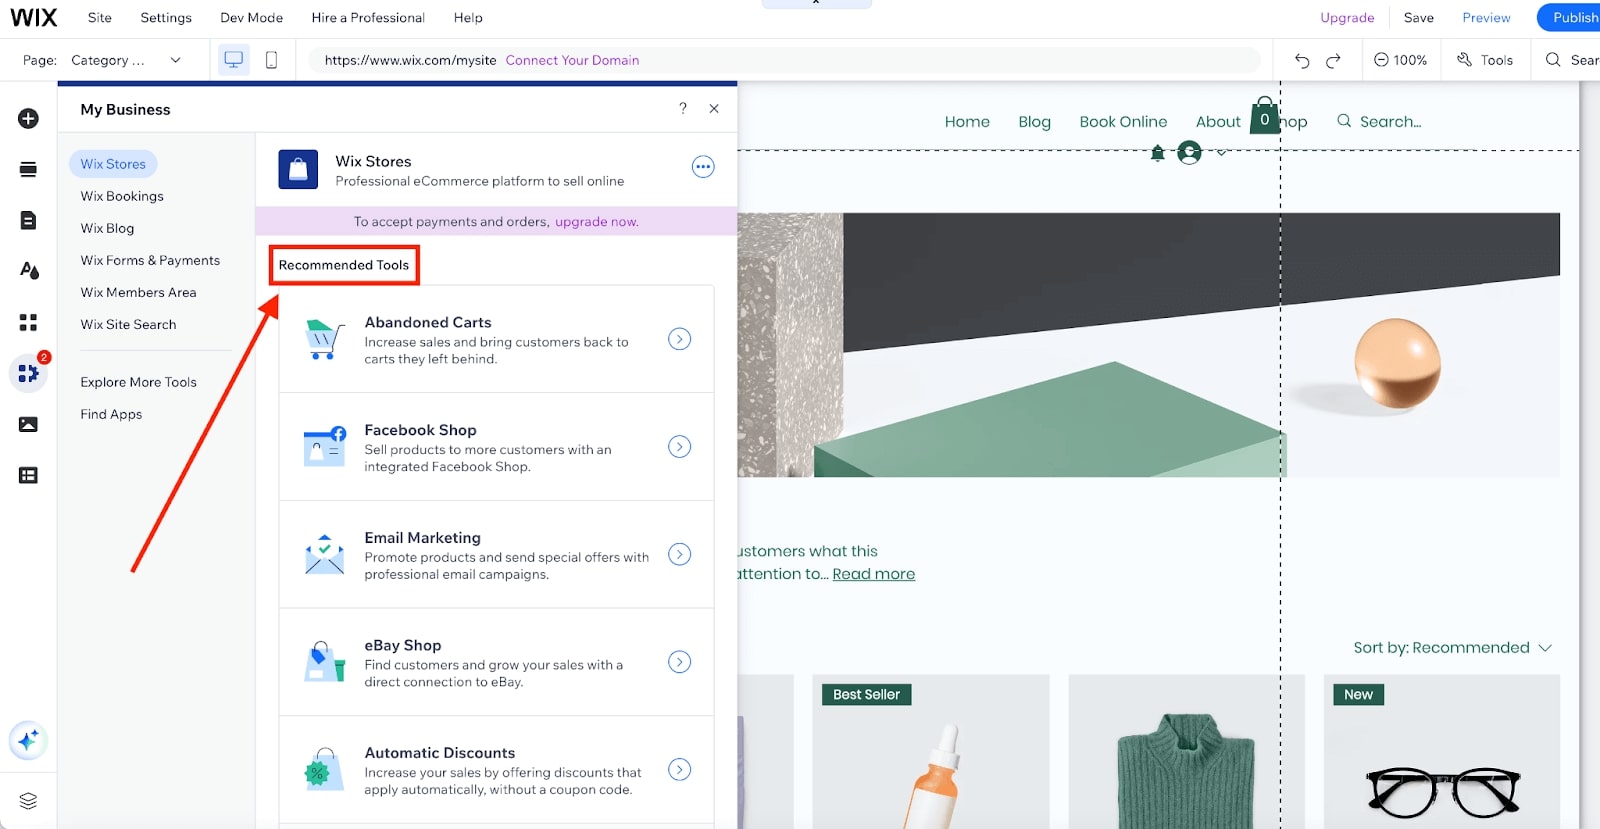
Wix also recommends several tools to enhance the functionality of your online store. One particularly useful tool is Email marketing, which allows you to promote your products and offers through email campaigns. You can also add Coupons to encourage customers to shop by providing promotional and one-time offers.
5. Use AI to Create Engaging Content
Now that your website pages are set up and enhanced with additional functionalities, it’s time to start populating your site with content.
You have learned how to add new elements, tools, and apps in the initial steps. The following steps will show you how to use Wix AI tools to generate engaging content for your site.
1. Click the star icon located at the bottom left of the website editor.
2. Select Create text for page to get new content on an entire page at once using AI.
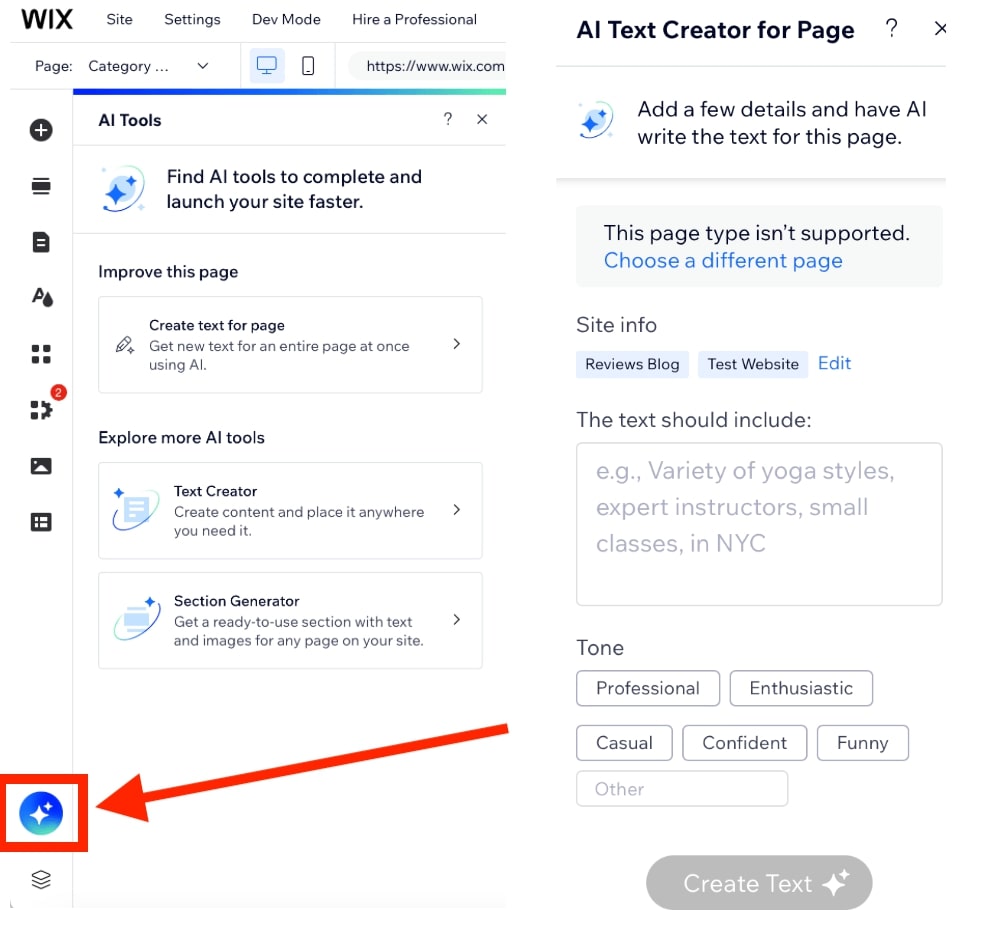
3. Drag and drop the AI Text Creator to generate content anywhere on the page. When you click on the Text Creator in the editor, a dialog box will appear where you can describe the type of text you want the AI to create.
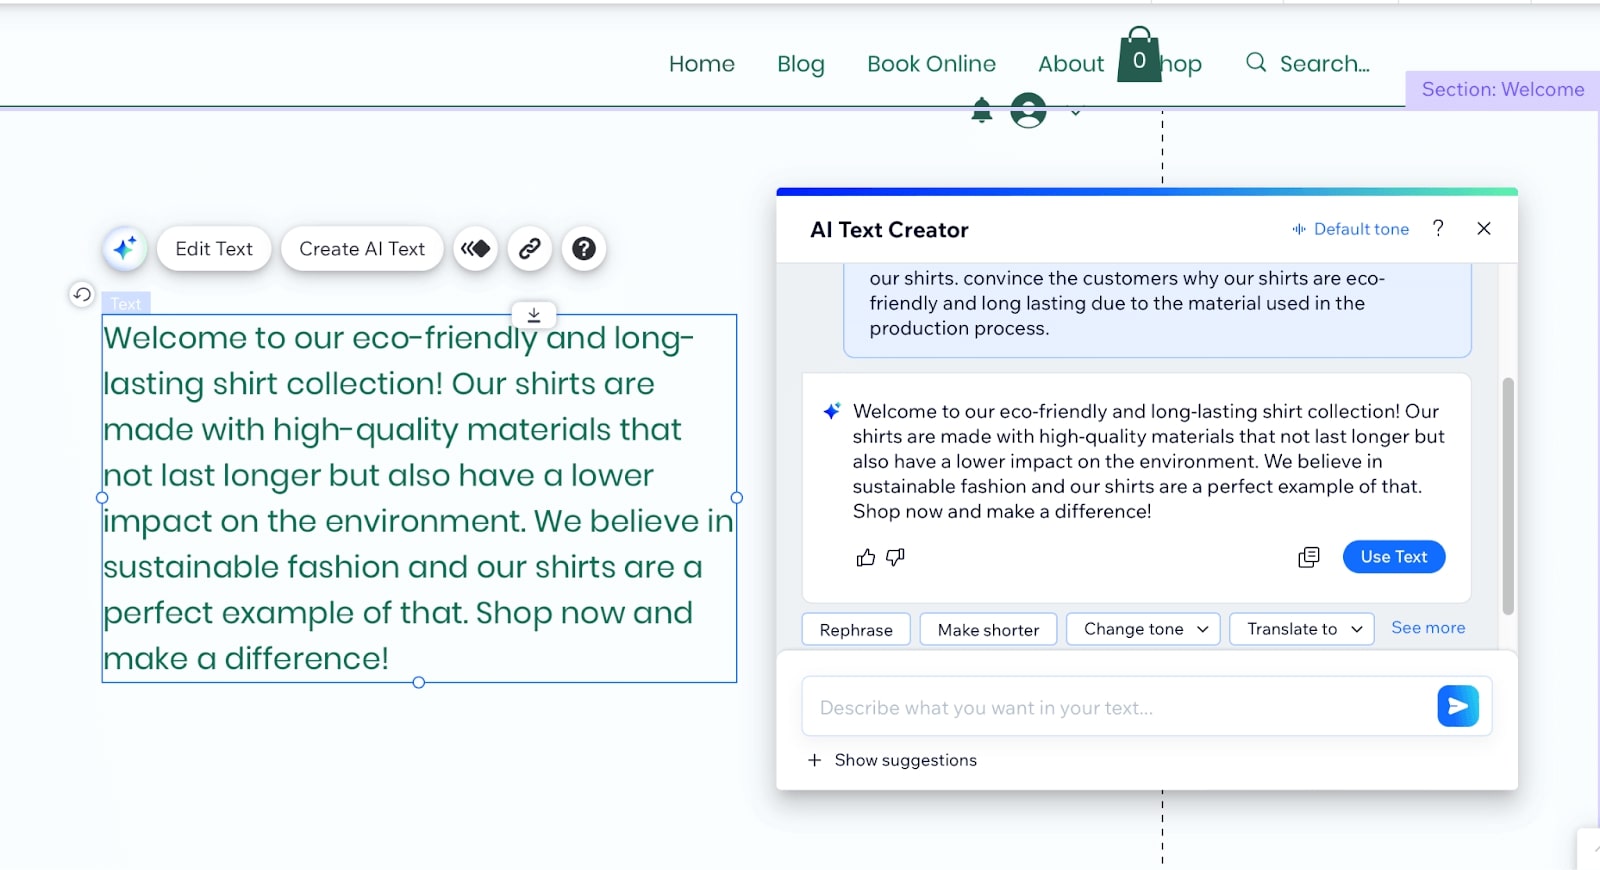
Note that we believe it is better to write your content yourself rather than using AI. That said, you are free to do what you want; it’s your website after all.
6. Optimize your Website for SEO
Your website will only reach potential customers if it is search engine optimized. Making your site from scratch with a website builder is incomplete without SEO, as it ensures your site appears in search results for your target keywords.
Even without spending money on ads, a well-optimized website will attract traffic and drive conversions if done correctly. For example, SEO has been a cost-effective way to grow our business reach and help more people find our site.
One important benefit of SEO is that it enhances your brand awareness. For instance, if you want to create a new website with a storefront for your business and don’t know where to start, you might type in ‘how to create an online store’ in a search engine like Google.

From the result above, Wix is on the first page for that keyword. This clearly shows that by popping up in search results for that term, Wix is an industry leader in website building. So, whatever product or service you are selling, you need to write people first content that adheres to Google’s E-E-A-T guidelines.
Nowadays, website builders have built-in SEO settings and optimization steps to enhance your site’s performance. You can also access real-time insights about your site’s performance in search results, which can be used to further improve your SEO.
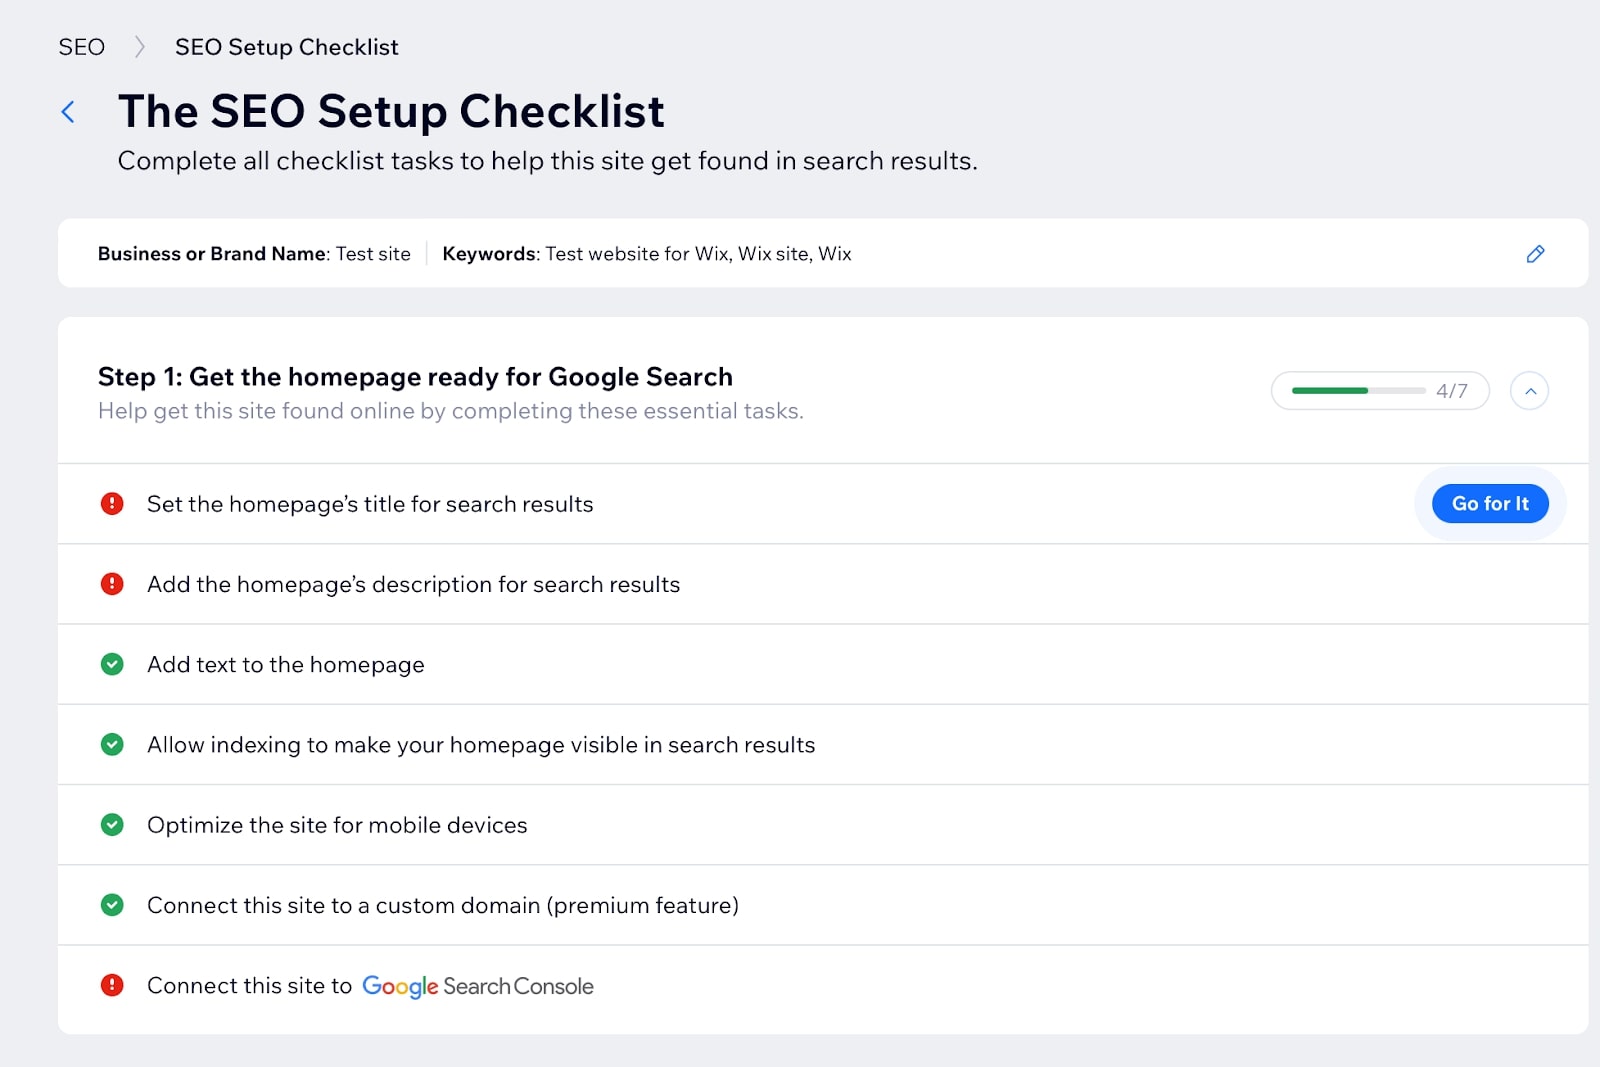
With Wix, you can follow a personalized SEO setup checklist to edit all your website’s SEO settings in one place.
Once you finish setting up your site, use the following Wix SEO tools and data to fine-tune your site:
1. From the Wix dashboard, click on SEO and explore the range of capabilities to optimize your reach even further.
2. Resolve issues and follow the optimization steps recommended by the SEO assistant.
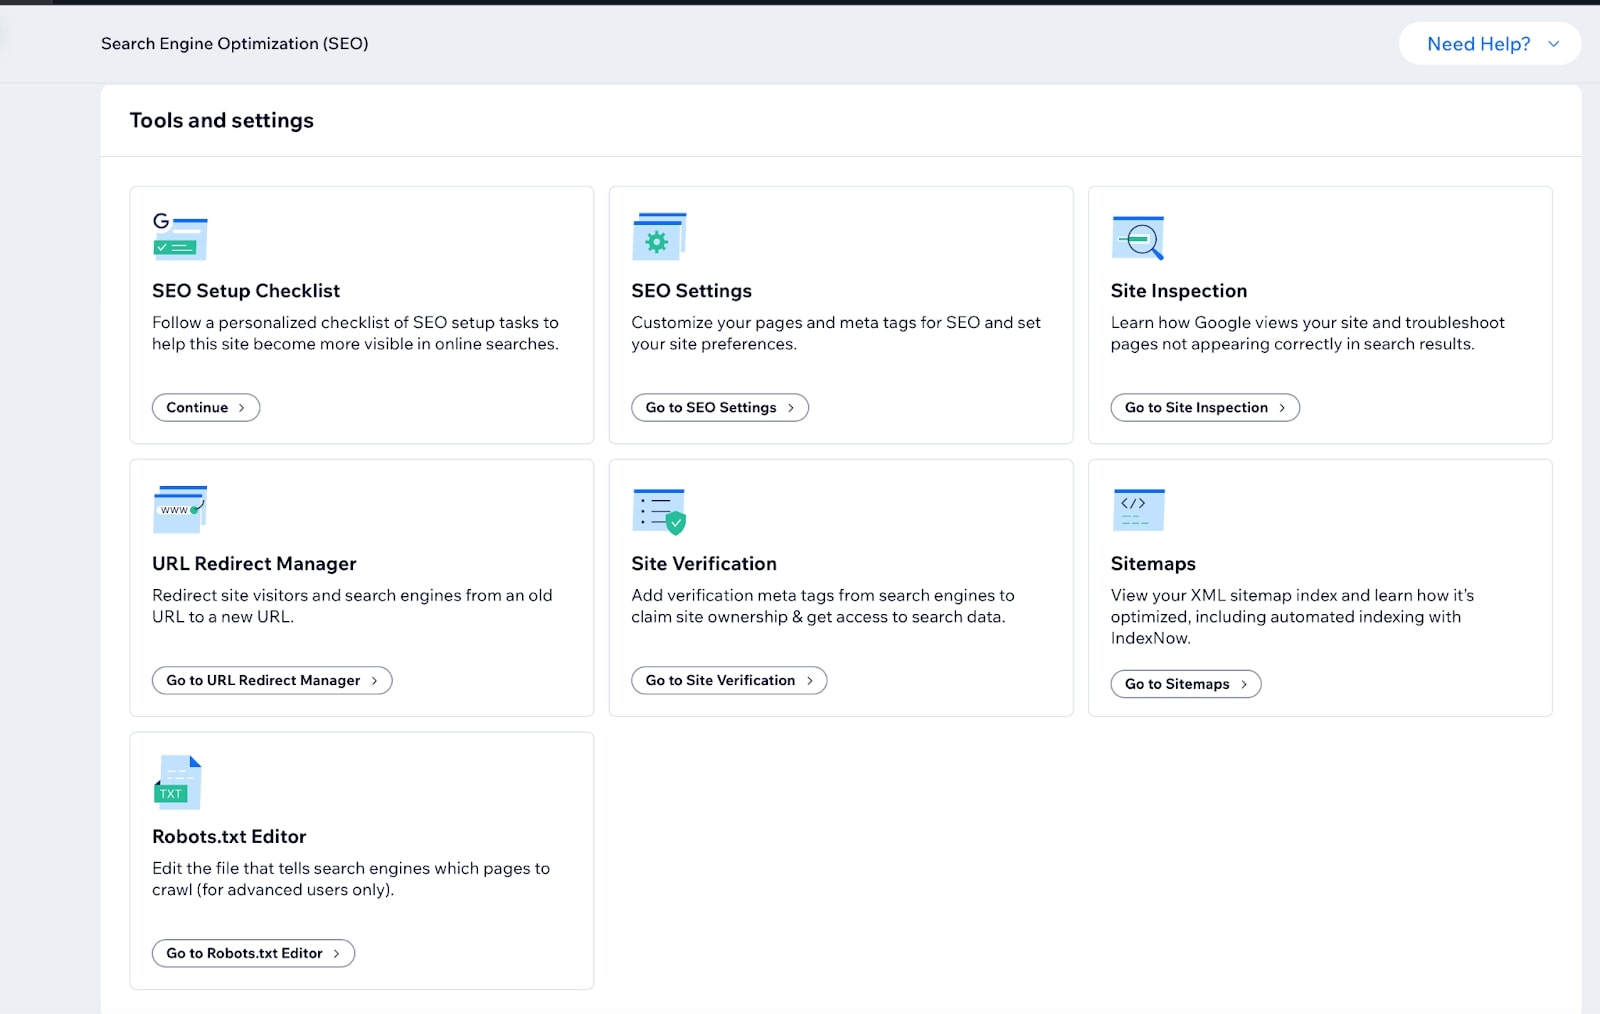
3. Complete the SEO setup checklist to help your site get found in search results.
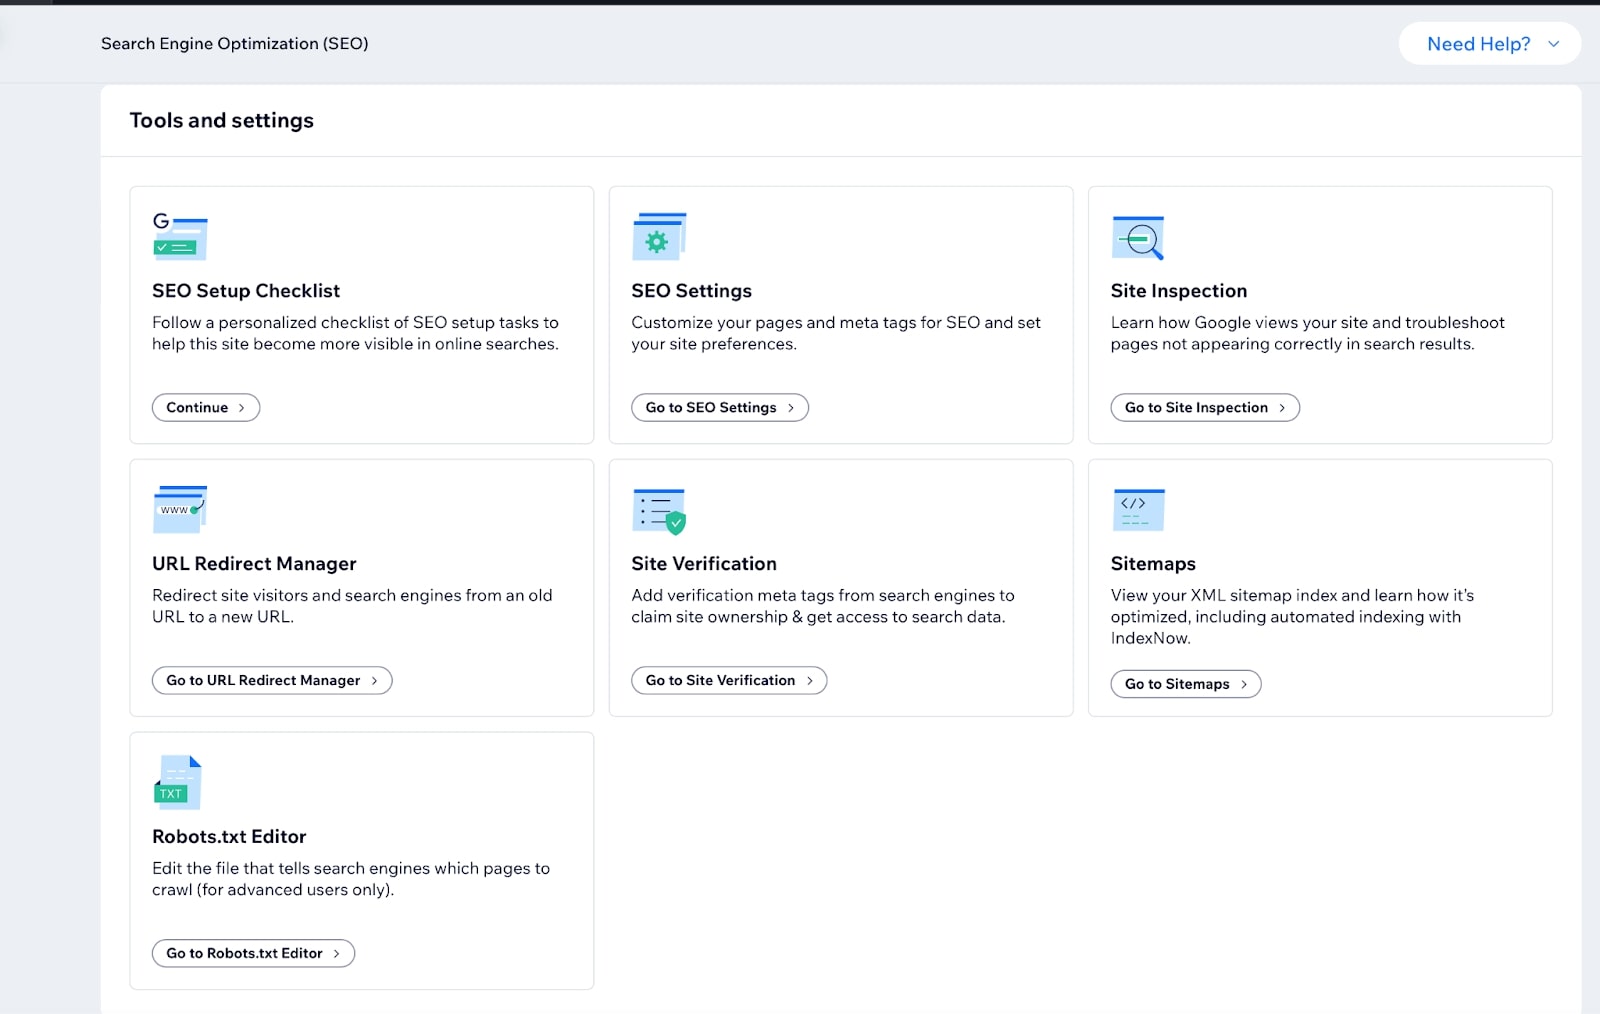
4. Edit SEO settings to customize your pages and meta tags for SEO.

One of the reasons why we have used Wix in our guide to make a website is that you have the necessary optimization tools at your disposal. Wix offers additional SEO tools and settings, including:
- Keyword Research Tools: Use these tools to discover relevant keywords for your site content.
- On-Page SEO: Optimize meta titles, descriptions, and headers to improve your site’s SEO.
- Image SEO: Enhance page loading times by optimizing your images with alt tags and compressing them.
- AI Image Tag Creation: Use AI to create optimized title tags and descriptions for your pages.
- Mobile Optimization: Ensure your site is mobile-friendly for better search rankings.
- Generate Sitemap: Create a sitemap to help Google crawl and index your site.
- Built-in SEO Analytics: Check your site’s performance using Google Search Console.
In addition to all of that, we highly recommend using complementary SEO tools. Specifically, we’re thinking of Semrush, SE Ranking, or Mangools.
7. Publish your website
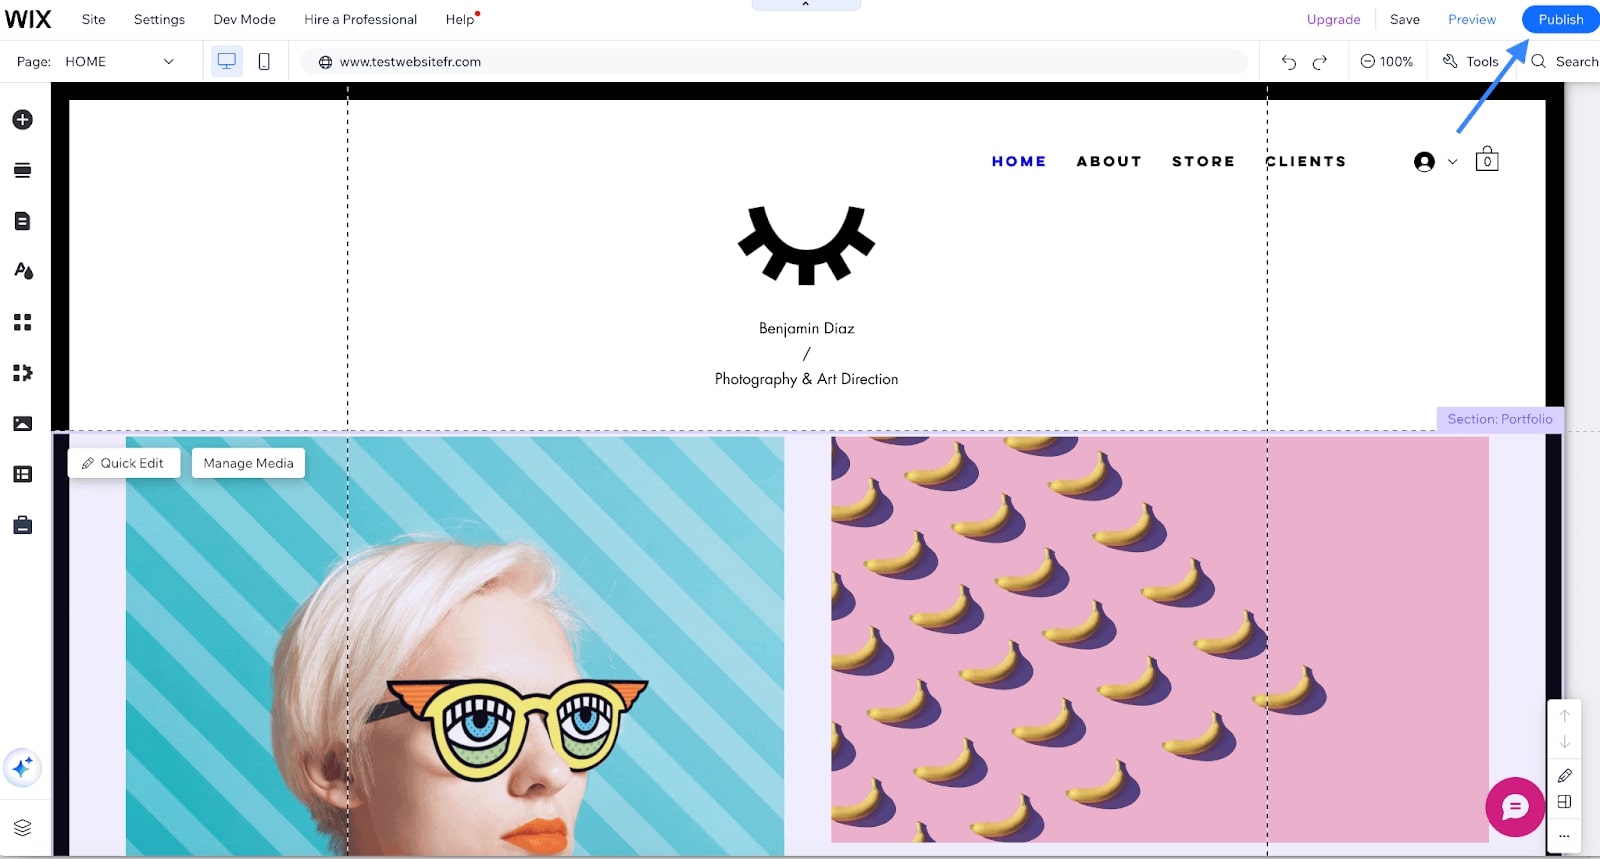
We have covered the basic steps to make a website using a builder. Before going live, you can preview your site to see how it looks on both desktop and mobile.
Make a website from scratch with Wix
Using Web Hosting + WordPress to Create A Website
Creating a website using a web hosting provider and WordPress requires more technical expertise than using website builders and involves a different setup process.
You need to find a hosting provider, choose a hosting plan, and install WordPress to get started. Here are the steps you need to follow to set up a website using hosting with this popular CMS:
1. Choose a Web Hosting Provider
As mentioned earlier, hosting providers are companies that rent out server space to host your website. Some of the best web hosting services include Hostinger, SiteGround, and InMotion Hosting.
These providers are highly ranked based on their performance, offering at least 99.9% uptime and load times under 3 seconds, as well as competitive pricing, robust security, extensive features, and ample server resources.
Since Hostinger is our #1 hosting provider, let’s review the other steps to set up your site.
2. Purchase a web hosting plan and domain name
Most hosting providers offer specific hosting plans optimized for websites built with WordPress.
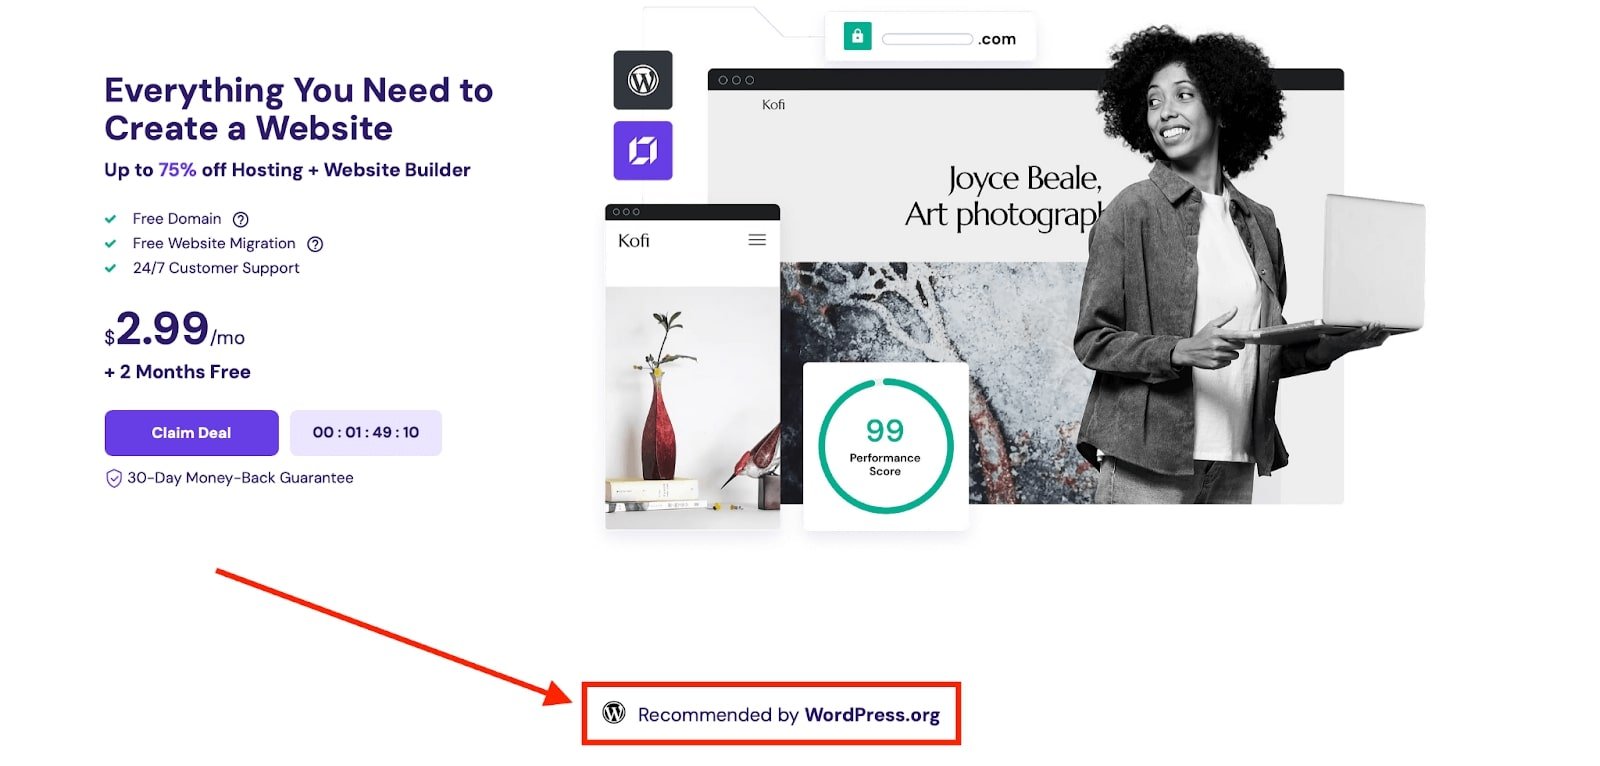
One of the reasons why Hostinger is recommended by WordPress is because they offer fast and secure hosting. You will get seamless WordPress hosting experience with a host of features backed by 24/7 WordPress experts.
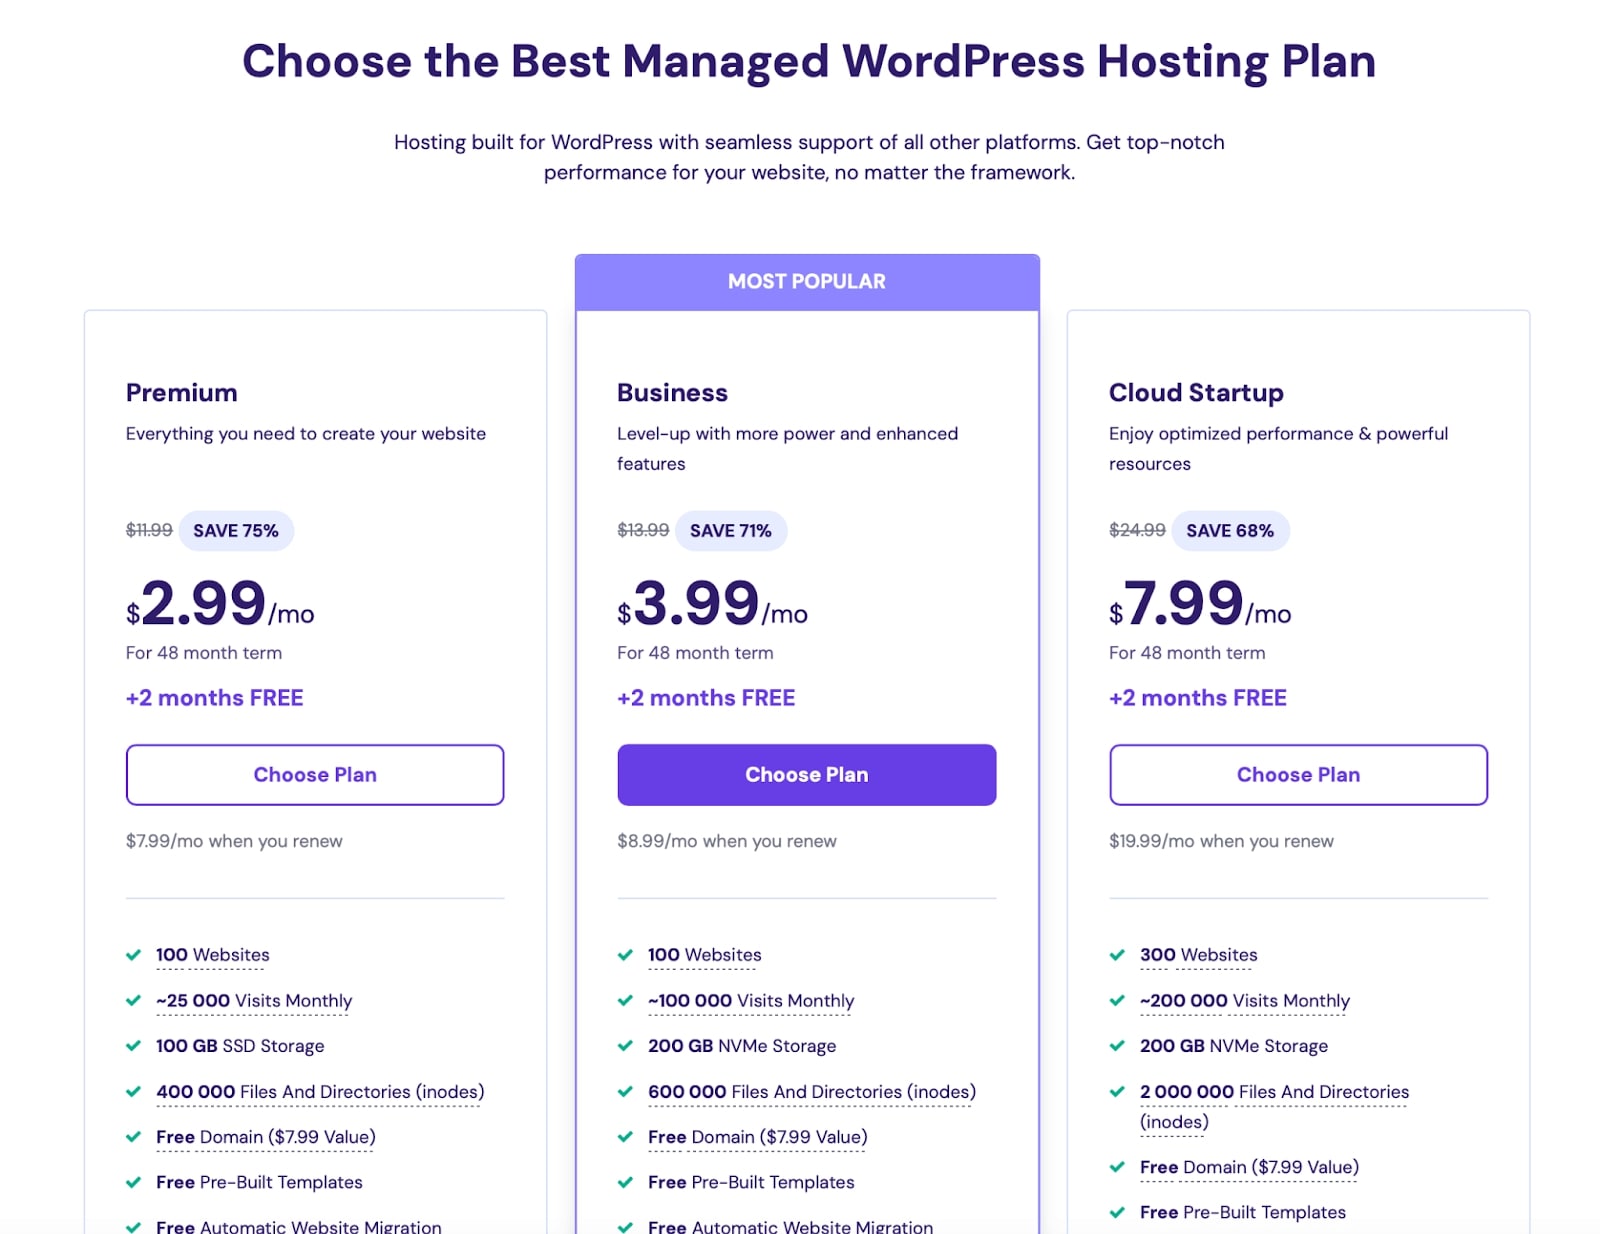
The cheapest premium plan on Hostinger costs less than $3 per month for a 48-month term. It also comes with a free domain for the first year, allowing you to save money on everything you need to create your website.
3. Install WordPress
WordPress can be installed in various ways, but we will explore the easiest method using Hostinger’s control panel.
Create a WordPress website with Hostinger
Here is how to do it using Hostinger onboarding form:
1. Login to your hPanel control panel
2. Go to Websites and Click on Add website → WordPress

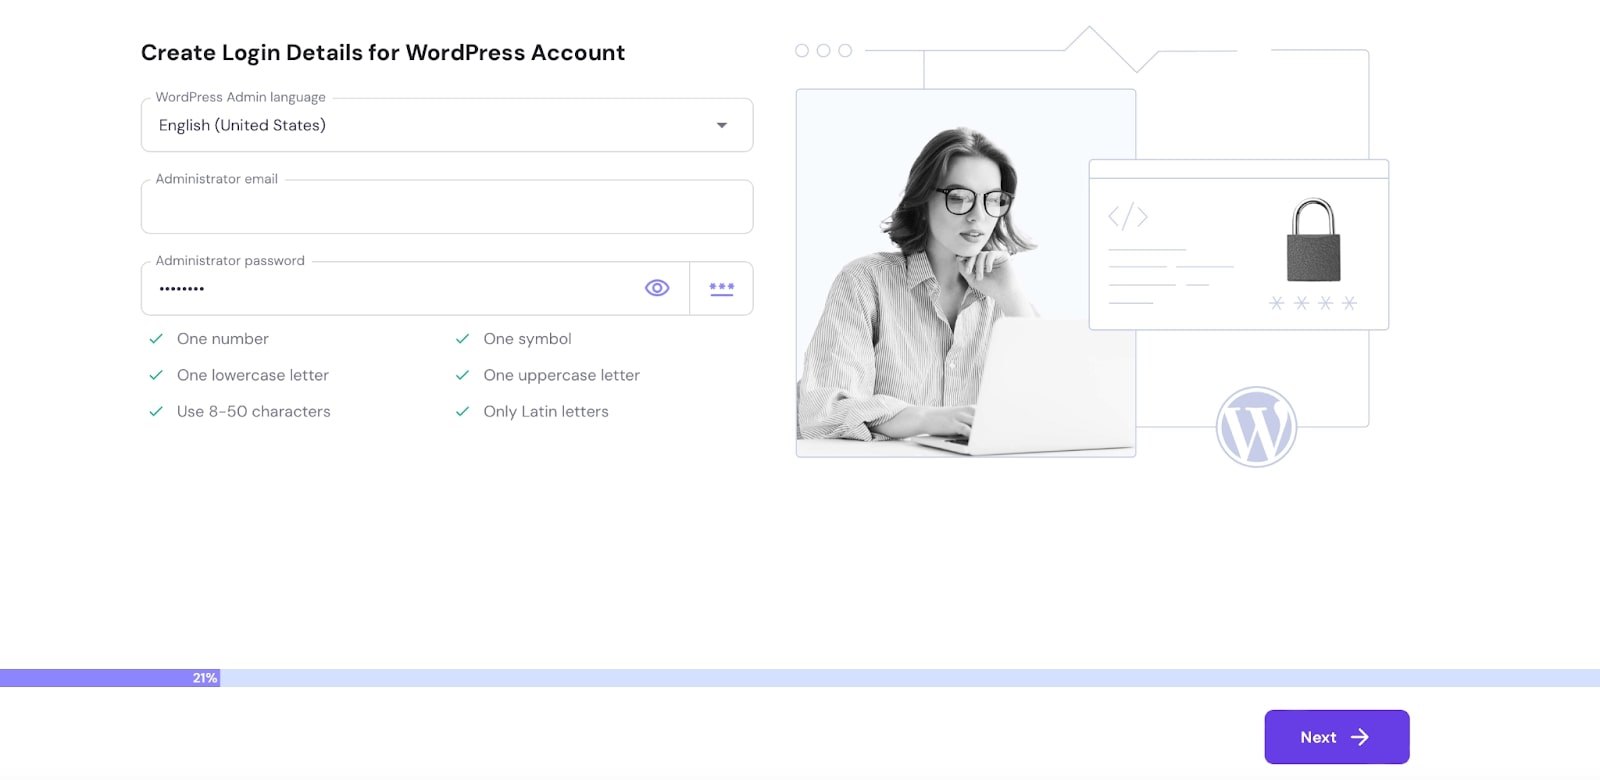
3. Create login details for your new WordPress account.
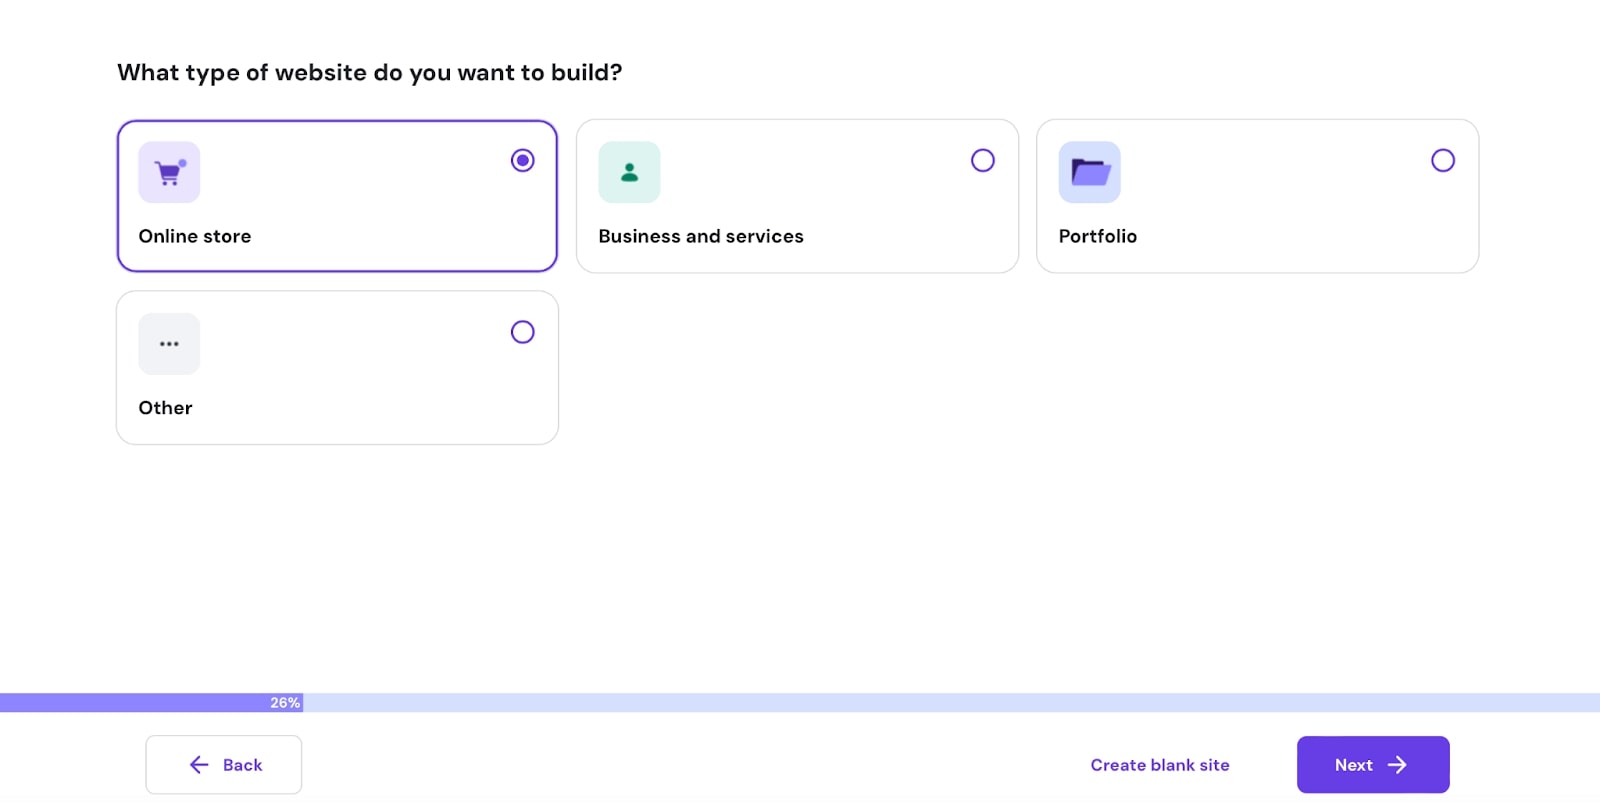
4. Choose the type of website you want to build and click Next. For this guide, we are making an online store.
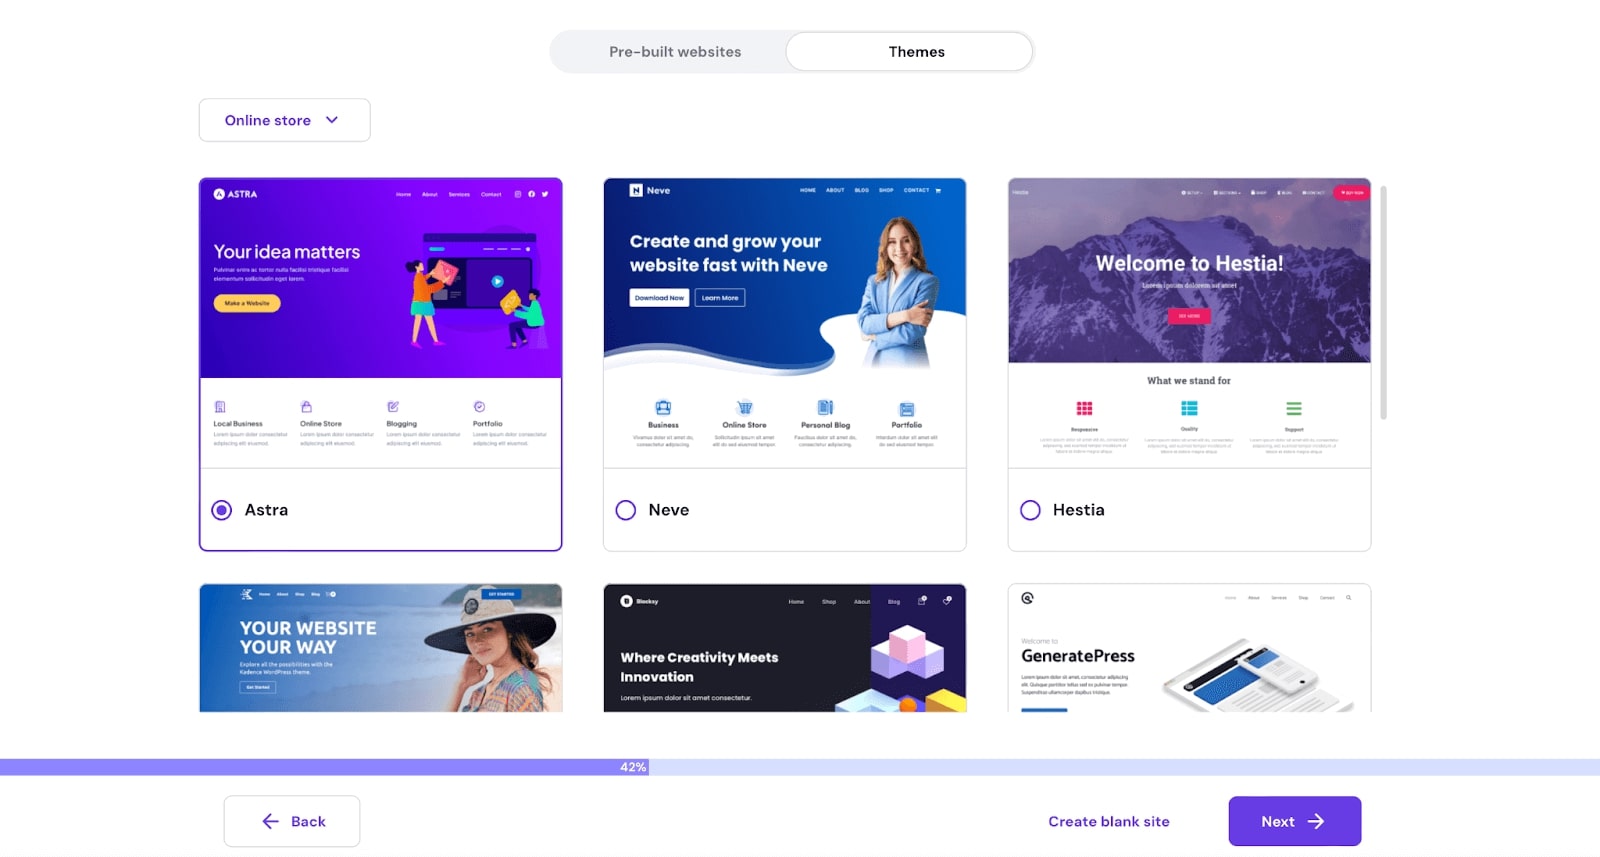
5. The next step is to choose a website theme, which will determine the look and feel of your site. From the available options, we decided to go with the Astra theme.
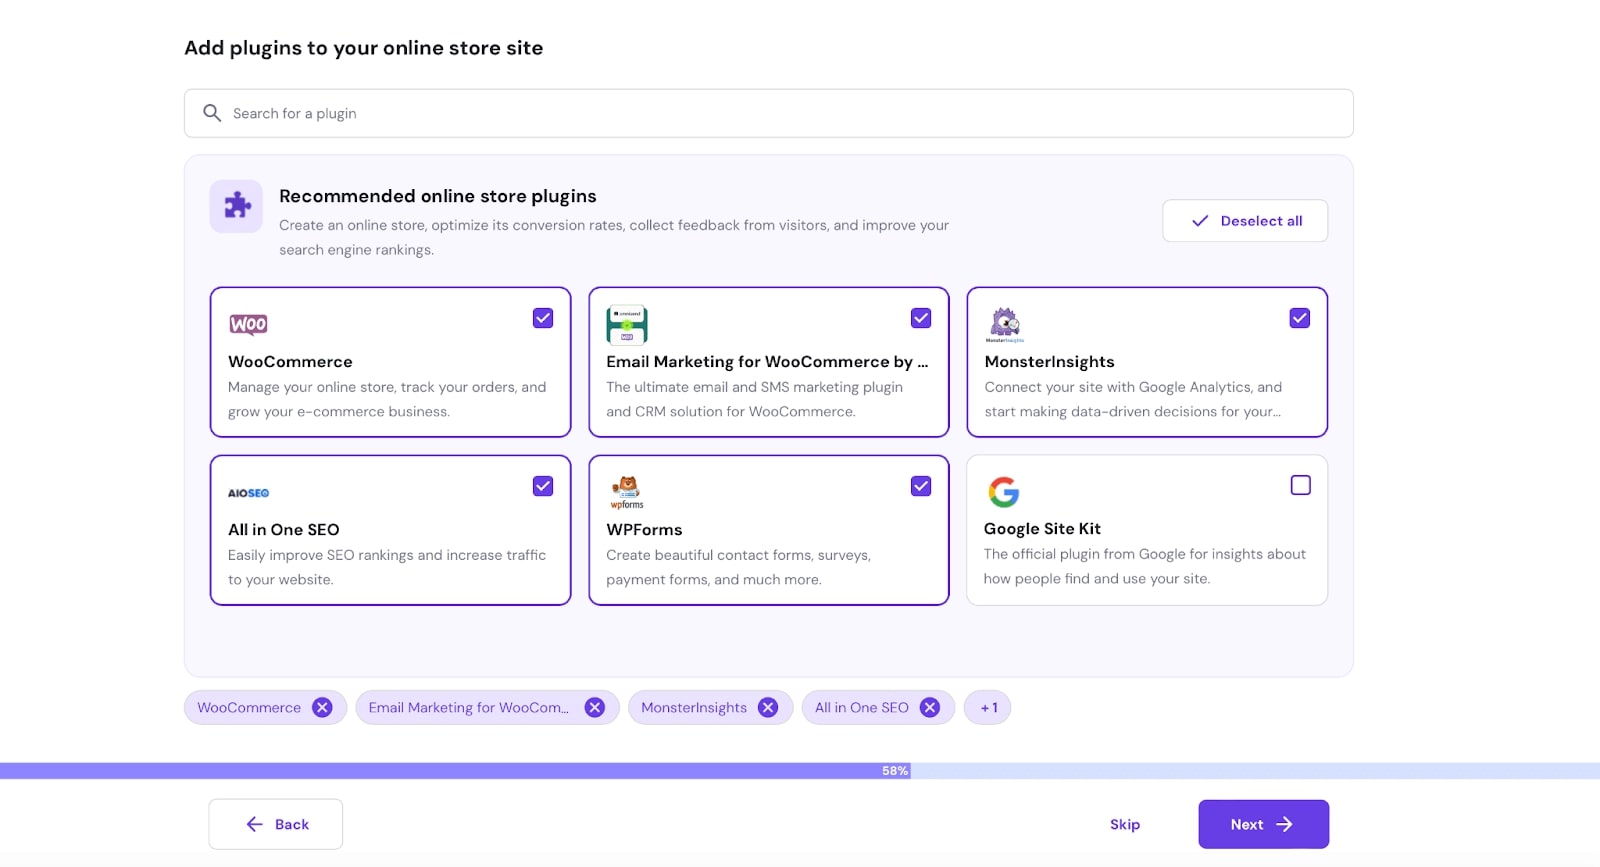
6. Hostinger allows you to add plugins to enhance your website’s functionality. If you’re unsure which features to add, go with the recommended online store plugins and click Next.
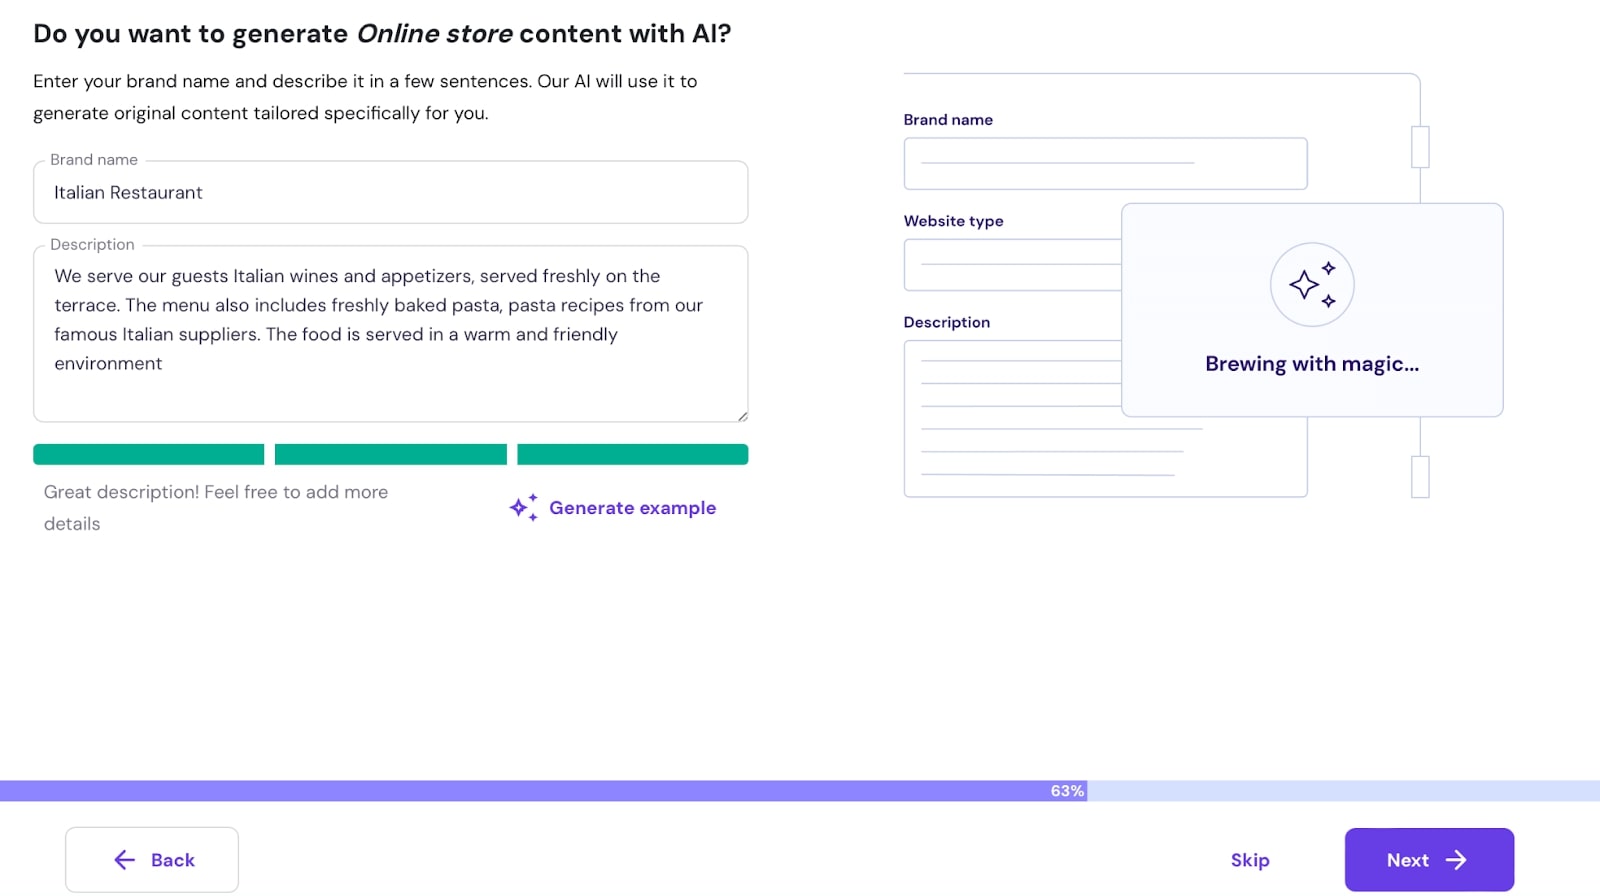
7. Like Wix website builder, you can generate your site content with AI on Hostinger for your WordPress website. Type in your brand name and description in the space provided or click on Generate example to use AI. Click Next if you are okay with the generated content.
8. The next step is to use and claim your free domain name. We recommend choosing a domain name that is unique to your brand.

9. Choose the nearest data center to your target audience and click Next.
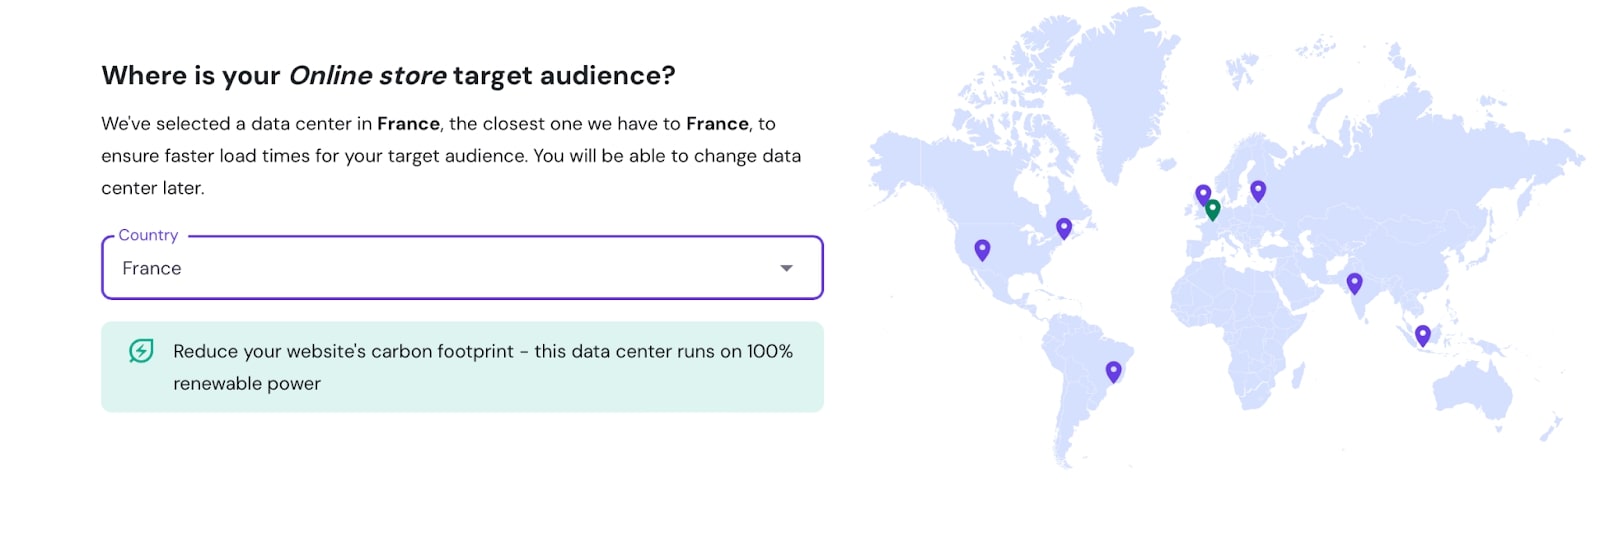
10. WordPress will start installing, creating credentials, uploading files, adding styles, and assigning your server. After the WordPress installation is complete, you will be redirected to your hPanel dashboard.
11. Click on the WP Admin Panel in your dashboard next to your created site.
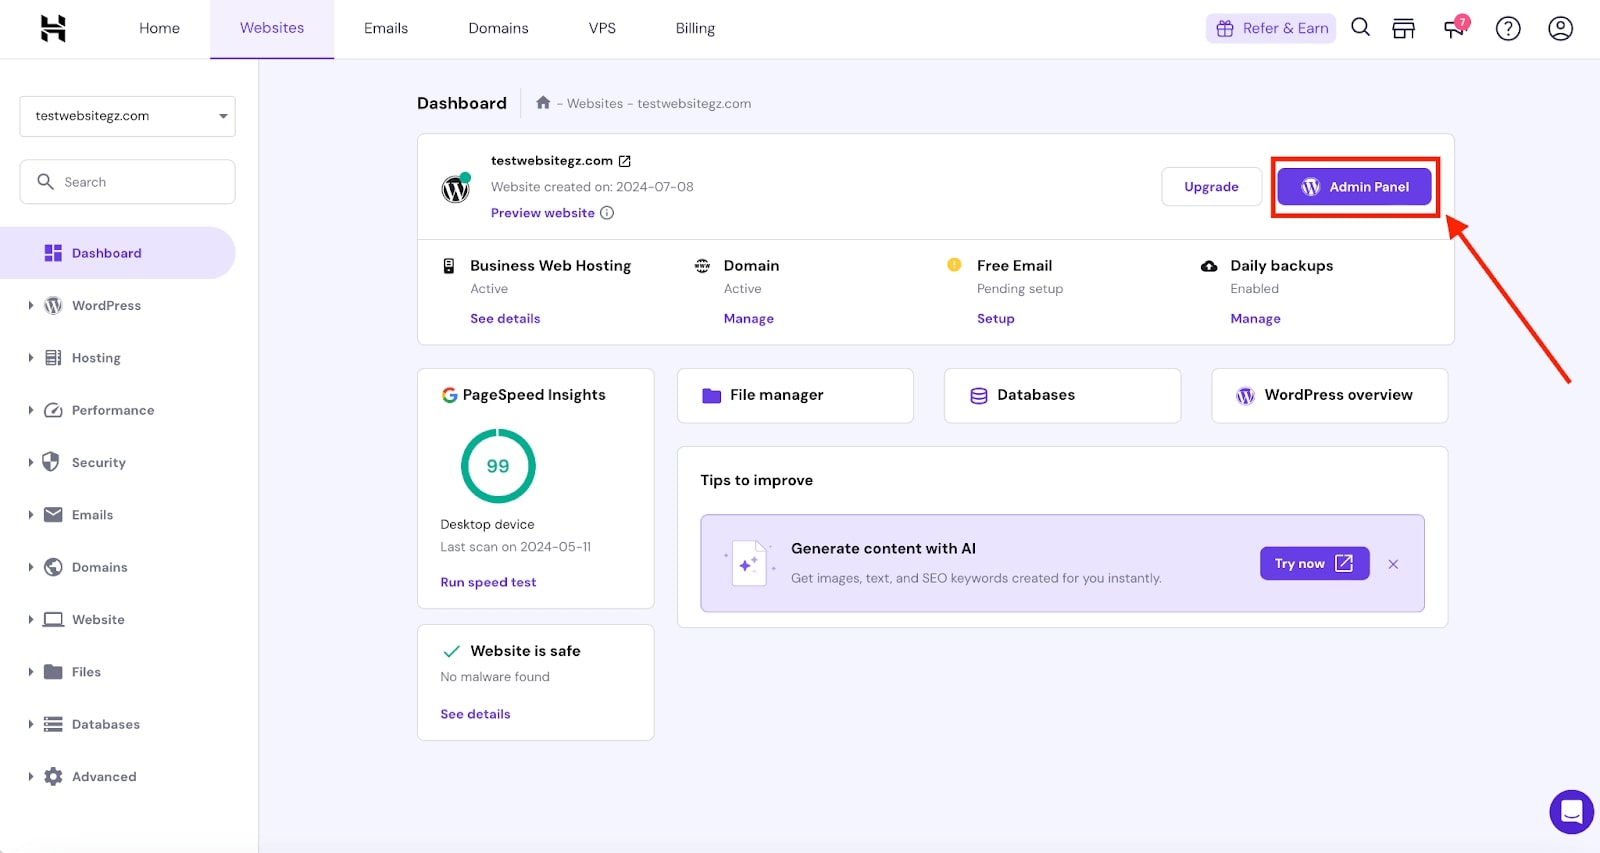
At this stage, your site is technically live. If you do not want people to have access to it yet, go to settings in your WP admin area, click on Reading, check the Search engine visibility option, and save. Don’t forget to uncheck it later once you are done setting up your site to ensure Google indexes it and shows it in search results.
4. Choose and Install a WordPress Theme
Although we selected a theme using the Hostinger onboarding form, you can still change or confirm your chosen theme if you don’t remember to build a website.
Here is how to easily install one from your WP admin dashboard:
1. In your WordPress dashboard, navigate to the left side, select Appearance, and click on Themes.
2. Click on Add New Theme at the top or below the page.
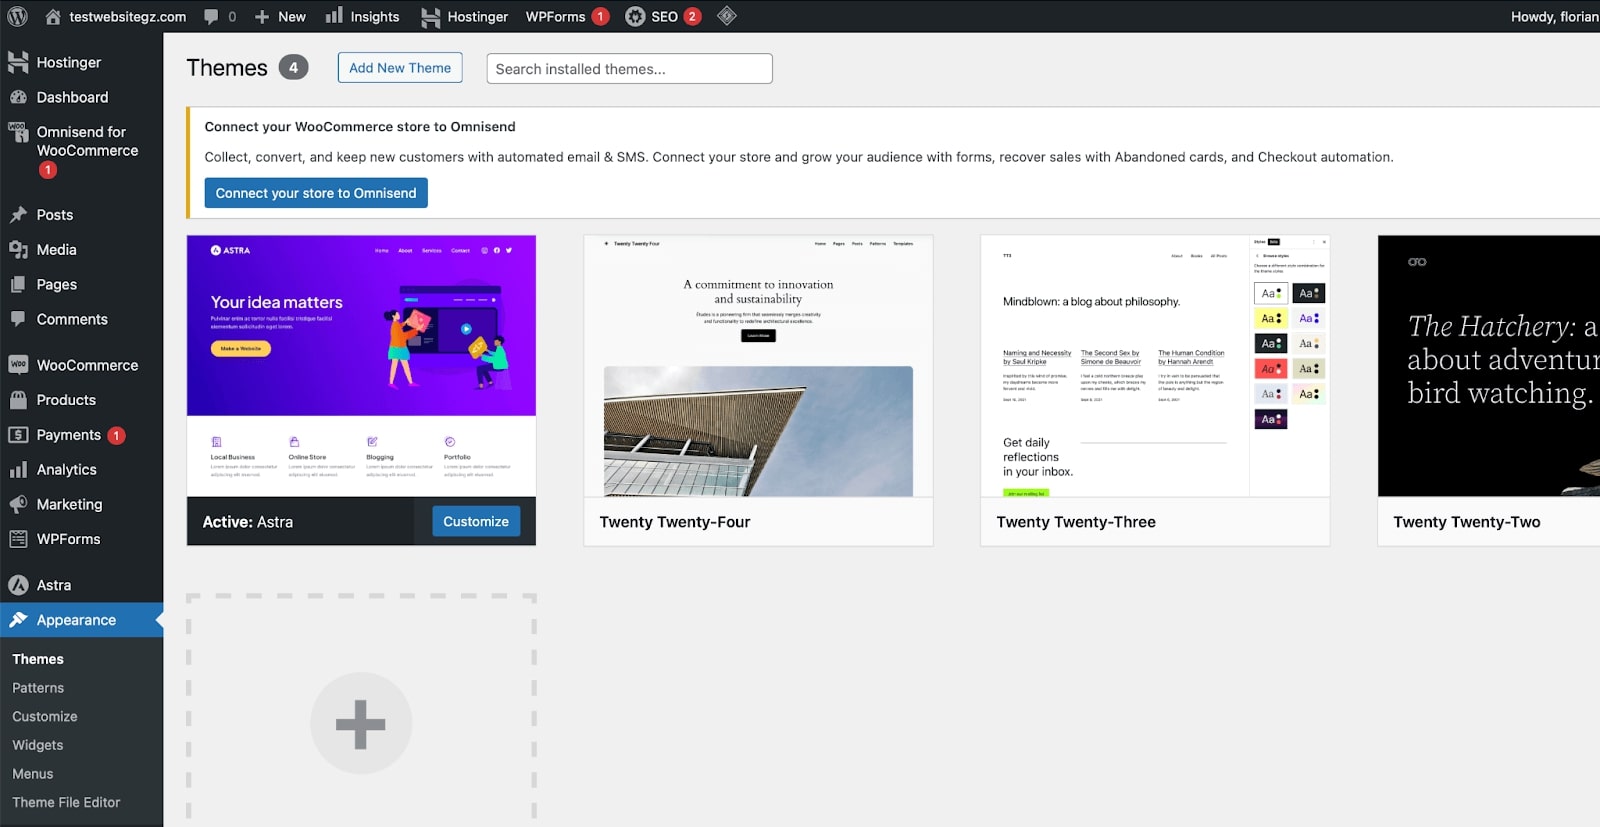
3. Browse through over 6000 templates and preview to see the website design. Once you find the right one, Click on Install.
4. Click on Activate after installing the theme to use it on your website.
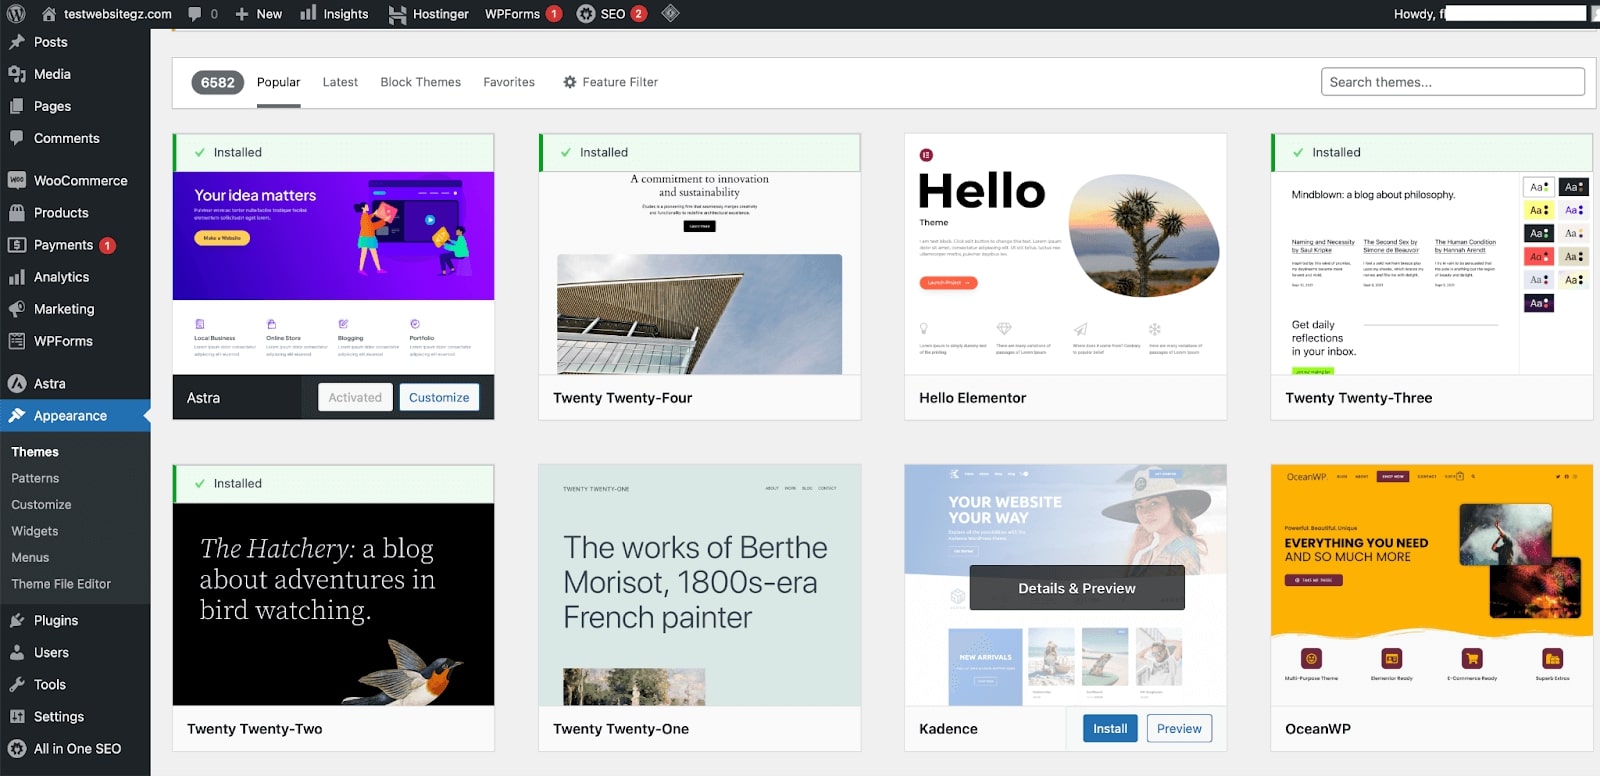
Before choosing a theme, consider its rating, mobile compatibility, and relevance to your website niche. Be sure to test your chosen theme before going live, as changing themes after publishing can impact your site’s structure and functionality.
5. Install WordPress Plugins
Creating a unique WordPress website requires customizing your chosen theme with new plugins. When we selected a new theme, we were prompted to install suggested plugins. For now, let’s install RTEasy builder to create elegant designs without coding skills.
To install a WordPress plugin, follow the steps below:
- From the WP admin dashboard, navigate to Plugin and click on Add new plugin.
- Find RT Easy Builder using the search bar and click Install now.

© WordPress - Go to Plugins in your WP dashboard to activate the plugin after the installation is complete.
Installing only recommended and essential plugins is important, as too many plugins can slow down your website. To keep your plugins updated, go to Dashboard → Updates for optimal WordPress website performance.
6. Set up Essential Pages and Navigation Menu
Based on our experience, you can create pages by using the WordPress AI assistant or follow the steps below to add pages manually to your WordPress website:
- From the WP Admin dashboard, navigate to Pages and click on Add New Page.
- Using the page editor, add the title and body text.

© WordPress - From the top left of the editor page, click on the ➕ icon to use the AI site creator to generate content, add elements, or WordPress widgets.
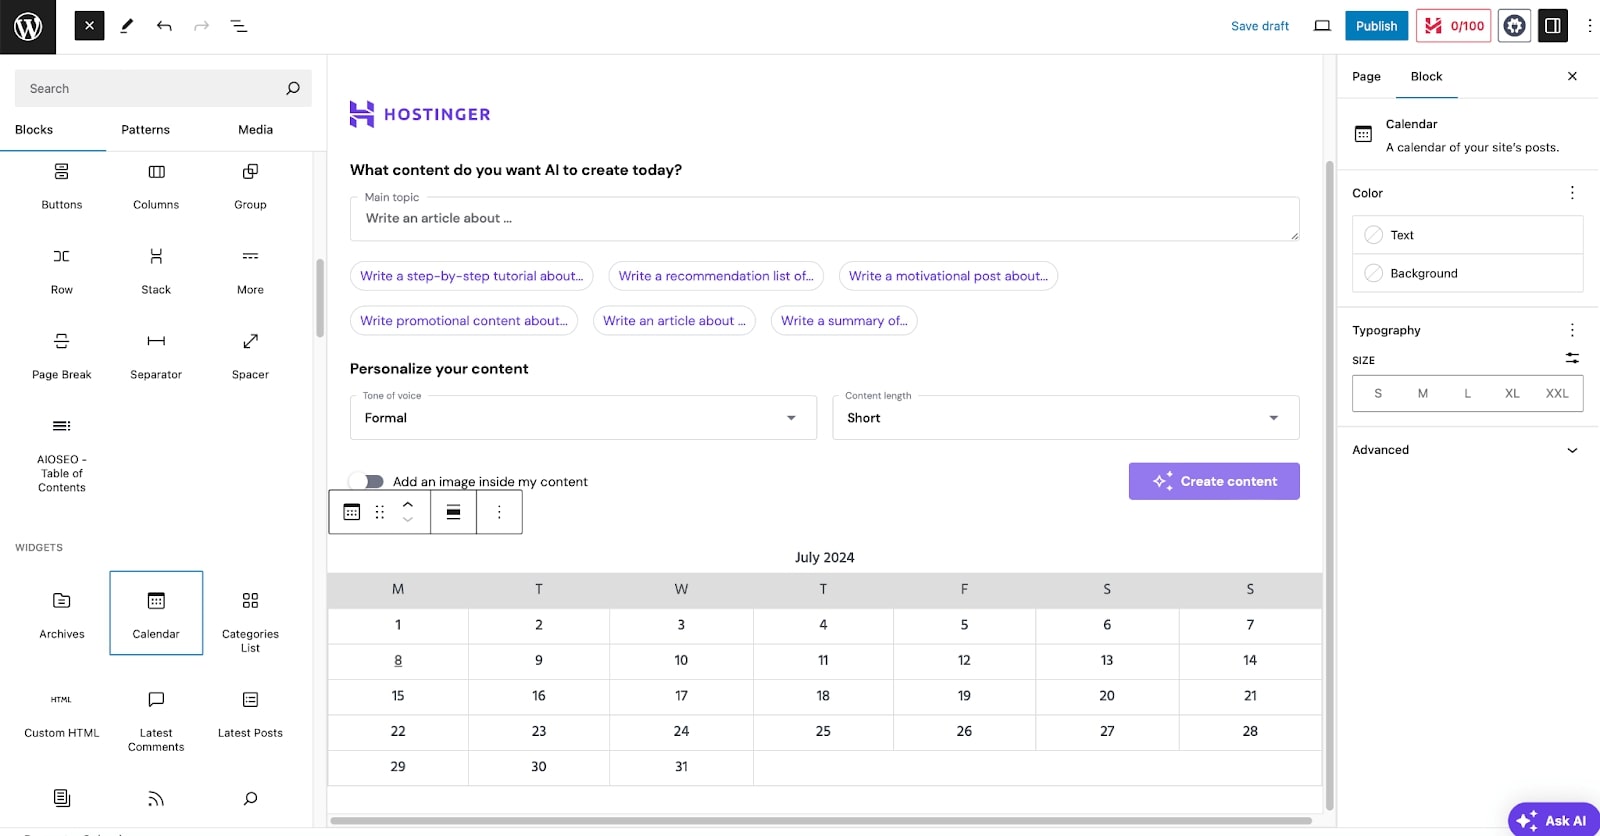
© Gizmodo - Add a Featured Image to your page or insert any image or video using the icons available in the editor area.
- Save the draft and Preview the page to see how it looks. Once you are okay with the page setup, click Publish on the top right.
The popular CMS also allows you to create navigation menus for your website pages, posts and category pages. A well-structured navigation menu helps visitors easily find what they’re looking for, enhancing their overall experience on your site.
Here is how to customize your WordPress navigation menu with new pages:
- From your WordPress admin panel, navigate to Appearance and click on Menus.
- From the left panel, check the boxes of the pages you want to Add to Menu.
- You can drag and drop the new pages to the desired order within the Menu structure. Also, create a sub-menu by placing a menu item under the primary.
- Click Save Menu to apply the changes with a Menu name.
Consider adding icons to your menu items to enhance visual appeal and improve navigation. Popular plugins for adding menu icons include Menu Icons by ThemeIsle and Font Awesome. These plugins make it easy to add icons next to your menu items, providing a more engaging and user-friendly experience.
7. Create Engaging Content for your WordPress Website
Another important step in creating your first website in just one hour is to populate it with engaging content. With the most trusted CMS, you can easily use its built-in blogging functionality to add new pages and posts to your site. Although a WordPress post shares similar creation steps with a page, it offers easier organization through categories and tags.
Here is how to add a post to your WordPress website:
- Navigate to Pages → Add a New Page from the Admin dashboard
- Provide a page title for your post in the text field at the top.
- Add body text, images, and widgets to the post editor below.
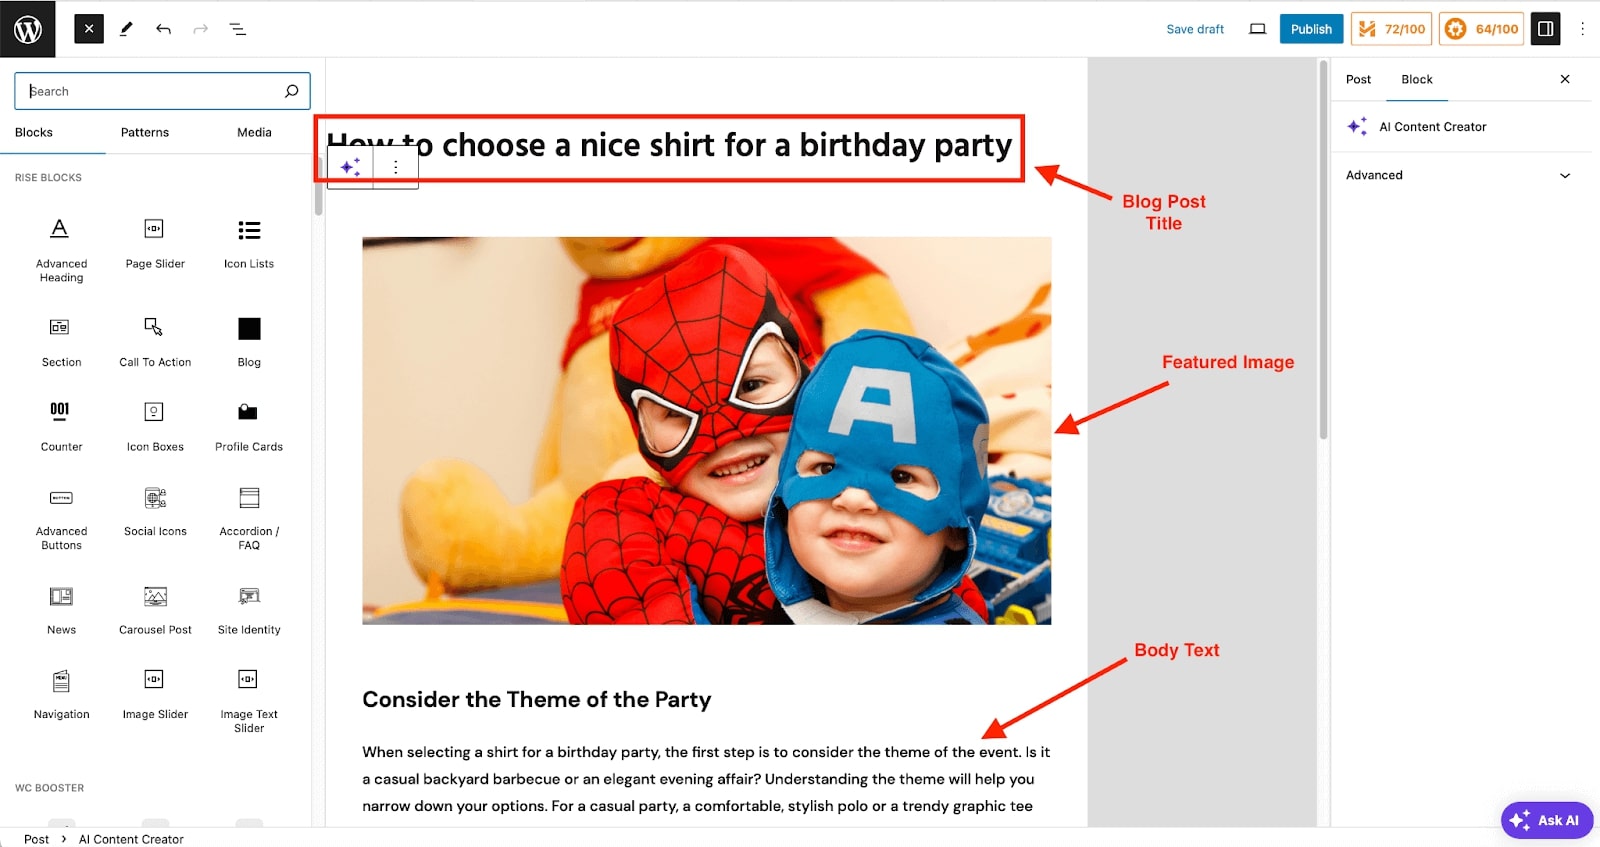
© Gizmodo - Set a featured image for your post by clicking Set featured image in the right-hand menu.
- On the right side, under Categories, check the appropriate categories for your post.
- Below the Categories section, add relevant tags in the box provided.
- When you’re ready, click the Publish button.
For this guide, we added it as a page through our Gizmodo WP admin because it contains vital information that remains relevant over time and doesn’t fit into the chronological structure of posts.
8. Optimize Your WordPress Website
An optimized WordPress website increases the likelihood of reaching people who are actively searching for information about what you offer.
Most WordPress sites come ready to rank in search engines right out of the box with an SEO-friendly theme combined with keyword-optimized content. However, you can further boost your website’s SEO by creating quality content with optimized meta titles and descriptions.
Here is how to optimize your metadata with AIOSEO plugin:
- Go to Plugins → Add New, search for All in one SEO, install and activate.
- Go to AIOSEO → General Settings in the WordPress dashboard.
- Navigate to the post or page you want to optimize. Click on Edit to open the editor.
- In the post or page editor, scroll down to find the AIOSEO Settings section.
- In the AIOSEO section, enter a keyword-optimized meta title that accurately reflects the content of your post or page.
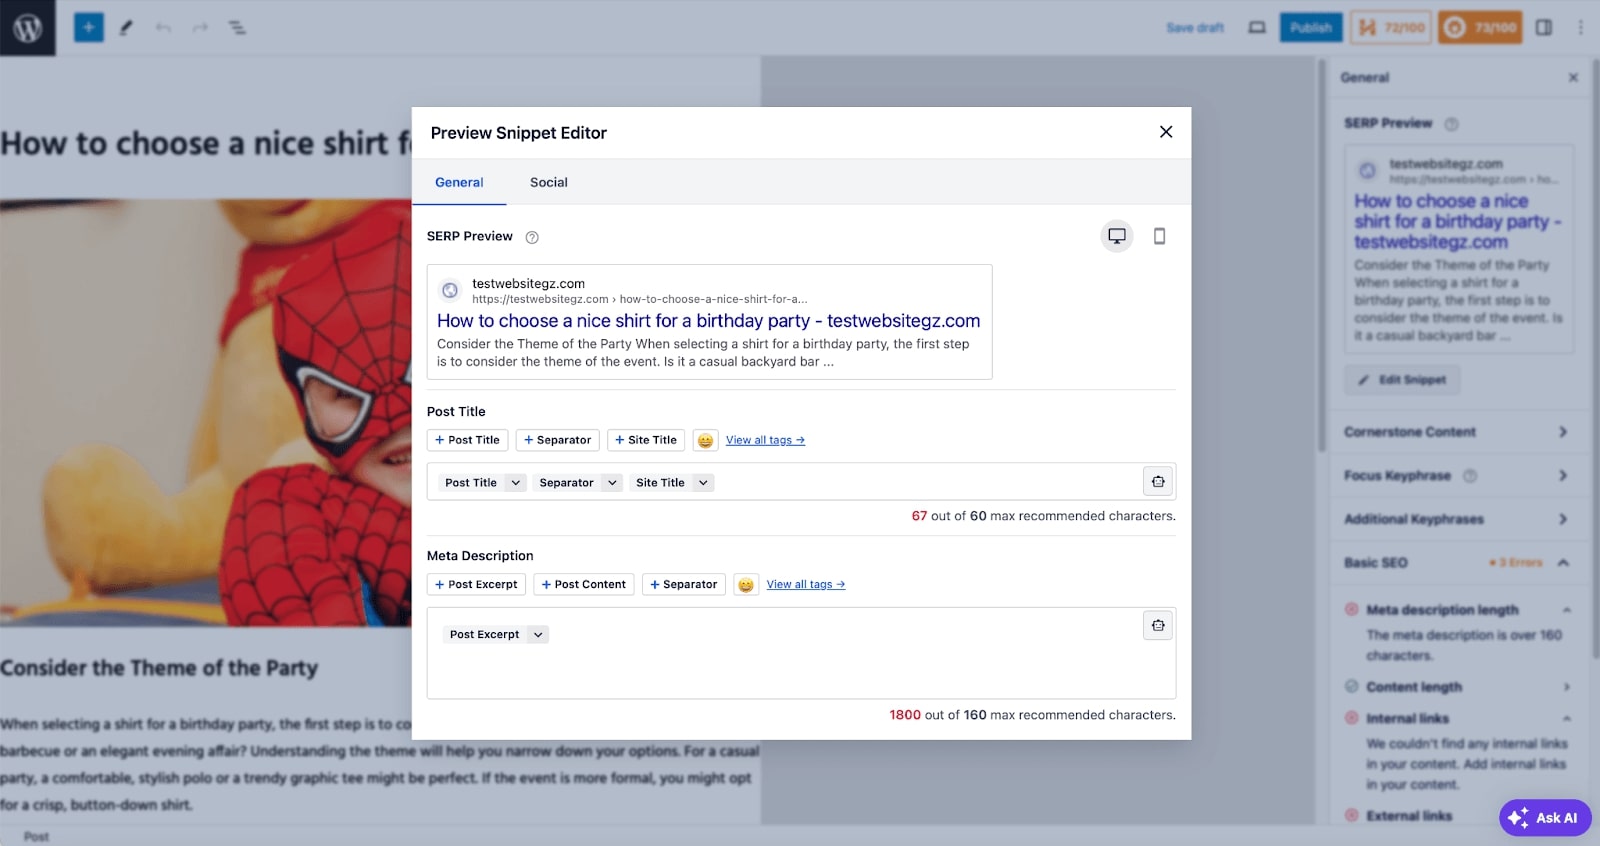
© Gizmodo - Provide a concise, keyword-rich meta description that summarizes the content and entices users to click.
- Enter your primary keyword or keyphrase in the Focus Keyphrase field to help AIOSEO analyze and suggest improvements.
- Review the SEO score and recommendations provided by AIOSEO to further optimize your metadata and content.
- After making the necessary adjustments, save your changes by updating or publishing the post or page.
There are several other ways to optimize your website for search engines. Some important SEO best practices include:
- Using proper heading tags
- Conducting extensive keyword research
- Implementing breadcrumb trailing for improved user experience
- Creating an Internal Linking Strategy
If these tasks seem too technical, consider hiring an SEO expert to handle the optimization of your website.
9. Publish your website
We are now at the final step of making a website. Review the steps above to ensure your website is fully functional. Preview your site by clicking on its name in the top-left corner of the dashboard to check for errors or issues. Click Visit Site to verify that all forms, functionalities, and links are working properly.
Remember to ensure your site is visible to search engines by going to Settings > Reading and unchecking Discourage search engines from indexing this site.
Once you are happy with the site, head to Hostinger from the WP Admin dashboard to complete any website setup you might have missed.
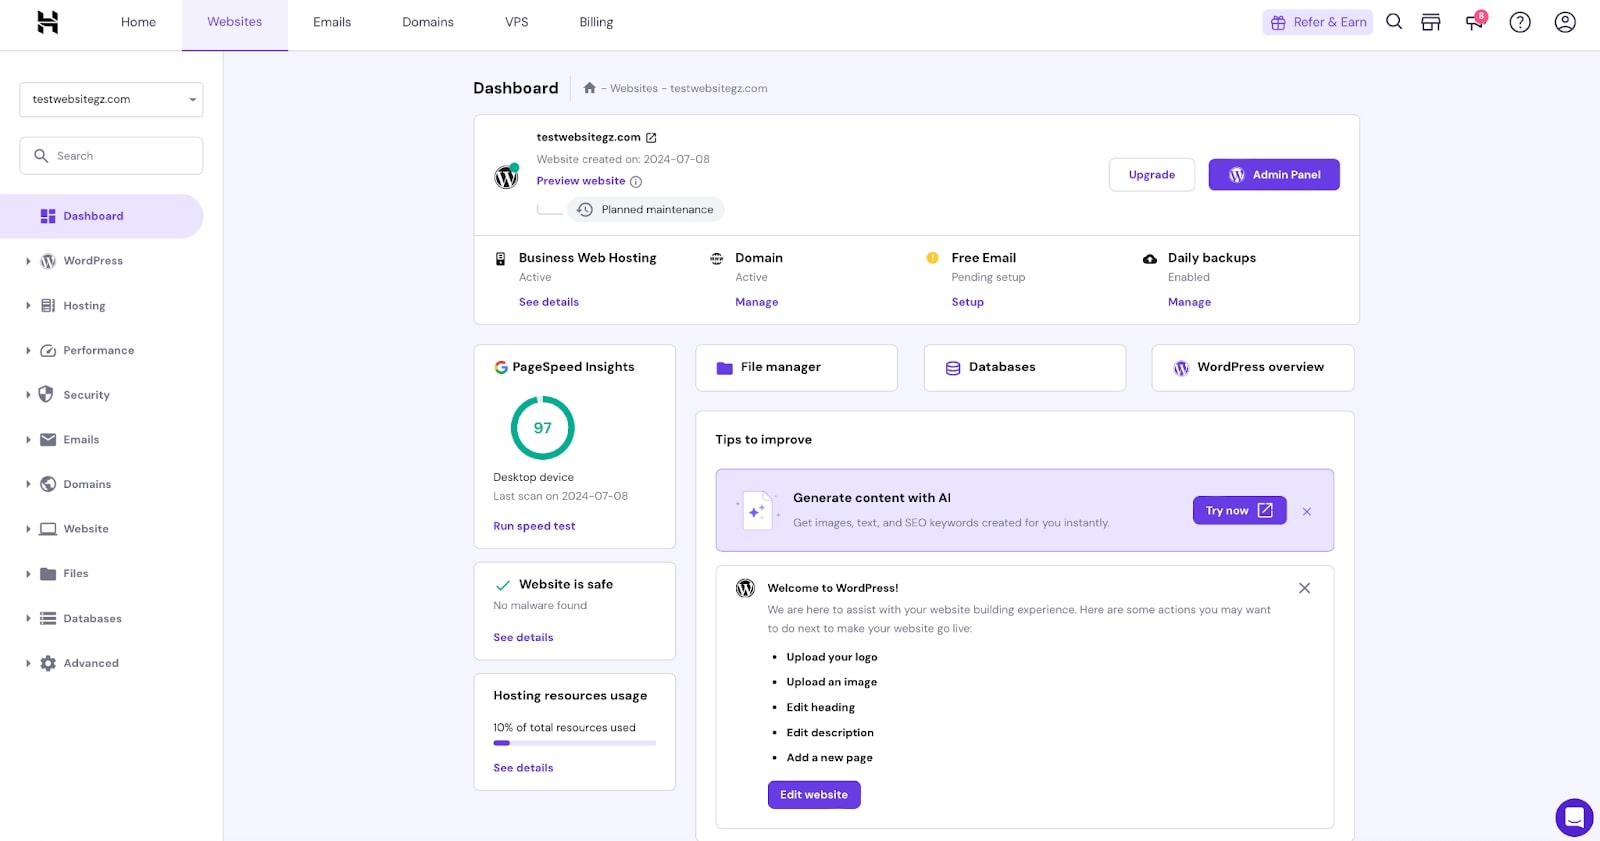
Click on Edit Website, and you will be redirected to the Hostinger onboarding process. Before going live, you must carry out some important actions.
In the WP Admin dashboard, for every incomplete step, expand it and click on Take me there to complete the recommended steps.

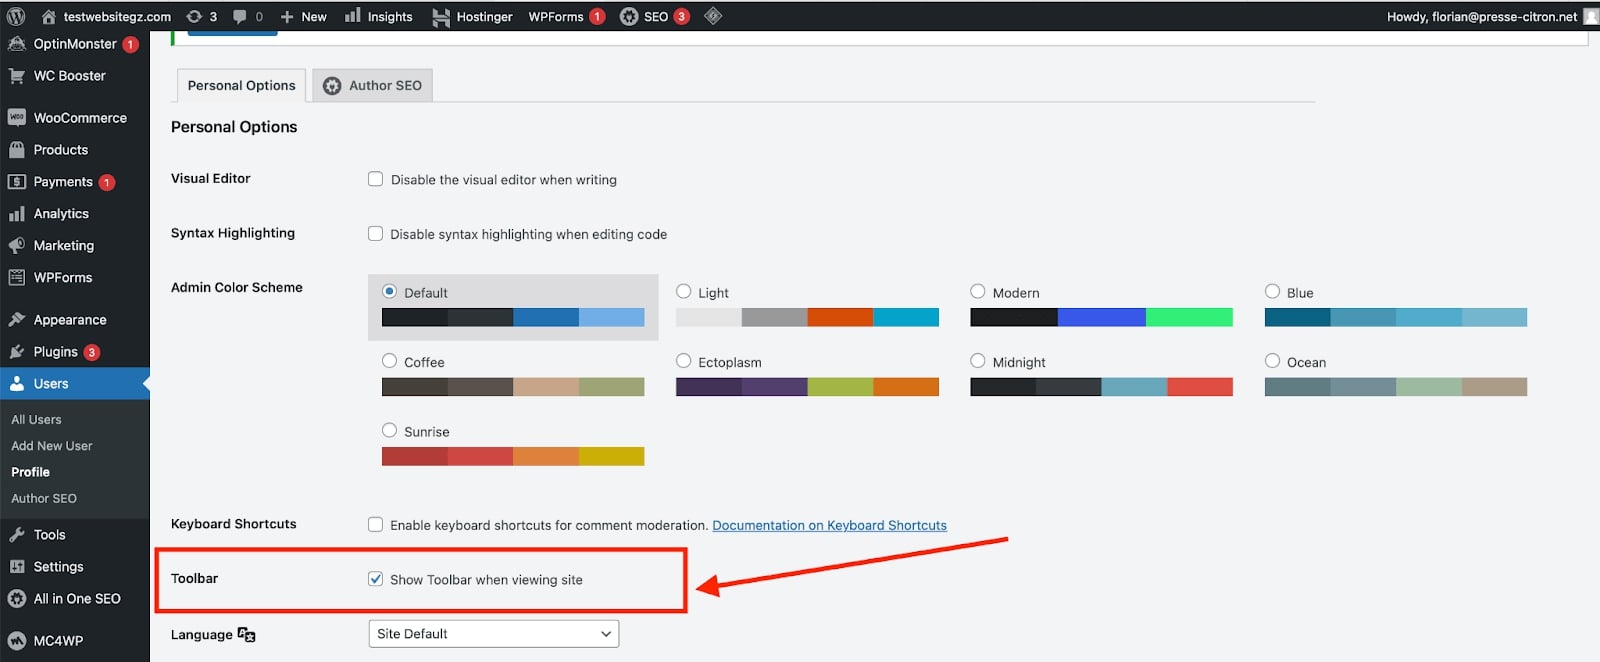
To remove the WordPress menu icon from the front end of your website, navigate to Users → Profile, scroll down to the section labeled Toolbar, and uncheck the box that says Show Toolbar when viewing the site. At the bottom of the page, click on Update Profile to save changes.
Website Builder vs. WordPress: Which Is the Best Way to Build a Website?
Now that your website is live, we will explore the pros and cons of using a website builder versus a web hosting provider with WordPress.
Pros of Using Website Builders
- User-friendly interface: Website builders are designed for ease of use, with intuitive interfaces that allow you to make a website.
- No technical skills required: You don’t need to know how to code or have any technical expertise.
- Quick setup and launch: You can have your website up and running in a matter of hours if not minutes.
- Built-in web hosting and domain registration: Most website builders offer integrated hosting and domain services.
- Well-designed templates: Access to a variety of professionally designed templates that you can customize.
- User support and tutorial videos: Extensive support resources and tutorials are available to guide you through the process.
- Drag and drop functionality: Easily add and arrange elements on your website without coding.
Cons of Using Website Builders
- Less control over website performance and security: You rely on the platform’s performance and security measures, and you have limited ability to customize.
- Possible limited scalability: As your site grows, you might find the builder’s capabilities limiting.
- Higher long-term costs: Subscription fees can add up over time.
Pros of Using Hosting + WordPress
- Greater customization and flexibility: WordPress offers extensive customization options through plugins and themes.
- Wide range of plugins and themes available: Thousands of free and premium plugins and themes to enhance your site’s functionality and appearance.
- Better control over website performance and security: You can optimize and secure your site according to your needs.
- More scalable for future growth: WordPress can handle the growth of your website with the right hosting plan.
- SEO-friendly: WordPress is built with SEO in mind and offers plugins to enhance your site’s visibility.
- Community support: A large community of users and developers offers support and resources.
- Ownership: Full ownership of your content and the ability to move your site to different hosts.
Cons of Using Hosting + WordPress
- Steeper learning curve: It can be challenging for beginners to learn how to use WordPress effectively.
- Requires some technical knowledge: Basic knowledge of web hosting, domain management, and WordPress is needed.
- Initial setup can be time-consuming: Setting up hosting, installing WordPress, and configuring your site takes time.
- Separate hosting and maintenance costs: You need to pay for hosting, domains, and possibly premium themes or plugins.
In our experience, website builders are faster and less technical to set up. They are the best choice if you need a website quickly and with minimal hassle. However, if you’re looking for more control, customization, and scalability in the long term, using hosting + WordPress is worth the initial investment of time and effort to build a website.
Your Website is Now Live – What Next?
Whether you used a website builder for a quick and easy setup or opted for the flexibility of hosting with WordPress, you’re ready to share your site with the world.
Choosing the right method depends on your needs and preferences: website builders are great for beginners seeking simplicity while hosting with WordPress, which offers greater customization and scalability.
Now, it’s time to take the next steps. Begin by enhancing your website’s visibility with SEO improvements, such as refreshing your content regularly with up-to-date information. This helps keep your site relevant and engaging for visitors and search engines alike. Make sure to also track your keywords to see which ones are winning or losing positions.
Consider monetizing your site through advertising platforms like Google AdSense, where you can earn money based on site traffic and ad clicks. This is a straightforward way to generate income from your online presence.
Monitor your website’s performance using Hostinger’s performance score metrics or Google Analytics. These tools help you track essential metrics, understand user behavior, and make data-driven decisions to improve your site’s effectiveness.
Boost your marketing efforts by leveraging social media platforms and email marketing campaigns to increase conversions. Implement blog marketing strategies to promote your website content and attract a wider audience.
Ensure your site’s security and maintenance by using automated security monitoring provided by Hostinger. Regularly update WordPress, plugins, and themes, and install SSL certificates to protect your site and build trust with your visitors.
Host Your Website on Hostinger
Creating your first website is just the beginning. Keep refining and growing your online presence to achieve your business goals.
Frequently Asked Questions
To conclude this guide, we will answer some of the most frequently asked questions.
Can a Beginner Create a Website?
Yes, beginners can create a website by following our step-by-step guide, making it easy to have your first website up and running in just one hour. After testing numerous methods and services, we believe that Wix is the simplest option if you have no prior knowledge.
How to Get a Domain Name?
Most website builders and hosting providers offer free domain names for the first year. Alternatively, you can purchase a domain from popular registrars like GoDaddy and Namecheap.
How Much Does It Cost to Make a Website?
Website builders like Wix offer free basic plans, with premium plans starting at below $20. Hostinger provides affordable hosting at $3 per month for a 48-month plan, totaling less than $150. You can start with these plans to host your first website and then upgrade to higher plans as your needs grow.
Which is Better: WordPress or Wix for Making a Website?
Both WordPress and Wix have their benefits. WordPress offers greater customization and flexibility, while Wix is more user-friendly, making it ideal for beginners. We recommend Wix for its ease of use.
Which Provider is Most Reliable for Hosting a Website?
Hostinger is known for its reliability, offering affordable and eco-friendly servers to host the website you create using either a website builder or WordPress.